Search models, users, collections, and posts

Modular Guitar Pedalboard

Print Profile(1)

All
P1S
X1 Carbon
H2C
P1P
H2D Pro
A1
X1
P2S
H2D
X1E
H2S
X2D
A2L

0.2mm layer, 3 walls, 5% infill
Designer
21.1 h
7 plates
5.0(2)

Open in Bambu Studio
Boost
124
438
12
3
284
51
Released 

Bill of Materials

Bambu Filaments
Select all
Black (14100) / Filament with spool / 1 kg
List other parts
  • 8mm x 500mm carbon rods x 3:

Description

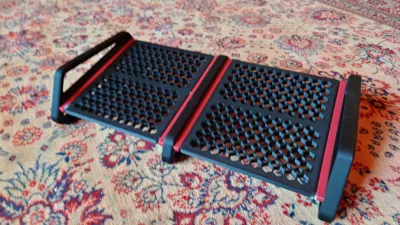
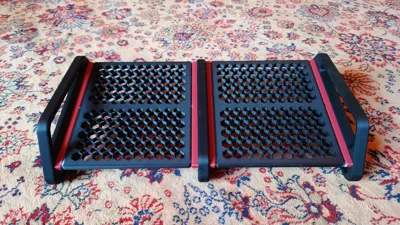
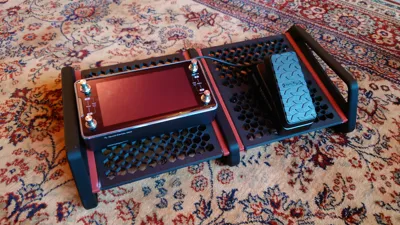
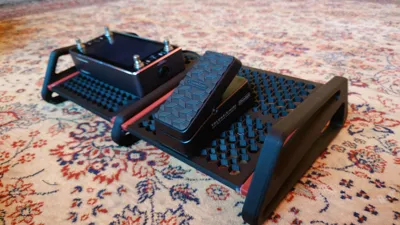
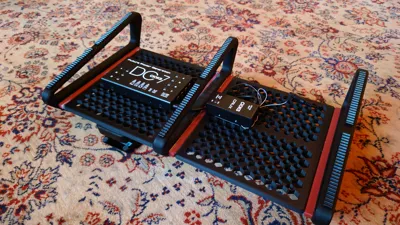
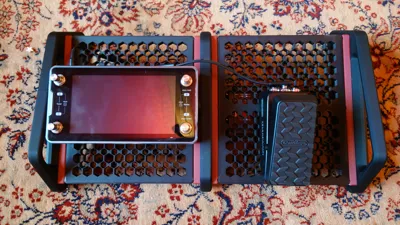
Customisable guitar pedalboard - can be extended with modular plates to suit your needs. 


I wanted something really light for practice/gigging. So I made this mini pedal board! Perfectly sized for the new Quad Cortex Mini and some accessories. 

The spacers are not necessary. I just needed them in order to fit the quad cortex as it is quite wide. But I think they add some nice customisation options. For example, you could print several of them (or change the colour every few layers) and make a flag design. Alternatively some PLA-Glow could look pretty cool!


Assembly:

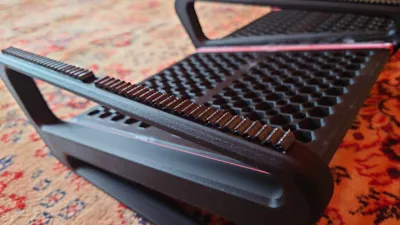
  1. Recommend using fibre-reinforced filaments (at least for the large square plates) - this will help to prevent warping. You want these as flat as possible because you will need to insert rods through them. 
  2. You will need three 8mm diameter rods. I used some 500mm long ones for my build (2 x plates + 2x 20mm spacers + 1 x 40mm spacer). 510mm would be ideal for this configuration but I was struggling to find longer carbon rods. Metal rods should work just fine too. 
  3. Slide all of the plates and spacers onto the rods. I recommend adding some dabs of superglue but the fit should be quite tight already. 
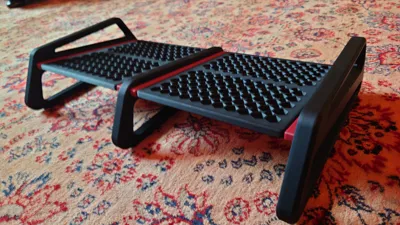
  4. Glue on the end pieces and any middle pillars. I used two part epoxy (gorilla brand as this is slightly gap-filling).


Comment & Rating (12)

(0/1000)

I made the board,..and used 48" threaded rods from Home Depot no cuts. I drilled holes in the end pieces I expanded the top board on both ends came to a realization and that was that I prefer to run my wires under the board but the current design does not lend itself to that. I would re-engineer the holes to be slots big enough to pass a standard 1/4 inch plug through so the wires can run through. Secondly,..you should re-design the middle supports by simply removing the top part of it between the top and bottom of the board. So long as the support is underneath, it only needs to wrap around the horizontal edges a slight bit to hold onto the board. This would allow a little more space for larger pedals. I used PLA,...which I know is NOT as strong as PETG,...but I hate cooking PETG for any project and then praying it doesn't string out. I might just mix up some epoxy and,...using a paint brush give it a few coats for some added strength. Great project and kudos to the creator.
The designer has replied
designer
1
Reply
Dude that looks incredible and thanks so much for the feedback - all noted for the next version! For what it's worth, I've been gigging with the PLA-CF version in the original pictures and it has held up great.
(Edited)
0
Reply
Would it be possible to find some method to add pieces to mount a quad cortex? If you can come up with a solution that works with this pedal board- you would have the printer world cornered!
The designer has replied
designer
1
Reply
I'm working in a mounting system, plus threaded inserts etc. to make assembly easier. But do you mean the full size QC? That might be possible with adding in a few of the spacers in the existing design.
1
Reply
Replying to @alxtech :
I have a full size QC. I set the pedal board up with left leg. then 2 panels with QC and EQ pedal, then middle leg and then a 3rd flat panel with tuner and expression pedal, and the right end leg. The 3m dual lock is just too much grab on itself but not enough to stay attached to pedal board. I wonder if something like 2 flat pieces that use the QC screws on the sides to mount to bottom of QC, then edges of these flat panels extend a 1/2 inch. that 1/2 inch that sticks out either side can get old down by a swivel piece mounted to the peal board that swings over that 1/2 extension attached to the QC and locks it down. Then to remove, just rotate the swivel piece and lift off the QC.
0
Reply
what are you using to mount the QC to the board?
The designer has replied
0
Reply
I've been using 3M dual lock. But it actually sticks a little too well and can be tricky rearranging things. I think version 2 of this will probably have some sort of clip system.
0
Reply
Replying to @alxtech :
ok. I was trying to avoid Velcro and the 3m stuff. I have the big QC, the original one. I ended up doing a total of 3 of the hex plates , 2 together for the QC and one off or the side for tuner and wah pedal. I’ll be keeping an eye out if you do make another version or come up with some kind of clip mount system.
0
Reply
Replying to @evermore707 :
If I may suggest,...If you take a bike chain apart and use only the number 8 shaped flat pieces from the side of the chain,...you can un-screw the screws on the pedal and you might need a correctly-threaded longer screw, maybe not, but then attach the chain link piece to the bottom of your pedal with one end protruding out the side,...this gives you a strong, ringlet to mount a screw to and allows you to BOLT your pedal to the board using washers to hold it in place. You can see an example in my pics I posted above on my Compressor and EQ that are on the board. I can litterally turn the board upside-down and shake the hell out of it once they're mounted with no worries. It's easier to find a company that makes these links than to try taking a chain apart with a press,...trust me on that. Another bonus,...nobody can steal one of your pedals off the board while you're on break. Let me know what you think of this hack...??
0
Reply
Print Profile
0.2mm layer, 3 walls, 5% infill
Came out great!
profile
1
Reply
Fun project
1
Reply
Print Profile
0.2mm layer, 3 walls, 5% infill
profile
1
Reply
No more

License

This user content is licensed under the MakerWorld Exclusive License.

You may create derivative works based on this object, provided that all such derivative works are published exclusively on the MakerWorld platform and include proper attribution to the original creator. You may not share, upload, host, distribute, or publish this object—or any derivative work of this object—on any other digital platform, marketplace, or distribution channel. Commercial use of this object and any derivative works is strictly prohibited. This includes, but is not limited to, selling, renting, sublicensing, or using the object in any context in which you receive monetary compensation or other financial benefits.