


Print Profile(1)
Bill of Materials


Description
Thanks for checking out my model! Interested in supporting my work or selling prints?
Support Crew – Show some love and help keep the projects flowing
Galactic Maker Foundry – Sell physical prints of my original designs
Foundry License+ – Sell prints and use my photos for listings
🎉 Supporter-only Discord coming soon – get early access, tips, and sneak peeks!
Membership
Join here to support or get a license
Ever looked at your bookshelf and thought,
“Needs more planet-destroying superweapon?”
Same.
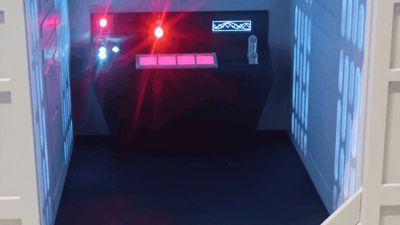
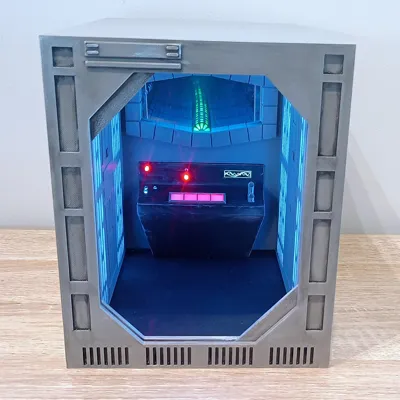
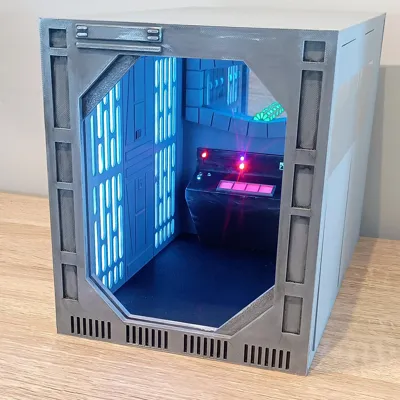
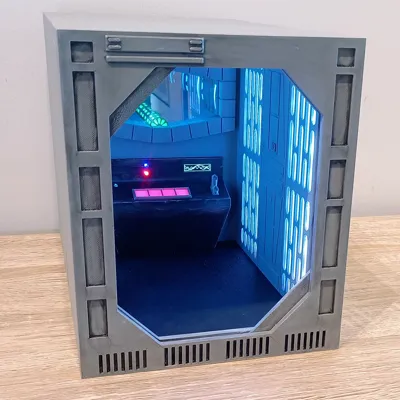
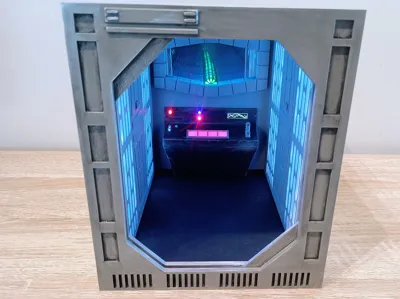
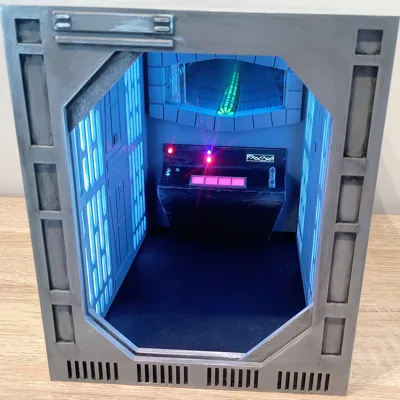
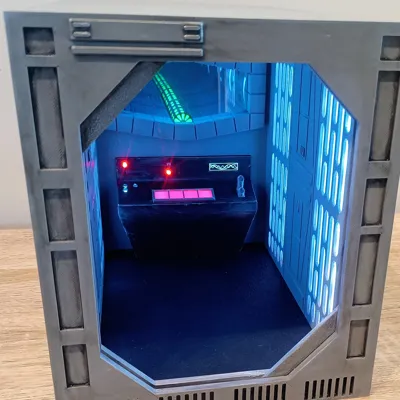
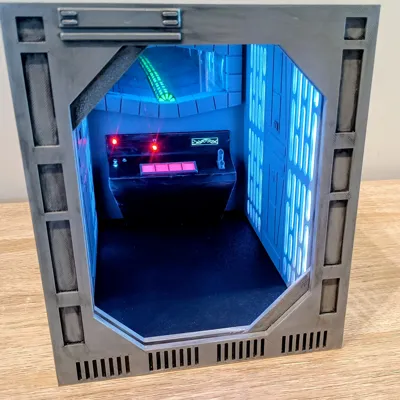
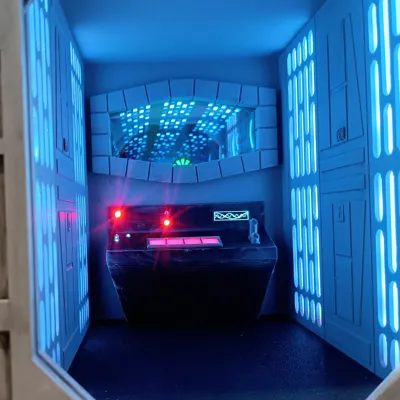
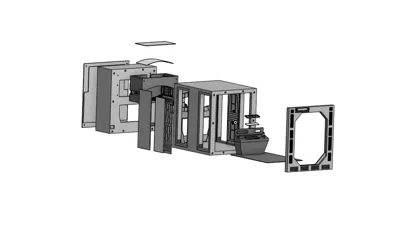
This Book Nook recreates a slice of an Imperial reactor control corridor, complete with a glowing infinity reactor shaft mounted above the command console. From the outside it looks like a neat sci-fi insert between books… from the inside it looks like someone definitely pressed the wrong button.
Up Top
• An infinity mirror reactor shaft creating the illusion of extreme depth
• Subtle green core lighting simulating an active power conduit
• Layered chamber detailing inspired by Imperial architecture
Below That
• A fully lit control console
• Warning LEDs (because something is always about to explode)
• Backlit command keys
• A 0.91" 128×32 OLED running custom sci-fi interface graphics
The OLED cycles animated system visuals, giving the room a sense of life rather than being a static diorama. It feels operational — like the superlaser is warming up and you’re one switch away from a bad decision.
Power
The entire unit is powered via USB, giving you flexibility to run it from:
• A power bank for cable-free shelf display
• A standard 5V wall adapter
• A phone charger plugged into a nearby outlet
For best brightness and stable operation, a 5V 2A power supply is recommended.
The Infinity Mirror
Originally, I planned to build the infinity mirror section from scratch.
Then I looked up the cost of proper one-way mirrors… and immediately reconsidered my life choices.
Instead, I repurposed an infinity mirror key holder. It already contained the mirror stack, drastically reducing the cost of the build while still achieving the depth effect.
Sometimes the smartest engineering decision is strategic scavenging.
Electronics
• LEDs are driven by a D1 Mini running WLED
• The OLED display is powered by an Arduino Nano
• Lighting and animation are handled independently for flexibility
A Quick Note About Photos
Infinity mirrors are extremely hard to photograph properly. I tried my best with my very mediocre photography skills, but it genuinely looks much better in person. The depth effect and glow are far more convincing with your own eyes.
If someone builds this and manages to photograph it better than I did, I fully support it.
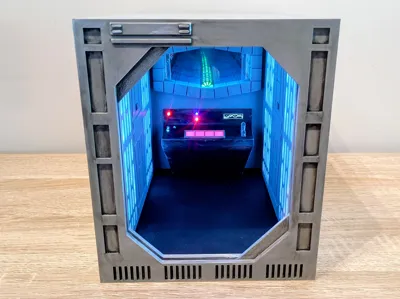
Designed specifically to sit between books, this model:
• Fits cleanly into a standard bookshelf slot
• Hides electronics internally
Compact on the outside.
Suspiciously overpowered on the inside.
⚠️ Please Read First ⚠️
This is an advanced build.
It includes:
• Arduino programming
• ESP8266 (D1 Mini) flashing with WLED
• 144 LED/m and 60 LED/m addressable strips
• 3mm discrete LEDs
• Soldering multiple LED segments
• Power distribution wiring
If you are not comfortable with soldering, flashing firmware, and basic electronics troubleshooting, this may not be the right project for you.
That said — if you take your time, it is extremely rewarding and the infinity effect is worth it.
The WLED preset configuration, Arduino .ino file, and full pinout details are included in the ZIP file in the Documentation section
PART 1 – Control Panel Electronics
1️⃣ Screen + Arduino
- Solder wires to the screen.
- Solder those wires to the Arduino (pinout provided with the code).
- Upload the code using Arduino IDE.
- You can adjust:
- Speed of the animation
- Size of the 3 wave patterns
Once working:
- Mount the screen with small dabs of hot glue in Console.
2️⃣ 3mm Console LEDs
- Insert the 3mm LEDs into their holes in Console.
- Secure each LED with a small dab of CA glue.
- Join all positives together and add an extra length of wire for connection.
Join all negatives together (common ground) and add an extra length of wire.
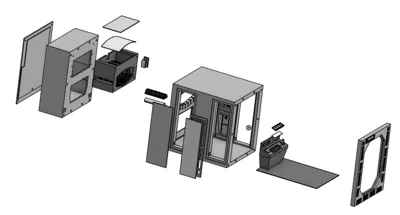
3️⃣ Console Structure
- Glue the Console frame and diffuser (CA glue) into Console.
- Glue in the Console greeblie.
- Glue in the 4 wall panels and their diffusers.
- Glue Mid and Rear together using Align Pins.
- Glue in the floor (textured plate finish facing up) into Mid
- Glue Console into Mid/Rear
PART 2 – Infinity Mirror LED System
LED Overview
This build uses:
- 144 LED/m strips (majority of infinity effect)
- 60 LED/m strip (side wall)
- Two separate LED data strings:
- String 1: Infinity mirror
- String 2: Side panels + control panel
⚠️ LED direction matters ⚠️
Look for:
- Arrows
- Numbers
- DI (Data In)
- DO (Data Out)
If installed backwards, they will not work.
4️⃣ Infinity Top LEDs (144 LED/m)
Top uses:
- 4 strips of 13 LEDs each (144 LED/m)
- Soldered together with ~50mm jumper wires (Red, Yellow & Black)
- Add ~100mm jumper wire at the beginning for connection
Stick them to the Infinity Top LED holder using backing tape.
Leave space at edges so it seats properly.
Glue:
- Top and 2 side Infinity diffusers into the Infinity body.
- Glue Infinity Tube Diffuser to Infinity Tube then glue into Infinity Body (Grille pattern towards the front)
5️⃣ Infinity Tube + Side Segments
Cut:
- 2 × 3 LEDs (144/m) – side diffusers
- 1 × 8 LEDs (144/m) – tube
- 1 × 3 LEDs (60/m) – opposite wall side
Wiring order:
- 3 LED (60/m)
- 8 LED (144/m)
- 2 × 3 LED (144/m)
- Then connect to the top 4×13 strip assembly
Hot glue these in place as needed.
LED Mounting Method
- Solder wires first.
- Attach strips to LED holder parts.
- Tack holders in place with CA or hot glue.
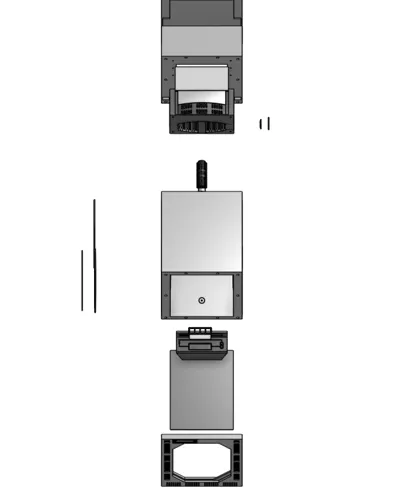
PART 3 – Infinity Mirror Hardware
This uses mirrors from key holder.
- Disassemble the key holder (keep the mirrors — the rest can be saved for future projects, comment your ideas).
- Carefully split plastic along seam with hobby knife.
- Keep mirrors.
⚠️ DO NOT clean mirrors with alcohol.
It will remove the reflective layer.
7️⃣ Install Mirrors
- Insert 2-way mirror Mid/Rear from rear opening.
- One side may be slightly clearer — place clearer side facing forward.
- If mirror is thinner than expected, add small hot glue dabs in corners.
Insert infinity body from rear.
Avoid pinching wires.
Secure with:
- 4 × M3 (6–12mm)
Insert rear mirror and secure rear infinity panel:
- 4 × M3 (6–12mm)
PART 4 – Side Panel LEDs
Order I use:
- Front left (22 LEDs 60/m)
- Rear left (22 LEDs 60/m)
- Control panel (5 LEDs 60/m)
- Rear right (22 LEDs 60/m)
- Front right (22 LEDs 60/m)
You can start anywhere, but it’s easier to:
- Run wire from ESP to front
- Work back toward rear
- Control Panel in the middle
- Finish opposite front
PART 5 – WLED Setup (D1 Mini)
- Go to install.wled.me and flash the latest stable WLED to your D1 Mini
- During the install process, you can enter your home WiFi details so it connects automatically
- After entering your home WiFi details and saving, click “Visit Device” to open the WLED interface on your network
- If you skip that step, connect to the WLED-AP WiFi network after flashing
- Open a browser and go to 4.3.2.1, then enter your home WiFi details
- Go to Config → LED Preferences
- Set GPIO D4 for Infinity LEDs and D2 for Wall Panel LEDs
- Enter your total LED count and press Save
- Test with a simple effect (Chase or Pulse) and keep brightness below 100% for stability
If using identical LED types and amount as me:
- You can use my preset.
Otherwise:
- Add segments manually.
Pins:
- Infinity mirror string → D4
- Wall panel string → D2
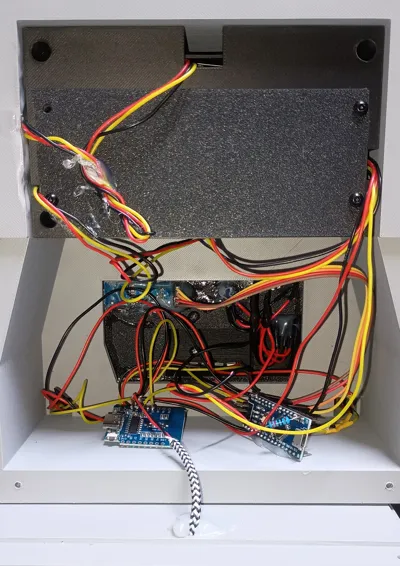
PART 6 – Power Distribution (Important)
To prevent regulator burnout or brownouts:
- Cut 2 extra red and 2 black wires.
- Thread USB cable through rear panel.
- Strip USB red + black.
- Twist together:
- USB red
- Both LED string positives
- Extra red wires
Do same for black (grounds).
Solder + heat shrink.
Then:
- Extra red/black → 5V + GND on D1 Mini
- Extra red/black → VIN + GND on Arduino
This creates a power distribution point instead of running LED current through the boards.
PART 7 – Final Wiring + Mounting
- Mount D1 Mini with double sided tape.
- Mount Arduino (I hot glued mine due to pre-soldered pins).
- Add hot glue strain relief to USB cable.
- Secure rear panel with 4 × M3 (6–14mm).
Final Assembly
Once tested:
- Tack in 4 wall diffuser covers with CA/Hot Glue.
- Glue 2 blast door segments (optional).
- Glue front panel using alignment pins.
- Optional light weathering to bring out edges.
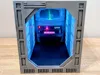
🎉 Final Result
Once powered:
The infinity mirror effect looks incredible.
Try:
- WLED chase animations
- Pulse effects
- Mixing up colours
After all the soldering and wiring — the payoff is absolutely worth it.
Bill of Materials (BOM)
Documentation (1)
License
You shall not share, sub-license, sell, rent, host, transfer, or distribute in any way the digital or 3D printed versions of this object, nor any other derivative work of this object in its digital or physical format (including - but not limited to - remixes of this object, and hosting on other digital platforms). The objects may not be used without permission in any way whatsoever in which you charge money, or collect fees.
Comment & Rating (0)