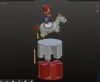
FC Famicom Game Console Circus Charlie Stage 4 (Optional multi-part multi-color or multi-color PIP (H2D etc.) printing)


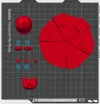
Print Profile(2)
Description
1. About the Modeling Story
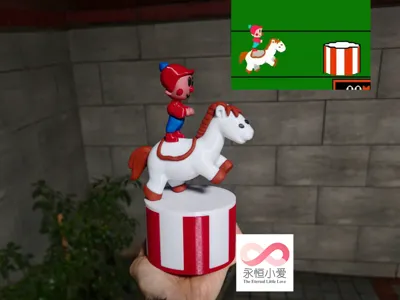
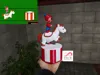
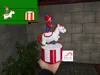
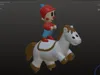
This model took about two weeks to model and two days to test (luckily, there was little rework this time). Why create this model? Because I saw someone playing FC Circus Charlie Stage 4 in a short video, and it has horse elements, and it's the Year of the Horse, so I had an idea and made it. After all, this game is a collective memory for those of us born in the 80s and 90s.
2. About the Model Itself
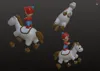
(1) After the test white model was ready, I also asked friends to confirm the accuracy, and this time, they all said it was very accurate. Compared to the previous Dragon Shiryu model where some friends called it "shit," this feedback was quite unexpected.
(2) In addition to the multi-part multi-color disassembled model, I also provide multi-color PIP print profiles for the complete character and horse (compatible with the H2D series) for users with different needs.
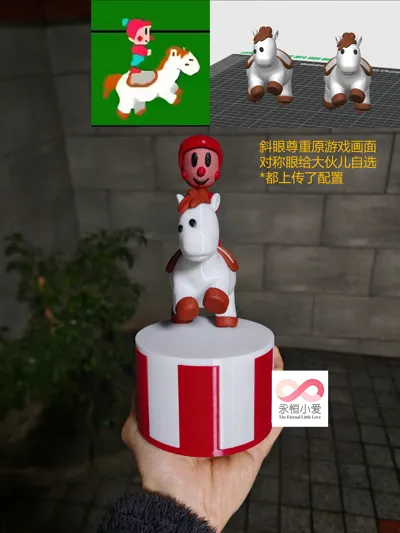
(3) According to the game's original image, the horse has two black dots on its head. After repeated confirmation, they should be eyes. Therefore, the model itself also reproduces this "cross-eyed/one-sided eye" look. However, fearing that some users might not like the cross-eyed horse model, I separately made a horse with normal eyes. Everyone can choose their preferred horse according to their liking.
See the figure below:

3. About Printing Instructions
(1) The placement direction of each part has been carefully considered, mainly balancing three points: ① Ensuring most supports are easy to remove. Some supports may look numerous but are easy to "debone"; ② Hiding print texture as much as possible after assembly; ③ Increasing print success rate for small and tall parts.
Based on these three points, my placement may not be the optimal solution, but I believe it is the most balanced approach. If you have better suggestions after printing, please feel free to propose them; the multi-color PIP print profiles are similar, but for multi-color PIP, necessary supports cannot be avoided, and some support textures cannot be hidden as well as with multi-part multi-color, so please be aware. I do not have an H2D machine. Although I have repeatedly sliced and tested supports and parameters according to the H2D model, there has been no actual printing. Users with this equipment should test multi-color PIP printing themselves.
(2) The PETG multi-part multi-color printing plate model was successfully printed without adhesive (but the printing plate needs to be washed); please test other materials yourself, the error is generally not significant.
4. About Model Assembly and Main Configuration
(1) Assembly has been repeatedly tested, balancing the mid-range values. However, due to differences in everyone's machines, materials, and printing environments, I cannot guarantee that everyone's printed results will be as precise as mine, but the difference will definitely not be significant (multi-color PIP assembly will be better, and multi-part multi-color each has its pros and cons). If small parts of the model encounter issues affecting assembly due to support residue or overhang accuracy, please sand them slightly.
(2) Please use 502 glue for all parts of this model, and remember to wear a mask.
(3) Please refer to the attachment for assembly instructions.Special note: 1. The model has many small parts that appear symmetrical but are not entirely symmetrical. The assembly instructions include left and right schematic diagrams (forward-facing plate screenshots) for reference; 2. The sizes of the four hooves are slightly differentiated to facilitate distinct installation.
(4) My PETG printing temperature is 245℃ for the first layer and 240℃ for other layers, please use this as a reference.
For my other models, interested users please click the image below to view my homepage.

Documentation (7)


License
You shall not share, sub-license, sell, rent, host, transfer, or distribute in any way the digital or 3D printed versions of this object, nor any other derivative work of this object in its digital or physical format (including - but not limited to - remixes of this object, and hosting on other digital platforms). The objects may not be used without permission in any way whatsoever in which you charge money, or collect fees.
Comment & Rating (0)