Marshall Speaker Enclosure for ReSpeaker Lite


Print Profile(1)

Description
If you like my work, please consider buying me a coffee! Thanks! https://buymeacoffee.com/klingy23

Boost Me (for free)
Boosting helps me create additional models or modify them! It costs nothing and it helps. Thank you once again for downloading and boosting.
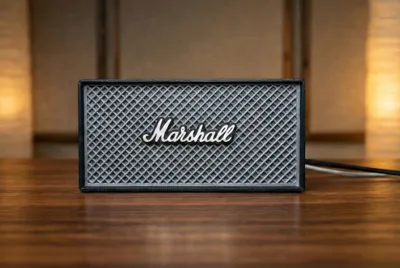
Turn your Seeed Studio ReSpeaker Lite into a desktop rockstar! This enclosure mimics the iconic look of a classic Marshall Bluetooth speaker, giving your voice assistant a stylish, retro aesthetic that looks great on any desk or shelf.
⚠️ Important Note: Audio Setup
Please note that this is solely an enclosure for the ReSpeaker Lite board. It acts as a microphone array housing, not a speaker case.
- There is no internal mount for a speaker driver.
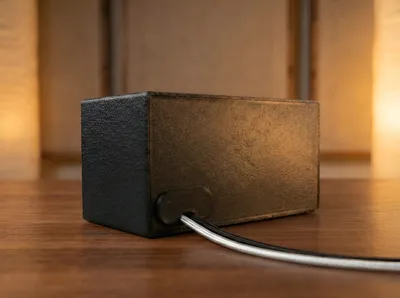
- You must connect your audio output via the 3.5mm jack to an external speaker.
Features
- Classic Styling: Modeled after legendary brand.
- Easy Assembly: The ReSpeaker Lite board simply lays flat on the internal mount—no screws required for the board itself.
- Light Control: Includes a specially designed cable clip that secures the wire and helps block internal LED light bleed, keeping the aesthetic clean.
🖨️ Printing Guide
I have uploaded one print profiles to accommodate everyone:
1. For AMS Users (Multi-Color)
- Select the AMS Plate.
- This is pre-painted in the slicer for a complete multi-color look right off the print bed.
2. For Non-AMS Users (Manual filament swap)
- Select the Non-AMS Plate.
- This profile is set up for a manual filament change. The printer will pause at the specific layer height, allowing you to swap filament colors to achieve the logo/details without an AMS unit.
Settings:
- Supports: ✅ REQUIRED FOR THE MAIN ENCLOSURE. Please enable supports for the main housing to ensure the overhangs print correctly.
- Material: PLA is fine.
Assembly
- Place the ReSpeaker Lite board onto the internal mount (it just lays in place).
- Route your cables through the back and connect them to the reSpeaker Lite board.
- Insert the cable clip to the back to secure the cables and block internal light.
- Snap in the Marshall mesh.
- Connect your external speaker via the aux jack.
License
You shall not share, sub-license, sell, rent, host, transfer, or distribute in any way the digital or 3D printed versions of this object, nor any other derivative work of this object in its digital or physical format (including - but not limited to - remixes of this object, and hosting on other digital platforms). The objects may not be used without permission in any way whatsoever in which you charge money, or collect fees.
Comment & Rating (1)