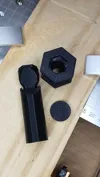
Horizontal Level Sensor

Print Profile(1)
Description
Horizontal Level Sensor (Personal Use / DIY)
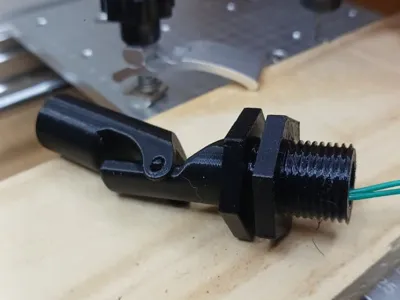
This model consists of a **3D Printed vertical magnetic float**, designed for **automation, level monitoring**, and **DIY** projects
The float uses a **mini reed switch type magnetic sensor (dry contact)**, activated by an **internal magnet within the float**, allowing liquid levels to be detected simply, reliably, and without direct electrical contact with the water
Boost Me (for free)
This project has been tested and validated, so help me create new projects like this by simply boosting this model
The project was developed with a focus on:
- simplicity
- low manufacturing cost
- ease of assembly
- home 3D printing
Typical applications
- Water level monitoring
- Home or rural automation
- Systems with Arduino, ESP32, ESP8266 and electrical controls in general
- DIY and educational projects
Required components
- Magnetic **reed switch** sensor (**mini model recommended**; the standard model has not been tested)
- Magnet **6 mm × 2 mm**
- Electrical wires
- Instant glue (used for:
- fixing the magnet
- gluing the cap
- fixing the threaded part to the float body)
- **Epoxy resin or waterproofing varnish**
Note on buoyancy:
- Inside the float, **styrofoam or foam** can be used for redundancy, in conjunction with varnish or waterproofing, ensuring buoyancy even in case of infiltration
Note on sealing:
- The use of an **O-ring is optional** and is at the discretion of the manufacturer, according to the desired level of sealing
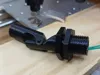
Model details
This model has undergone several practical tests, and the file provided here already represents a functional and validated version
Tests were performed using **PETG**
Other materials, such as PLA or ABS, **have not been tested** in this project. In the case of PETG, **some waterproofing method is necessary**, as FDM printing does not guarantee total sealing
The project was designed for direct use, without the need for mandatory modifications:
- the part comes out almost ready from the printer
- just remove any supports
- assemble the unit
- install the sensor and the magnet
- perform waterproofing
- finish with varnish, epoxy, or another sealant
The entire assembly process is quick, taking less than 5 minutes after printing
In terms of cost:
- the estimated production cost is around **R$ 7 to R$ 10 per unit**, considering printing, sensors, magnet, energy, and consumables
- an equivalent ready-made imported product usually costs around **R$ 20 per unit**, even when purchased in bulk
Assembly instructions
1. Printing the parts
Print all parts according to the recommended parameters
Check for any visible failures between layers, especially in the float region
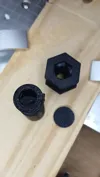
2. Float preparation
- Insert the magnet (6 mm × 2 mm) into the internal housing of the float
- Secure the magnet with instant glue
- Ensure the magnet is well-positioned and does not move
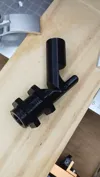
3. Reed switch installation
- Position the reed switch in the housing of the fixed body
- Adjust the position so that activation occurs when the float approaches
- Secure the sensor with instant glue or a small amount of epoxy
- If necessary, solder the wires before final fixation
4. Waterproofing
3D printed parts are not fully waterproof
It is recommended to apply:
- epoxy resin
- waterproofing varnish
- or another equivalent method
Special attention should be given to:
- the float
- the joint regions
- the sensor area
This step prevents gradual water entry and loss of buoyancy; I also recommend plastic foam or styrofoam as internal redundancy to ensure buoyancy in case of water infiltration
5. Final assembly
- Remove supports
- Check for free movement
- Insert the magnet at the end of the float and glue it; if desired, another magnet can be used to guide or apply internal pressure to improve fixation during the glue drying process
- Bend the reed switch legs into an 'S' shape; this aids in its activation. The magnetic reed switch sensor functions better when it captures the magnetic field at the tip, and since the sensor legs are ferromagnetic, it helps conduct and ensures better operation
- Position the sensor at the bottom of the float body (the fixed part where the float is attached)
- Confirm the reed switch activation with the float magnet using an LED or a multimeter in continuity mode
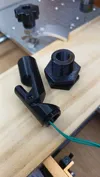
- Apply super glue to the hexagon on the float body and attach the threaded part, which is press-fitted
- Waterproof the float internally and add foam or styrofoam for redundancy (do not add resin, or it will not float)
- Apply glue to the cap and attach it to the float, which is press-fitted
- Pour resin, silicone, or hot glue into the wire passage and where the sensor is located, and wait for it to dry
6. Functional test
Before final installation:
- test the float in a water container
- confirm electrical activation
- verify that the float remains stable and functional
Documentation (8)


License
You may create derivative works based on this object, provided that all such derivative works are published exclusively on the MakerWorld platform and include proper attribution to the original creator. You may not share, upload, host, distribute, or publish this object—or any derivative work of this object—on any other digital platform, marketplace, or distribution channel. Commercial use of this object and any derivative works is strictly prohibited. This includes, but is not limited to, selling, renting, sublicensing, or using the object in any context in which you receive monetary compensation or other financial benefits.
Comment & Rating (0)