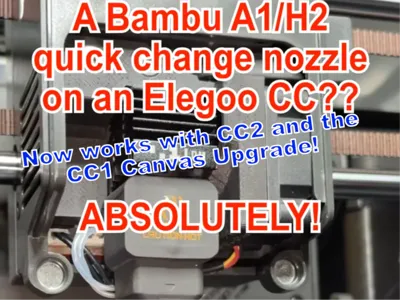
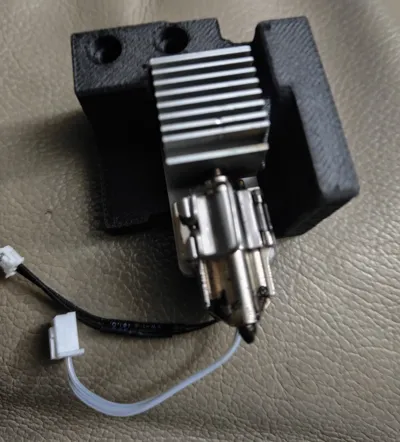
Adapter for H2/A1 Quick Swap hotend Elegoo CC/CC2


Print Profile(1)

Bill of Materials


- RECOMMENDED: SirayaTech PPA-GF ~$46/kg preferred filament x 1: https://www.amazon.com/dp/B0G5276CWP
- Bambu compatible heater assembly x 1: https://www.amazon.com/dp/B0FR96Q58X
- Elegoo compatible Heater and Thermistor x 1: https://www.amazon.com/dp/B0FNCS82QF
Description
Boost Me (for free)
Boosts cost you nothing, but they really help us model designers, so, if you like this model, please give it a boost.
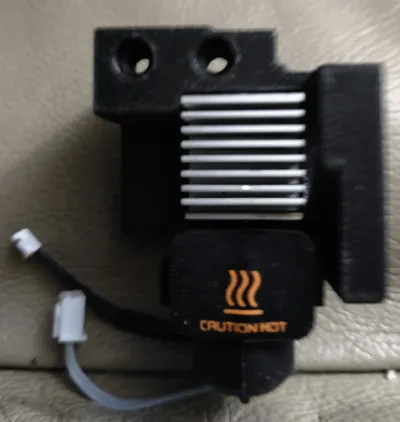
UPDATED v3.1: Fixed the issue with the screws for the hall effect sensor on the fan shroud causing the part to crack by adding a small screw boss to accomodate the full length of the screw.
This design is inspired the adapter created by Pedrinbeep, which provided the foundation for my original version. His model worked well and established the core geometry, but then Elegoo released the Canvas upgrade for the CC1, which broke compatibility with the original adapter geometry, so this is a complete redesign from the ground up, so no longer really a remix, but still giving recognition to Pedrinbeep for his original design which inspired it. An added bonus with this redesign, its now also compatible with the Centauri Carbon 2 as well
Original model: Adapter for H2D and A1 Hotends for Elegoo CC
During testing, several tolerance and durability issues appeared that weren’t obvious in PLA/PETG but became clear in high temperature engineering filaments like PPA-CF. This remix addresses those issues and improves overall usability and reliability. If printed in PLA, PETG, ABS, even PA6, This part will not hold up to the heat. You really need to use PAHT-CF, PPA-CF or PPS-CF to do this properly. We remixed the original model to print correctly with these filaments.
Complete Redesign: I had been working on a version of this adapter that could work on the Centauri Carbon 2, then, completely unexpectedly, Elegoo released the Canvas conversion kit for the Centauri Carbon 1. Unfortunately, the Canvas conversion breaks compatibility with the original adapter design, so it became necessary to implement a complete redesign, the result is this model that is compatible with all Elegoo Centauri Carbon machines… It will still work on the OG Centauri Carbon, but it also works on the Centauri Carbon 2, and on the Centauri Carbon 1 with the Canvas conversion kit. Special thank you to @mannu24 for his assistance testing and confirming fitment on the Centauri Carbon 2
Not comfortable printing in these materials or changing over the thermistor and heater?
No problem, you can purchase just the printed adapter, or the completed assembly with the heater and thermistor, fully plug and play, on my Etsy shop at https://Elegoo.3DCreationsofRI.shop
This model is specifically designed to be printed out of PPA-GF, PPA-CF, or PAHT-CF. The recommended material is SirayaTech PPA-GF currently as low as $46/kg from Amazon https://www.amazon.com/dp/B0G5276CWP which is much more affordable than the Bambu PPA-CF
Do keep in mind, this stuff is incredibly stiff, you're not going to print it through an AMS. External spool only. But the SirayaTech PPA-GF is formulated to print reliably with a 0.4mm nozzle, I've printed literally hundreds of these, and never had a nozzle clog at 0.4mm. These materials will more than hold up to the heat required for this application. I also strongly recommend you get the white Zirconia heater block, as it insulates far better than the black synthetic stone style, further protecting the bracket from excess heat. Its also recommended that you anneal the adapter bracket at 100°C/215°F for 2 hours after printing, before you attach the heat block. (its a small part, so 2 hours is more than sufficient time for crystalization of the polymer, and annealing raises the heat deflection temperature from 82.5°C when unannealed to 192°C when annealed. The carbon fiber maintains dimensional stability of the part during annealing, so there is no warping or significant shrinkage of the part) I personally recommend printing it in SirayaTech PPA-CF, its got great high temperature tolerance, is formulated to be easy to print on typical consumer printers, and at about $53/kg is far more affordable than the Bambu PAHT-CF.
Now, I know what you're thinking, 192°C?! But my hotend runs at 320°C! Yes, that's true, but that's INSIDE the core of the hotend melt zone… The PPA-CF bracket is far enough away from the hotend melt zone, and protected by the zirconia insulating block that its never going to get exposed to anything even close to its 192°C Heat Deflection Temperature.
What you'll need to complete the installation:
Bambu compatible Heater Assembly
https://www.amazon.com/dp/B0FNC62ZQW?
Compatible Heater Assemblies:
- BambuLab A1
- BambuLab P2S
- BambuLab H2D / H2D-S → Right-side block ONLY (left side has different hole spacing)
Elegoo Centauri Carbon compatible heater and thermistor
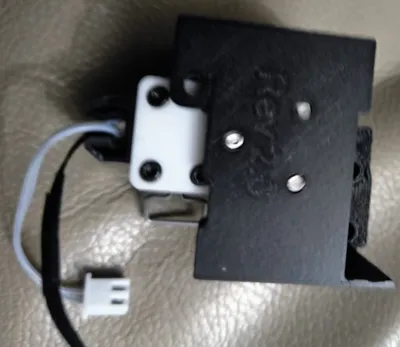
- 3 either M3x6 Flat Head Cap Screws or M3x8 Button Head Cap Screws (I believe Pedrinbeep used the flat head cap screws, which the head design allows a little more thread engagement at 6mm length, which is why he said 6mm length. Button head cap screws don't get sufficient engagement with 6mm screws, so 8mm was used and they were not too long)
- 3 M3 nuts.
What’s changed in this model from the Pedrinbeep's original design?
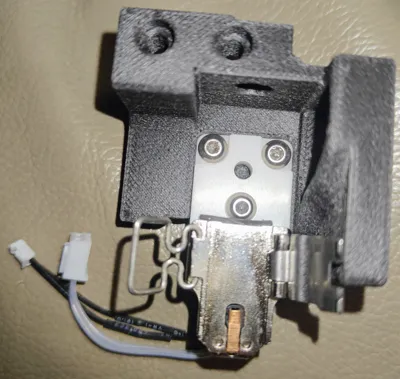
This is a complete redesign of the adapter bracket re-created from scratch in Fusion from the ground up. The changes to accomodate the Canvas upgrade, and the geometry of the CC2 were more than a simple remix would allow. We had to change the fan duct to accomodate the filament sensor for the Canvas system (on both the CC1 and CC2), we had to adust some of the bracket geometry to allow wires from the filament sensor to route properly, we also skeletonized the bracket to reduce the mass added to the toolhead.
Why these changes matter
These refinements completely alter the core design — they bring full compatibility with the original Centauri Carbon, the Centauri Carbon 2, and the Centauri Carbon with the new Canvas upgrade. One bracket will work on all versions of the Centauri Carbon machines.
When using the new style white Zirconia Bambu heating blocks, I found M3x8 buttonhead screws to be the perfect length. If you use the older style composite stone (black) block, you may find M3x6 screws are necessary. The main thing to remember is, the screws should fully engage the threads of the captive nut, but not protrude past the back face of the adapter. In my testing, M3x8 buttonhead screws sat perfectly flush.
Installation is pretty much the same as in Pedrinbeep's original video, except you shouldn't need to do any post processing to the adapter, and no need to install heatset inserts. In addition, for Canvas systems, you will need to transfer the filament sensor on top of the stock fan duct onto the adapter fan duct. Other than that, follow his video guide, including the PID tuning and printer calibration instructions.
When everything is installed:
You MUST calibrate your printer. PID Tune at 220C and re-level
Follow the steps shown in the video.
- If you only use H2D hotends, no need to re-level after the initial install re-level. If you only use A1 hotends no need to re-level after the initial install re-level
- If you switch between H2D and A1, you MUST run Automatic Leveling EVERY TIME. Their nozzle lengths differ, calibration is essential.
The adapter works perfectly for both after many redesigns, but recalibration is mandatory when switching.
Credits
Inspired by the original model by Pedrinbeep.
This complete original redesign exists thanks to his foundational work.
Boost Me (for free)
If you like this model, please consider giving me a boost.
Want to Sell Your Prints?
Download and print for personal use, free. Want to sell printed versions? Join my Patreon here:
👉patreon.com/3DCreationsofRI
Active members of my Patreon are licensed to offer prints of MY ORIGINAL MODELS commercially (i.e. does not apply to remixes).
All of my original designs, photographs, and—where applicable—my original modifications to remixed designs are Copyright © 2026 John H. Tetreault d/b/a 3D Creations of Rhode Island - All rights reserved, except for rights expressly granted by the applicable model license. These designs are provided without any warranty, including without limitation, any warranty of fitness for a particular purpose.
License
You may create derivative works based on this object, provided that all such derivative works are published exclusively on the MakerWorld platform and include proper attribution to the original creator. You may not share, upload, host, distribute, or publish this object—or any derivative work of this object—on any other digital platform, marketplace, or distribution channel. Commercial use of this object and any derivative works is strictly prohibited. This includes, but is not limited to, selling, renting, sublicensing, or using the object in any context in which you receive monetary compensation or other financial benefits.
Comment & Rating (37)