Cardinals of Devotion - Cardinal Bird Hueforge


Print Profile(1)
Description
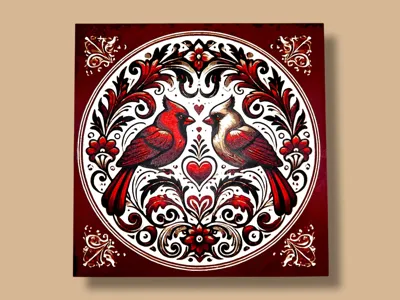
This piece showcases a pair of richly detailed cardinals in deep crimson and warm ivory tones, symbolizing love, devotion, and enduring connection. Framed by an intricate circular border of scrolling florals and heart motifs, the symmetrical composition feels timeless and sentimental, with a handcrafted, vintage charm. The bold contrast and layered detailing make it an eye-catching decorative piece that works beautifully for Valentine’s Day, winter décor, or year-round displays celebrating love and togetherness.
Project: Cardinals.hfp
Print at 100% infill with a layer height of 0.08mm with a base layer of 0.16mm
The Model is 200x200mm in size
You may print at higher layer heights below the Base Thickness of 0.48mm
The Max allowed Thickness is 2.48mm and the Actual Thickness is 2.16mm
#080a0d PLA PolyLite Black Transmission Distance: 0.3
#8e1012 PLA Prusament Wine Pigment Transmission Distance: 2.8
#b22f18 PLA BambuLab Tough Vermilion Red Transmission Distance: 3
#7d6556 PLA BambuLab Matte Dark Brown Transmission Distance: 2
#d3b7a7 PLA BambuLab Matte Latte Brown Transmission Distance: 2
#cbc6b8 PLA BambuLab Matte Bone White Transmission Distance: 1.6
#ffffff PLA BambuLab Matte Ivory White Transmission Distance: 3.5
This print uses 7 unique filaments
Swap Instructions:
Start with Black
At layer #9 (0.8mm) swap to Wine Pigment
At layer #13 (1.12mm) swap to Vermilion Red
At layer #16 (1.36mm) swap to Dark Brown
At layer #19 (1.6mm) swap to Latte Brown
At layer #22 (1.84mm) swap to Bone White
At layer #24 (2mm) swap to Ivory White for the rest.
One AMS? No problem! There is a pause included before the 4th color is completed - one method to utilize one AMS is to assign the additional colors to previously used slots when sending your print. Here is an example of my preferred method and strategy:
|
If you have more than one AMS or are manually changing filaments, |


This was a custom request, please visit my Patreon page if you are looking for custom created hueforges for both private and public use.
License
You shall not share, sub-license, sell, rent, host, transfer, or distribute in any way the digital or 3D printed versions of this object, nor any other derivative work of this object in its digital or physical format (including - but not limited to - remixes of this object, and hosting on other digital platforms). The objects may not be used without permission in any way whatsoever in which you charge money, or collect fees.
Comment & Rating (4)