1.3" OLED & ESP32-C3 CASE - Desk Companion


Print Profile(1)

Description
Boost Me (for free)
Boosts, photos, and comments really motivate me to keep building projects like this, which take a lot of time and filament.
So don’t hesitate — it genuinely makes a difference 🙏
This project and its tutorial are constantly evolving, just like the C309 project (the Yeti) that I’m working on in parallel.
I’m working alone on this project and dedicating my free time to it, so please be understanding.
— thank you all 🙂
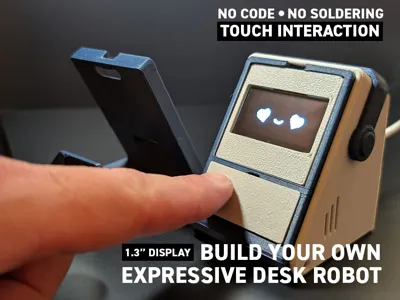
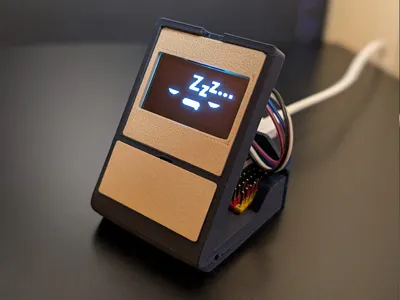
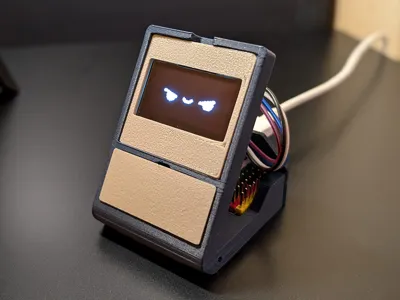
🤖 Expressive Desk Robot – ESP32-C3 & 1.3" OLED Display
When combined with the 1.3" firmware available at www.leroyd.com/beta/,
it becomes a small expressive desk robot based on an ESP32-C3 and a 1.3" OLED display.
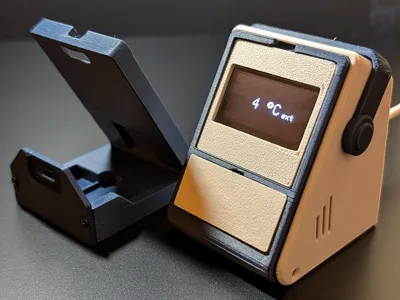
It shows animated faces, time and weather, and reacts to touch.
✨ Features
🧩 Companion robot mode (beta but functional)
- Feed it!
- Wash it!
- Put it to sleep!
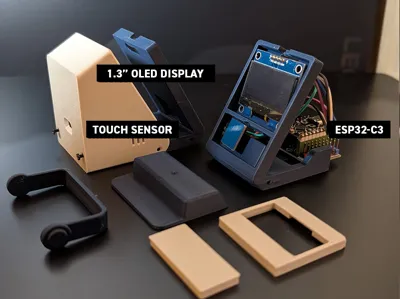
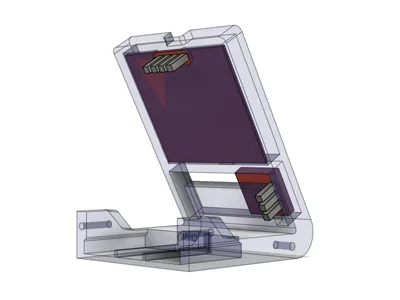
🖥️ 1.3" OLED display
👆 Capacitive touch interaction
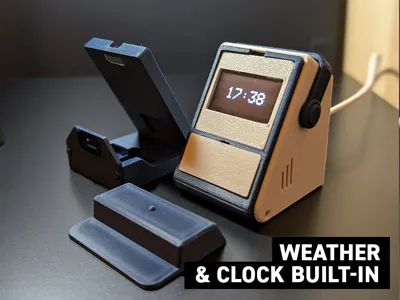
⏰ Wi-Fi synchronized clock
- Time zone configurable from the web interface
🌦️ Weather via Open-Meteo
- Location based on GPS coordinates
- Coordinates configurable from the web interface
🔊 Piezo buzzer
- Melody during a specific interaction
- Enable / disable from the web interface
📳 Vibration motor (experimental feature)
- Enable / disable from the web interface
🔋 Space for an internal battery
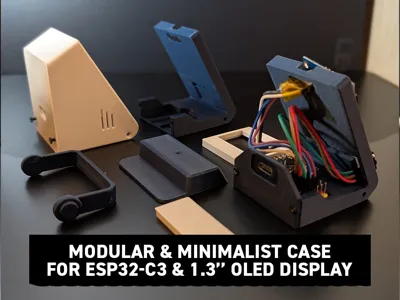
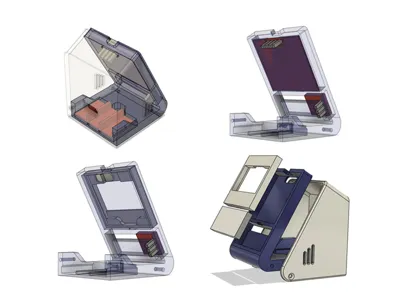
🧩 Modular and minimalist enclosure for 1.3" OLED display + ESP32-C3 Super Mini
✅ No code to write
✅ No soldering required
Firmware, compatible screen, and instructions available here:
👉 https://leroyd.com/beta/
This model is first and foremost an enclosure for your 1.3" displays and ESP32-C3.
I made it compatible with the Companion 309 (Yeti) firmware.
https://makerworld.com/fr/models/2109424-compagnon-309-build-your-expressive-robot#profileId-2281938

🤖 Expressive Desk Robot – ESP32-C3 (1.3" OLED)
This project is a compact, minimalist, and expressive desk robot based on an ESP32-C3 Super Mini and a 1.3" OLED display.
It displays animated faces, the time and weather, and reacts to touch in a simple and affectionate way.
The project is designed to be accessible to everyone, with no soldering and no code to write, thanks to a ready-to-use firmware.
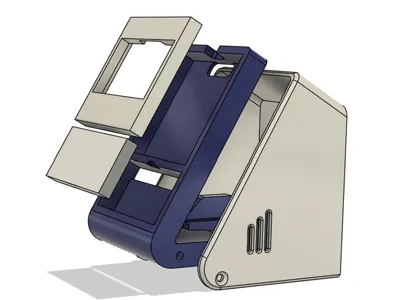
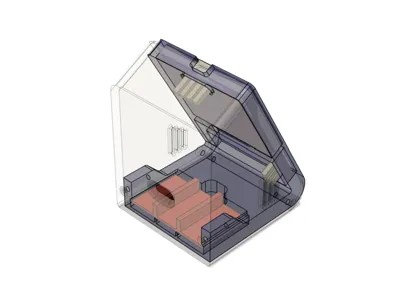
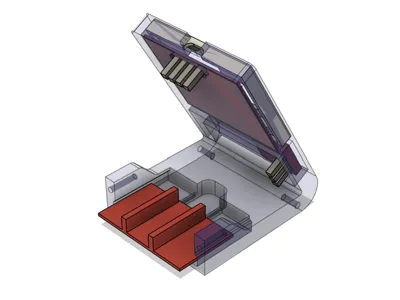
🧱 Enclosure & Assembly
The enclosure is made of several 3D-printable parts:
- Tilted main body
- Screen holder
- Front panel (touch area)
- Base / stand
- Rear cover
🔩 Hardware Used
- 4× M2.5 screws
- Diameter: 2.5 mm
- Length: 6 mm
No glue is required.
🧠 Clock & Weather (Details)
- The clock is automatically synchronized via Wi-Fi
- The time zone can be selected from the web interface
- Weather data is provided by Open-Meteo
- Location is defined using GPS coordinates
- GPS coordinates can be modified from the web interface
- No API key required
🔌 Component Wiring
Below is the basic wiring required for a successful first startup.
You can later add the piezo buzzer for sound and the vibration module by following the connections indicated in the tables below.
Hardware list available at www.leroyd.com/beta/ → 1.3" firmware

📟 OLED 1.3" Display (I²C)
| OLED | ESP32-C3 |
|---|---|
| VCC | 3.3V |
| GND | GND |
| SDA | GPIO 8 |
| SCL | GPIO 9 |
⚠️ I²C Address
The I²C address (0x3C or 0x3D) depends only on how the OLED display is manufactured.
It is not a software setting.
👉 The link to the compatible display as well as the 1.3" firmware are available here:
🔗 https://leroyd.com/beta/
👆 Capacitive Touch Sensor
| Touch sensor | ESP32-C3 |
|---|---|
| VCC | 3.3V |
| GND | GND |
| OUT | GPIO 7 |
The sensor is placed behind the front panel for invisible interaction.
The one selected in the parts list fits perfectly in the dedicated slot and requires no soldering.
📳 Vibration motor
| Vibration motor | ESP32-C3 |
|---|---|
| VCC | 3.3V |
| GND | GND |
| IN | GPIO10 |

The vibration motor is currently in an experimental phase.
It activates during a long press on a face (more than 3 seconds) and displays the “love” expression.
👉 It likes being stroked.
🔊 Piezo buzzer
| Buzzer piezo | ESP32-C3 |
|---|---|
| + | GPIO 5 |
| − | GND |
The piezo buzzer is used in addition to the vibration motor.
During a long press (more than 3 seconds), it plays a melody at the same time as the vibration and the display of the “love” expression.
Sound can be enabled or disabled from the web interface.
🔋 Power Supply
- Power via USB-C
- Enough space inside the enclosure to add a battery
- Operation via USB or battery, depending on the chosen configuration
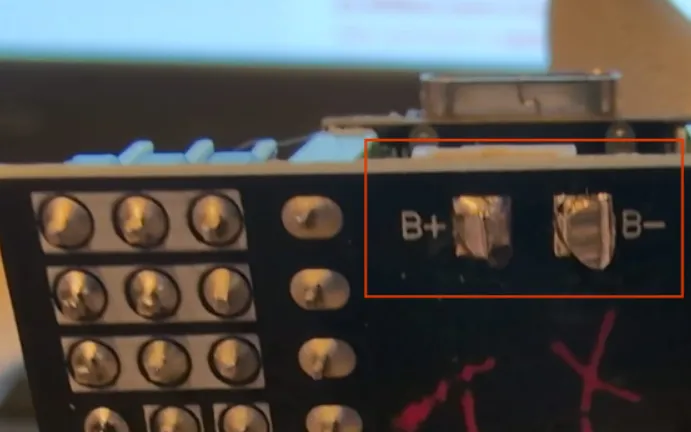
The ESP32-C3 breakout board (extension module) includes an onboard LiPo battery charger.
If you want to power it using an internal battery, use the two solder pads located under the extension board.
⚠️ Important:
You are free to choose the battery, but I do not recommend using a battery with too low or too high capacity.
A capacity between 500 mAh and 800 mAh is preferred.
I cannot be held responsible for improper battery use or any damage it may cause.
Even though batteries are present in most of our devices, they remain potentially dangerous components.
👉 If you have any doubt, prefer powering the device via USB only (without a battery).
💻 Firmware & Configuration
👉 All links (firmware, compatible display, recommended components) are grouped here: 🔗 https://leroyd.com/beta/
🎉 You’re all set!
Once you have assembled your desk robot and connected it to your computer using a USB-C cable, it’s time to install the firmware.
- Go to leroyd.com/beta
- Click “Connect” in the section:
“OLED 1.3" – Install the 1.3 firmware – ESP32-C3 Super Mini”
That’s it — the software installation can begin 🚀

- Click “Connect” to launch the web installer
- Select the serial port corresponding to the ESP32-C3
- Confirm the firmware installation
- Wait for the flashing process to complete
⚠️ Important:
Close the page once the installation is finished (before configuring Wi-Fi)
Premier Démarrage — Mode Point d'Accès (AP)
If you skip the Wi-Fi connection step, your desk robot will automatically switch to offline mode.
Only part of the companion’s features will be available.
After flashing – first boot only
- The device starts in AP mode
- In your list of Wi-Fi networks, a network will appear: Bot_config
(It is also accessible from a smartphone)
👉 If you are using a smartphone, make sure to disable mobile data before connecting.

- Connect to the Bot_config network
- Open the configuration page: 192.168.4.1
- Set:
- Your Wi-Fi credentials
- The URL you will use to connect to your companion
(example: deskrobot.local)
- Save the settings

👉 Once configured:
- AP mode is disabled
- The robot automatically restarts
Normal Use — YourURL.local (e.g. deskbot.local)
- Displays outdoor temperature & local time
Replace 55.123, 55.123 in the left column with your own GPS coordinates
(latitude and longitude).
Select your time zone in the right column.
Click “Save” to apply the changes (bottom of the page).
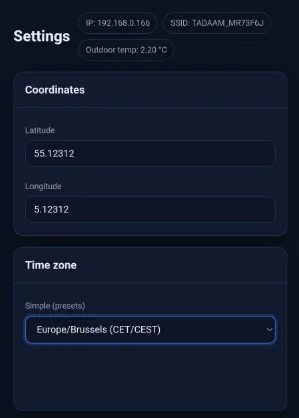

This will update the current outdoor temperature and the local time displayed on your companion.
Child Mode

Disables all functions except face display.
Raising
Allows you to feed and wash the companion.
When feeding, a cooldown time is enforced between two actions
(give it time to chew and swallow…).
- Food increases in 15% steps (subject to change) and causes a *decrease in cleanliness
- Cleanliness returns to 100% after each wash
Over the course of a day, its hunger, fatigue, and cleanliness naturally fluctuate (decrease).

Slides
Here you can choose which pages are displayed or hidden on the companion’s screen.

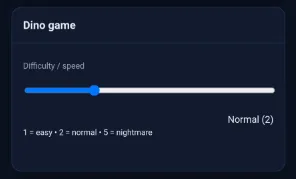
Dino Game
This tab lets you choose the difficulty level of the Dino game
(level 5 is way too hard).
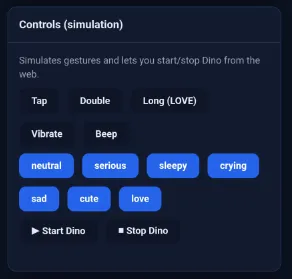
Controls
For direct control of the companion from the web interface.
Maintenance
In the Maintenance section, you can fully reset your companion.
This action will erase everything, and the device will need to be completely reconfigured.
🖨️ 3D Printing
- Recommended filament: PLA
- PETG also possible
- Printing without complex supports
- Tolerances designed for easy assembly
🎯 Project Spirit
This robot is designed as a discreet and expressive desk companion.
A small, living object — simple, endearing — that reacts when you take the time to interact with it.
License
You shall not share, sub-license, sell, rent, host, transfer, or distribute in any way the digital or 3D printed versions of this object, nor any other derivative work of this object in its digital or physical format (including - but not limited to - remixes of this object, and hosting on other digital platforms). The objects may not be used without permission in any way whatsoever in which you charge money, or collect fees.
Comment & Rating (44)