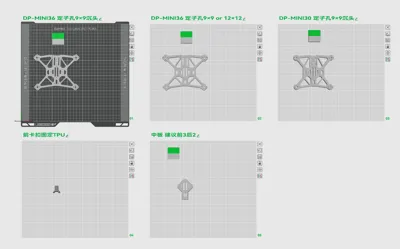
DP-MINI36/30 Carbon Plate Modifiable Version


Print Profile(2)

Description
Please see the source file version 0213 (I have corrected the motor hole positions)
Open-source models are strictly prohibited from any form of commercial use
Please comply with national laws and regulations for all flights, and do not engage in dangerous flight activities that endanger the life and property safety of others There are countless roads, but safety is paramount
This model is a modification based on the previous DP-MINI30 project, which can be cut from carbon fiber or 3D printed
This is a completely open-source project, and editable STP files are also included in the source files You are welcome to optimize it based on this, and of course, I hope you also open source it on Maker World
I. Bill of materials required for this machine:
1. Frame
Bottom plate, middle plate (can be carbon fiber, or printed using carbon fiber-filled engineering filament)
2. Limit block
Front buckle limit block (printed with TPU)
3. Hardware:
3.1, M2*20 countersunk screws *4 (3 pieces also acceptable), penetrating the middle plate and flight tower
3.2, M2*14 countersunk screws *2, securing the rear of the middle plate
3.3, M2*6 countersunk screws or regular screws *16, securing the motors
3.4, M2*4 screws *2, securing the front buckle limit block
3.5, M2*6 aluminum standoffs *6 (5 pieces also acceptable), separating the middle plate and bottom plate, 3D printed alternatives available, please model them yourself
3.6, M2 self-locking nuts 4-6 pieces, or plastic nuts
4. Canopy
Kuaifeng MINI series canopy, the only choice, it is recommended not to choose dazzling colors, as paint affects strength
5. Electronic components:
AIO: Kuaifeng F405 AIO V2 (F7 and H7 computing power is severely excessive) or MINI25 integrated AIO, requires spacers and slotting
Motor: 1504 3600-4000kv, I have adapted to both 9*9/12*12 stator hole positions The author is too poor and used Ruishu 12*12 2800kv, also forced to use an extension plate, which is very weak
Receiver: Any ELRS2.4G, Unicom 900M will shoot down your 915 in minutes
VTX: Small O4 + Ruishu or Flywoo wide-angle lens, no difference from large O4
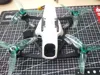
II. Frame Assembly
Weld the receiver, capacitors, and power wires as shown in the figure below, and initially combine them with the middle plate The receiver is placed below the middle plate, see the figure below for details
Use zip ties or similar for simple fastening, and combine the bottom plate with the battery strap (this must be completed first)

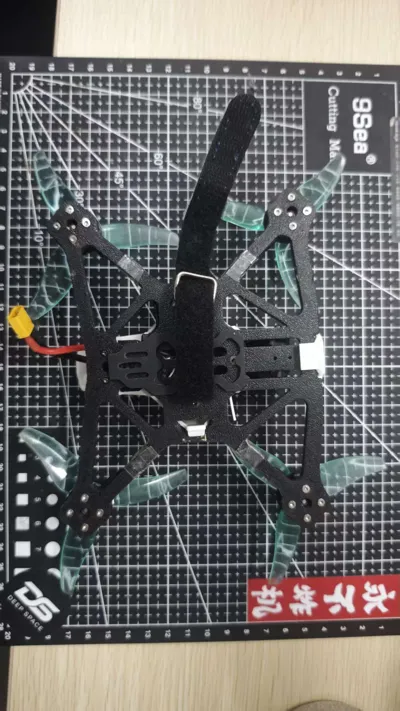
Install aluminum standoffs with screws The main screws of the frame pass through the bottom plate + aluminum standoffs + middle plate The screws and aluminum standoffs at the rear of the flight tower can be omitted
Installation diagram is as follows

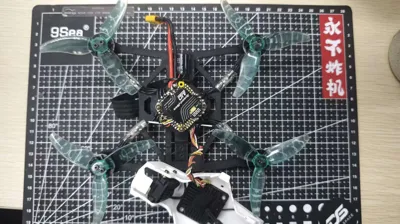
Continue to fix and weld the motors, etc., and secure the front buckle limit block Pay attention to the direction of motor wiring
The receiver antenna can be fixed at the tail, or like me, secured with UV glue underneath the middle plate

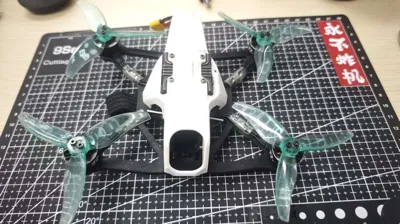
When installing the canopy, pay attention to the motor wiring to prevent it from being pinched by the lower edge of the buckle

Install battery anti-slip pads, whatever works for you, adhesive strips are also fine

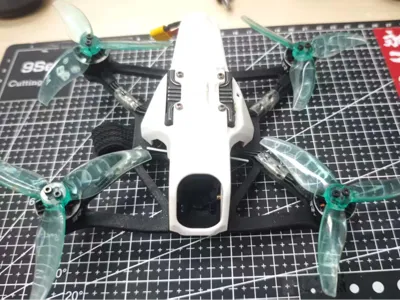
Ready for takeoff

III. Modification Suggestions
1. Hardware optimization
Enlarge the holes in these two positions For the carbon fiber version, you can use press-fit nuts For the 3D printed version, use heat-set inserts Shorten the screws in the yellow area to 12mm The author is very lazy and will draw it when there's time If you're not lazy, you can draw it yourself; the STP files are provided

2. Reinforcements
You can refer to racing drones and add reinforcements to both left and right sides The author is very lazy and will draw it when there's time If you're not lazy, you can draw it yourself; the STP files are provided
3. 3D Printed Parts
You can add a 3D printed part to fix the receiver antenna at the rear The author is very lazy and will draw it when there's time If you're not lazy, you can draw it yourself; the STP files are provided
You can add a 3D printed part to fix the receiver in the middle plate interlayer The author is very lazy and will draw it when there's time If you're not lazy, you can draw it yourself; the STP files are provided
4. Cable management
Motor wiring is prone to movement You can use UV glue or design cable guides The author is very lazy and will draw it when there's time If you're not lazy, you can draw it yourself; the STP files are provided
IV. Others
The author is really lazy and doesn't want to record videos If you are willing to record videos, you can come and play with the author (IP: Haizhu, Guangzhou)
Thanks to D.Power eill for the design idea and my friend Ma Ge for the canopy contribution
If you want to cut carbon fiber plates, you can contact our "beautiful and sweet-voiced" Boss Yu
【Taobao】7-day no-reason return https://e.tb.cn/h.7s78h18Ey5cmrTN?tk=9hJqUR1QPmY MF937 「Full carbon fiber drone frame aerial photography racing drone body carving processing unmanned aircraft 3k carbon fiber products」
Click the link to open directly or search Taobao to open directly
License
You may create derivative works based on this object, provided that all such derivative works are published exclusively on the MakerWorld platform and include proper attribution to the original creator. You may not share, upload, host, distribute, or publish this object—or any derivative work of this object—on any other digital platform, marketplace, or distribution channel. Commercial use of this object and any derivative works is strictly prohibited. This includes, but is not limited to, selling, renting, sublicensing, or using the object in any context in which you receive monetary compensation or other financial benefits.
Comment & Rating (0)