Search models, users, collections, and posts

SideBox - Snapmaker U1 Dry Box

Print Profile(3)

All
H2S
H2C
H2D Pro
H2D

Standard Modules
Standard Modules
Designer
12.5 h
4 plates
5.0(2)

Main Housing - with TPU Seal - multi-material
Designer
11.6 h
2 plates

Main Housing - no seal - single-material
Designer
9.5 h
2 plates

Open in Bambu Studio
Boost
132
358
51
6
287
12
Released 

Description

**** Update 25.02.2026 **** (1) Added BOM for hardware (2) Updated point 5 of description with my new observations - humidity levels are even better then I initially though

**** Update 08.02.2026 **** (1) Laser CUT template for plexiglass attached (2) Fusion file attached to modify and develop your own modules.


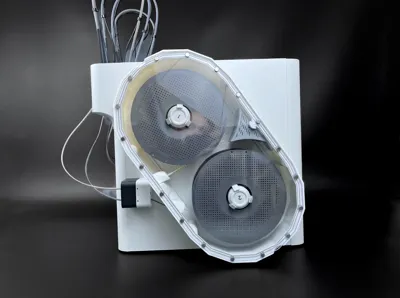
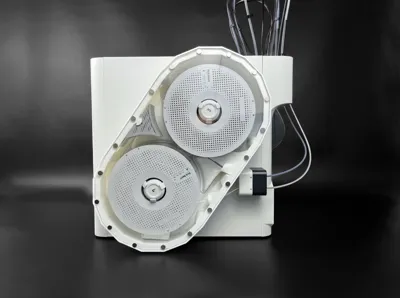
SideBox is a Snapmaker U1 filament dry box design with following key benefits:


  1. Easy mounting - No need to remove the spool holders like in other models, no risk to brake them
  2. Two mounting techniques - silicone or double sided tape, both are removable from plastics
  3. Lightweight - one SideBox adds only around 500g to the weight of the printer
  4. Two  versions - single material and multi-material with embedded TPU seal
  5. Very effective - I easily managed to achieve very low humidity, same as inside AMS units - both versions “double sided tape+no seal” and “silicon+TPU seal” hold the same low humidity (but with silicone mounting technique and TPU seal version desiccant will deteriorate slower)
  6. Well vented - to make sure the vents on the right side of the printer can operate
  7. MODULAR - side elements like filament channels, vent modules, sensor modules can be interchanged
  8. Expandable - you can create your own modules, Fusion file with modules available in CAD files, feel free to attach your modules as additional print profiles here (describe it please)
  9. Easy assembly - hexagonal shape makes multiple assembly and mounting steps easier
  10. Very good visibility inside

IMPORTANT: In STL/CAD files you will find Snapmaker Orca 3MF. In print profiles you will find profiles  for H* series. Separate profiles are prepared for main housing (two versions) and the modules. You can print main Housing on U1 of course, on H* series, and other larger printers. However it is too large for 256x256 plates.


BOM (Hardware only) for ONE SideBox

  • 3x20mm self tapping screws, 10pcs (for housing)
  • 5x2mm neodymium magnets, 18pcs (for housing)
  • 2,5x6mm self tapping screws, 32pcs (for modules)
  • 8x3 neodymium magnets, 18pcs (for the lid)
  • 3/4mm thick Acrylic/Polycarbonate glass 470x250.5mm (+/- 0.5mm) for manual cutting (for laser cutting - template is attached)
  • Round humidity sensor (not obligatory, you can use a blank module instead)
  • Full list available in the video in following timestamps:  0:24, 1:42, 3:15


Please watch the video with the instructions. Make sure your captions are enabled.


Comment & Rating (51)

(0/1000)

Pinned by Designer
Thank you for this great model! and thank for replying to messages. this means the world
designer
2
Reply
I finished/installed the Side Boxes yesterday and took them for their first spin. Prints came out fine. Here's some feedback that might be useful to others: 1) I printed the models with PETG+TPU gaskets. That part worked amazingly well. As others have noted, though, you might have to monkey around with the pieces to get past slicer complaints about "too close to the build plate border". I also made sure the prime towers were moved into the open space (roughly center of the plate) to avoid potential problems. 2) I have a Shaper Origin, and since there is a DXF file for the acrylic windows, this seemed like a sure way to cut them out. They did not fit well though and I needed to trim each side which was a pain. Drop of glue and let the magnets find their sweet spot worked well. 3) PTFE tubes slid out of the holes. The "wipe some superglue" trick didn't work for me. There is minimal clearance to the feeders, so feeding filament is a bit of a bother. Mounted with slicone glue, easy.
(Edited)
The designer has replied
designer
2
Reply
Hi @ginjeff , thank you so much, finally some feedback! I double checked the DXF laser template, it has 1,2mm relief all around, so it should be plenty taking into consideration machine precision cuts. Very curious on what went wrong. I hear you on the filament feeding, had the same challange. I managed to shape the shorter distance tube in such a way that actually filament just "targets" the feeding hole perfectly. But I am thinking of combining the SideBox with the many available U1 PTFE Adapter designs on makerworld. Especially the ones with ECAS04 connectors, which have the smallest footprint.
1
Reply
Replying to @kaleen :
With the origin, I cut about 0.2mm closer all around, still didn't fit so I needed to trim that side, too. On the right side, the filament in the top hole did hit the feeder exactly. Could have been a lilttle bit of luck with the filament not curling too much. The others took a little manipulation, and I was a little concerned about them bending enough to not feed properly. I thought about connectors - might be a good approach. Right now, I don't have any tubes on the left side and feeding is OK. I might try using some of that silicone glue to hold the tubes in place and maybe cut a short one for the bottom as that's the hardest to get into the hole. I have less access on the left side of the machine (near a wall) and hoping I don't have to change the filaments too often. Maybe I'll park the black and white PLA on that side as I almost always have them loaded.
0
Reply
Replying to @ginjeff :
Ok, so the fit of acrylic will remain a mystery :) The DXF template dimensions are 250.6 x 463.1mm (2,4 narrower than inside of SideBox).
0
Reply
Great model, especially for U1 users that don't have much space on each side of the machine. Well thought out. I found the template for the acrylic to be off on one side, other side fit perfectly. To be clear, I realize it is half and needs rotated 180 degrees for the other half of the cover. However your model doesn't have the same dimensions between the two sides of the half model. I have taken the quarter of the template that fits perfectly and created a .svg file for those with Lasers and can provide that to you to attach to your model if you want it.
The designer has replied
0
Reply
Hi, I double checked the drawing template in my CAD software. Just to be sure we are talking about the template which helps drawing the lines and cutting using mitre-saw. Everything looks ok and both sides of the template are the same. Of course if you disregard the lip used for hooking to the side of acrylic. If you acrylic is 250.5mm as per instructions it should give you a good way to draw the edges to cut it (if you flip it and rotate it for the other side like in the video). Please note that for laser cutting there is another file - DXF made available and this one does not have this lip.
0
Reply
Replying to @kaleen :
I must have missed your laser template. I’ve already created an svg file the provides a .5 mm clearance all around. Cut the acrylic, used a forstner bit to counter sink some 2 mm magnets into 3mm acrylic. Thanks again, great model.
0
Reply
Replying to @SmithKrenning :
Ok. My laser cutting template has only 1.2mm clearance all around (2.4 in total) I think 5mm is too much and part of the TPU seal/magnets may be exposed?
0
Reply
What size screws and what size magnets
The designer has replied
0
Reply
At this moment all needed parts and tools are listed in the course of the video assembly guide, I will add BOM in a week time.
0
Reply
The other screws are mentioned in 3:15 of the video - 2.5x6mm and 8x3 magnets for the lid
0
Reply
Boosted
Love the clever idea of tpu printed seal on top of box... I will probably use PETG as main material (since its more functional and it also bonds well with tpu). Desiccant box could be bigger... Any chance getting DXF (or any vector) file for acrylic cover, i want to get it laser cut?
The designer has replied
2
Reply
Hi thanks, sure I will upload the vector file later today. Larger desiccant box will not fit over the vent exrensiions.
1
Reply
I got it made; it's a bit rough, but made and saving my filament. First time cutting plexiglass manually, it ain't easy. My setup: Snapmaker SnapSpeed PLA Gray, no TPU for the seal, double-sided foam tape, 0.1" plexiglass from ACE Hardware, thread-forming screws from MakerWorld. It fits quite well, just a couple of mm left on the inside to give some wiggle room. I didn't use TPU or any sealant on the plexiglass and I have been able to get the left side down to 20% RH in my 55%RH room. On the right side, I didn't put any double-sided tape around the fan inlets, and that one hovered around 40% RH. I took them out and put the tape on them, got it down to 20%.
The designer has replied
0
Reply
Proper thread-forming screws are hard to find. I searched on Amazon, Alibaba, none of em had the right kind. A couple of industrial sites do, but its 1000 count orders. You need ones with flat bottoms for max strength. You need to use the right size magnets, 8mm for sure. PRO TIP: heated tip from plastic iron @ 356F for 30 secs and then pry off wrong size magnets, the heat makes the magnet less magnetic :( Don't use Acetone, that leaves a residue that doesn't come off. Possible improvements: 1) make door on desiccant stay better, maybe a nub on the sides to hold it, 2) have hole for filament be wider or oval shaped to allow it to come from more angles from the spool 3) have filament hole line up better with feeder, bottom ones are a bit angled, 4) print issue I ran into with the vent part, was not good adhesion on the bottom part away from the vent, I had to use my plastic iron to smooth it out, My supports didn't work that well to stop it from just being strings of loose filament.
0
Reply
Hi, sounds great! Thanks for your feedback! 👍🏻
0
Reply
Hi @kaleen ! Great model. If needed how would one remove the silicone from the printer/printed parts to remove it from the u1 without damaging?
(Edited)
The designer has replied
0
Reply
Hi, same way you remove it from other fixtures - using thin wire or fishing rope to cut it, and then a plastic scraper to remove the leftowever away. But if you are thinking to remove the SideBox then consider using double sided tape - it is a little more difficult to apply but easier to remove, probably will let go with a little plastic prying tool.
1
Reply
Replying to @kaleen :
Great, I was unsure it could reliably be held with double sided tape. I'll try that first. Also I'll have to modify it a little. The magnets I have are 5x3 and 8x3, and I'll try to print a cover, because plexiglass is hard for me to cut right now especially that big. Any tips on how to enlarge the magnet holes ? Thank you!
(Edited)
0
Reply
Hello Kaleen, The model is awesome. Unfortunately, I printed the parts without the TPU gasket and I don't know what gasket I can use between the plexiglass and the model. Do you have any idea which gasket would work best here? Double-sided tape is unsuitable for this, but in my opinion, an adhesive with a sealing, but not sticking top material would make sense. I just have no idea what is suitable for it. Thank you very much and best regards
The designer has replied
Show original
0
Reply
Narrow Electrical tape or ventilation tape attached carefully to the border (perimeter) of acrylic glass worked for me in the past for simular applications. (Eg sealing plastic containers).
0
Reply
Replying to @kaleen :
Hey kaleen, thanks I’ll try it.
0
Reply
Is it possible for you to sell a premade ore just the acrylic panels I would be super interested mtebot1-promo@yahoo.com
The designer has replied
0
Reply
Hi Matthew, not sure where you're from, but nowadays in virtually every country there are services where you can order plexiglass already cut to size. The template for this is attached in download-STL/CAD files section.
0
Reply
Replying to @kaleen :
Thank you
0
Reply
would be good if magnets are not in the same groove where seal is.
The designer has replied
0
Reply
This is on purpose - to have the forces closest to the seal. My test show this is very airtight. Aslo - Magnets are little below the seal level.
(Edited)
1
Reply
Replying to @kaleen :
ah OK great thanks!
0
Reply
hello, I don't understand how the temperature is managed and where the hot air comes from, thank you
The designer has replied
Show original
0
Reply
Hello, "Drybox" is not a filament dryer, but a reinforced airtight container; it has no active drying function
Show original
0
Reply

License

This user content is licensed under a Standard Digital File License.

You shall not share, sub-license, sell, rent, host, transfer, or distribute in any way the digital or 3D printed versions of this object, nor any other derivative work of this object in its digital or physical format (including - but not limited to - remixes of this object, and hosting on other digital platforms). The objects may not be used without permission in any way whatsoever in which you charge money, or collect fees.