Aligned engravings - laser pointer for Falcon A1 Pro


Print Profile(1)

Bill of Materials
- modules laser focalisables - Laser croisé x 1: Réglable - Rouge - 3-5 V - 650 nm
- inserts M3 x 1:
- Vis M3 nylon x 1: Autre matière ok
Description
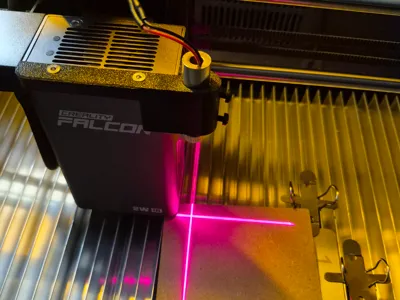
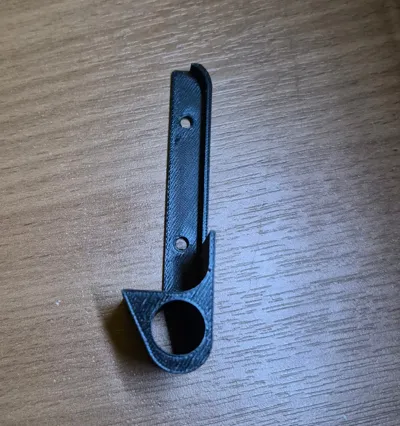
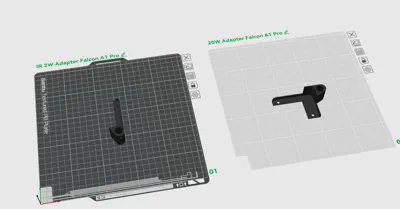
Cross Laser Pointer – Creality Falcon IR 2W + Creality Falcon 20W - For ultra‑precise centering in LightBurn
I work in LightBurn with a Falcon A1 Pro 20W, as well as an IR 2W laser head. I needed a reliable way to perfectly center my engravings, especially on very small plastic or metal parts
The camera offers good accuracy once calibrated, but centering a pattern on a 2 cm diameter part can sometimes be tedious
The 20W head allows the laser to be turned on at low power in LightBurn for positioning, but the IR 2W head does not: the infrared beam is invisible to the eye, and the integrated pointer only lights up during framing
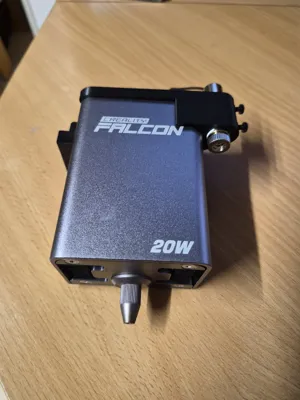
My goal was to add a cross laser pointer to the IR 2W head to get a perfectly visible cross on the bed, then use the Pointer Offset setting in LightBurn to achieve highly precise centering
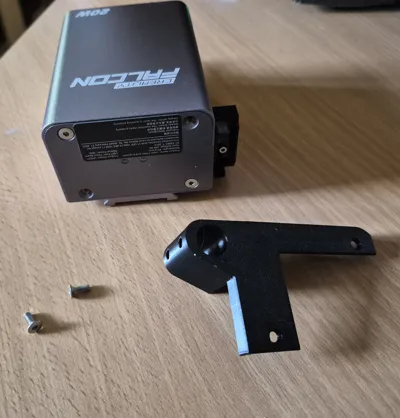
Having found no IR 2W compatible model, I designed this adapter in Fusion 360, which I am sharing with you here
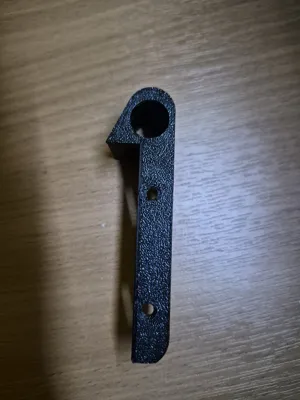
I also added my adapter for the 20W head on the 2nd bed, also made in Fusion 360. Also simpler for centering
The difference is that this second adapter also attaches with the original screws, but one screw is front left, and the other is rear right (the front right screw is not recommended to remove!).
Design & installation :
Attachment :
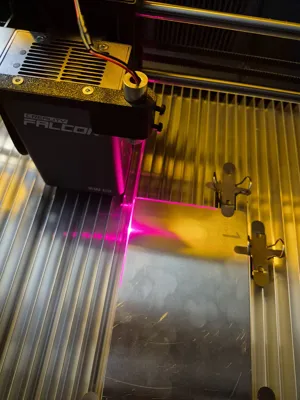
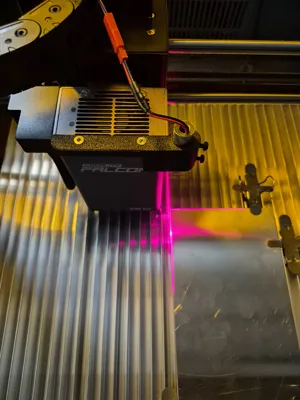
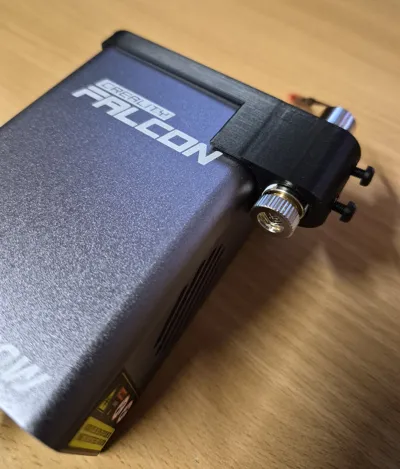
The adapter attaches with the 2 original screws located at the front (see photos), on the 2W head and 2 original screws (one front left and the other rear right) on the 20W head
No other screws needed
The holes are chamfered to perfectly accommodate the original heads and maintain a clean finish
IR 2W and 20W laser pointer passage :
- Hole diameter : 12.70 mm
- Pointer diameter used : 12.10 mm
- Adapter height : 24 mm
- Width : 73.70 mm
- Left side cutout to not obstruct the machine's removable connector
Laser retention :
- Two 3.6 mm holes allow M3 inserts to be installed
- I use two M3 nylon screws to secure the pointer without damaging its tube
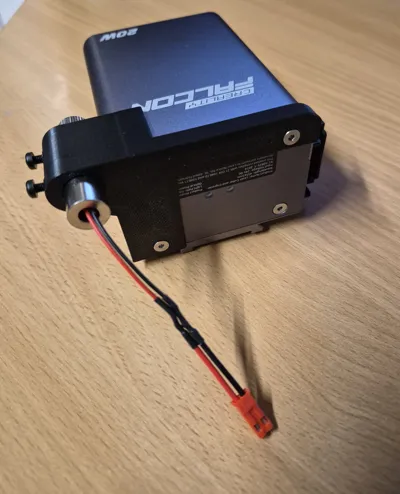
Clean wiring :
- The pointer operates between 3 and 5 V
- I ran a 2-wire sleeved cable through the original rack for a discreet and secure installation
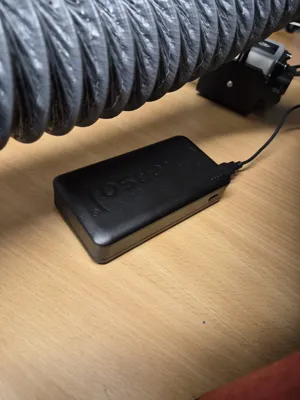
- For power, I placed a power bank under the machine. A small hole in the bed + a cable gland to protect the cable. I then soldered a USB‑A plug to it on the outside
- Alternative : Place a power bank directly at the back of the machine if you do not wish to drill
LightBurn setup (I am also including screenshots of LightBurn in French and English in the photos)
1 ) Preparation
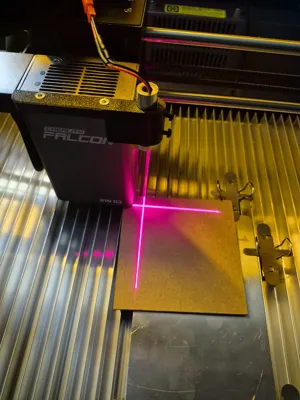
- Place a material (plastic or metal for the IR 2W head as it is an IR laser. I personally tested on an aluminum plate as well as on a plastic plate 3D Printed in PLA with my Bambu Lab X1C 3D Printer). For the 20W head, wood cardboard or any other compatible materials
- Turn on the laser pointer
- Make a dot with a marker at the center of the cross
- In Device Settings → Basic Settings, disable Enable Pointer Offset
2) Test engraving
- Create a 20 × 20 mm square
- Set up the engraving according to your material for IR engraving or other, depending on the head used
- In Start From, choose Current Position (never Absolute Coordinates)
- Job origin : bottom left corner
- Start the engraving
3) Measurements
- Measure :
- X = horizontal distance between the bottom left corner of the engraved square and the fine marker dot
Y = vertical distance between the base of the square and the marker dot - Note :
- If the square is engraved above the dot → Y negative
If the square is engraved below → Y positive
- If the square is engraved above the dot → Y negative
- X = horizontal distance between the bottom left corner of the engraved square and the fine marker dot
4) LightBurn adjustment :
- In Device Settings, enable Pointer Offset and enter your X and Y values
5) Verification :
- Perform a test engraving again
If necessary, adjust X and Y for fine-tuning (repeat the operations described above, the values will be very small and will allow for optimal adjustment. If the initial measurement was done correctly, it might no longer be necessary to adjust
- Once calibrated, simply place the bottom left corner of your piece on the center of the cross: the engraving will be perfectly centered
- After numerous tests, even when changing laser heads or materials, the precision remains constant
- Note that it is necessary to calibrate for each thickness (the laser pointer being offset from the main laser, the geometry changes (focal distance), which causes a slight offset. I recommend performing a calibration test for each thickness as indicated above and keeping a list of your thicknesses with X and Y values and according to the head used, on paper or an Excel file. This way, each time you need to engrave, you will only have to enter the correct X and Y values before starting the engraving. A little work to do at the beginning, but afterwards, once your material library is set up, working with the pointer is a real pleasure
I also spoke with the LightBurn developers, who are very responsive. They confirmed to me that regular improvements are planned
I don't know, but perhaps one day, thanks to AI, the camera will offer such precision that this type of pointer will no longer be necessary
In the meantime, this solution has allowed me to achieve remarkable precision with the IR 2W and 20W heads, and I am happy to share it with you if it can help you
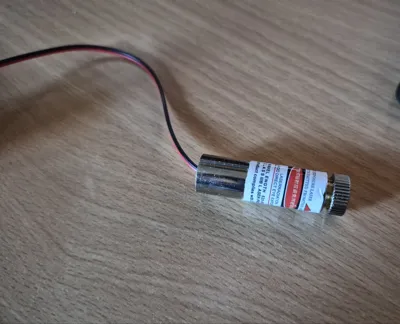
Information on the laser pointer used :
Type : focusable cross laser
Voltage : 3 to 5 V
Power : 5 mW
Wavelength : 650 nm
Safe for use : Does not burn materials, but remains dangerous for the eyes, never point the laser beam at the eyes !!!
Pack of 4 bought ~€10.60 on Amazon
Probably cheaper if you find them individually
Compatibility :
- 100 % compatible Creality Falcon IR 2W and 20W
Usage tips :
- Use a cross pointer for optimal centering
- Route the cable through the rack to prevent snagging
- Use nylon screws to avoid crushing the pointer tube (other screws are possible but be gentle when tightening)
- Check that your pointer is ≤ 12.50 mm in diameter
- Don't forget to turn the laser pointer head for focus and also to level the cross
- An excellent video tutorial exists for setting the pointer offset on Falcon 2.
A video is sometimes clearer than text. Here is the YouTuber's link : https://www.youtube.com/watch?v=Vg3BnQKk0Ww
Important note :
Please note that framing in LightBurn does not take into account the laser X - Y offset on the Falcon. It is during engraving that your offset setting will take effect!
Happy printing and engraving to all!
Boost Me (for free)
Your boosts, comments, and shares are much more than a click: they encourage me to refine my models and offer useful parts. Thank you very much for your support!
For one-time support and to help me create more, you can also buy me a coffee here:

License
You may create derivative works based on this object, provided that all such derivative works are published exclusively on the MakerWorld platform and include proper attribution to the original creator. You may not share, upload, host, distribute, or publish this object—or any derivative work of this object—on any other digital platform, marketplace, or distribution channel. Commercial use of this object and any derivative works is strictly prohibited. This includes, but is not limited to, selling, renting, sublicensing, or using the object in any context in which you receive monetary compensation or other financial benefits.
Comment & Rating (0)