Durandal | Fire Emblem: The Blazing Blade


Print Profile(1)
Description
If you like my stuff and got a Boost, why not toss it my way? Every bit I get
helps me to do this full time.
Boost Me (for free)
Press this button to use a Boost Token to give me a free dollar!
And if you're interested in purchasing a Commercial License Membership, check it out here!
Membership
Click here to get the rights to sell prints of my models yourself!
Sorry for the interruption; on to the Meat and Potatoes!
Durandal, The eponymous Blazing Blade of the 7th entry in the Fire Emblem series of video games; the chosen weapon of the Little Knight Roland of the Eight Legends of Elibe used to decisively end the war against the dragons, his descendent Eliwood to foil Nergal’s plot to summon dragons to the continent, and by the forces of his son Roy to prevent King Zephiel of Bern from bringing the world ruin at the hands of the Demon Dragon Idunn.
It’s killed a lot of dragons.
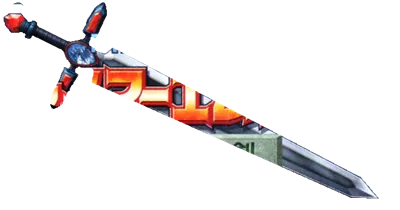
Overall, I wanted to challenge myself to make a sword based solely off of 2D images. I’ve done many models using the actual 3D models ripped from the game as templates, but as Durandal is from a GBA game with a protagonist that’s seen very little love through the entire franchise, it’s never received an official 3D model. So, I thought I’d give it some recognition in the form of this model.
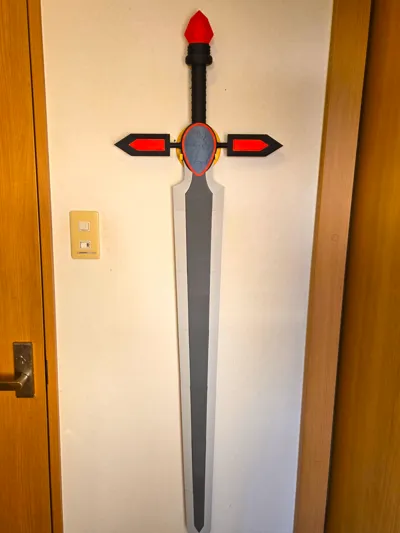
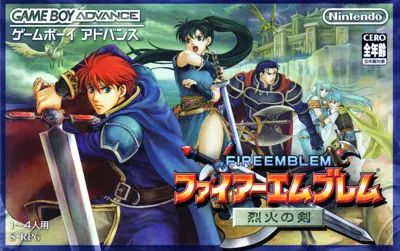
I’ve made this sword primarily based off of the box art for the Japanese version of Fire Emblem: The Blazing Blade, and created it to be printable without AMS and without the need for copious amounts of glue. It’s also designed to be as foolproof as possible–all the parts are either physically unable to be attached incorrectly, or if you do assemble them wrong, make it really obvious that you did.
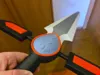
Included as well is a custom wall hanger for the sword modeled after the Heaven Seal item from the same game.
That being said, it is possible to put certain pieces together in the wrong order, so I highly recommend watching the assembly video directly below for guidance. There is also a short video detailing my process of making the model, should you be interested! Written description of the model can be found below the videos.
Assembly:
The Making of Durandal:
History of Durandal: Coming Soon
Parts List
Files:
- DurandalSTEP.step - A STEP file containing the sword and its hanger in one convenient file.
- X1CDurandal3MF.3mf - A 3mf file designed in BambuStudio with all the settings I used when printing the model myself. Made with the X1C preset, but can be changed to and used with any BambuLab Printer other than the A1 Mini.
- ReducedX1CDurandal3MF.3mf - A 3mf file with the Left and Right Blade 1, Handle, and Center pieces slightly reduced in resolution to get the file size below 200 MB.
Filaments:
All filaments listed are BambuLab PLA.
- Basic Dark Grey (Core of the Blade)
- Basic Light Grey (Edge of the Blade)
- Basic Blue Grey (Insignia in the Center of the crossguard)
- Matte Charcoal Black (Majority of the handle and crossguard)
- Matte Scarlet Red (Decorative parts such as on the pommel, crossguard, and around the insignia)
Printed Parts:
Special Print Instructions:
All parts printed without infill noted are 5%.
- Blade
- Core1 - Dark Grey, 20% infill
- Core2, 3, 4, 5 - Dark Grey
- BladeL/R1 (2 Pieces) - Light Grey
- BladeL/R2 (2 Pieces) - Light Grey
- BladeL/R3 (2 Pieces) - Light Grey
- BladeL/R4 (2 Pieces) - Light Grey
- BladeL/R5 (2 Pieces) - Light Grey
- BladeL/R6 (2 Pieces) - Light Grey
- Blade7 (sword tip) - Light Grey
- BladePegs (x5) - Any Color, 20% infill (note that one of the pegs will be entirely within the Handle)
- Crossguard
- Left/Right Crossguard Rods (2 pieces) - Charcoal Black, 20% infill, brim recommended
- Left/Right Arm (2 pieces) - Charcoal Black
- Left/Right CrossguardPeg (2 Pieces) - Any Color, 20% infill
- Left/Right Top/Bottom Red (4 pieces) - Scarlet Red
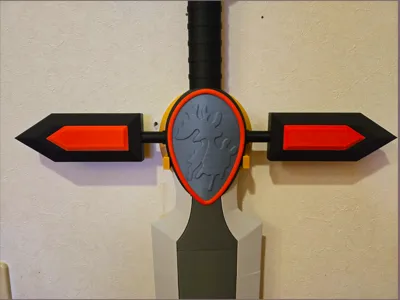
- Insignia
- Center - Blue Grey, 20% infill, supports on
- CenterCollar - Charcoal Black, make sure supports are on specifically for the overhang at the open mouth. Supports on
- Handle
- Handle - Charcoal Black, 20% infill
- Pommel - Scarlet Red, 20% infill
- Handle End - Charcoal Black, 20% infill
- Wallmount
- Wallmount - Gold
- Wallmount Pegs (x2) - Any Color, 20% infill
Non-Printed Parts:
- Glue/Superglue
Assembly
Intro:
Overall, this model has been designed to minimize the amount of mistakes that can be made by ensuring that parts either cannot physically fit together in the wrong orientation, or are extremely obvious that they’re not supposed to go together in that way, in the case of the Blade Core pieces.
However, due to how certain pieces lock others in place, you can assemble them in the wrong order, so make sure you follow the instructions step-by-step to avoid glueing something in too early and locking other pieces out.
Accordingly, with the exception of a few of the red decorative pieces, the vast majority of pieces fit snugly together without glue. However, it’s probably still a good idea to use some form of glue to make sure pieces don’t get knocked loose during use or assembly.
Also, as always, I recommend dry-fitting everything together before glueing them together permanently. This is just general advice, but sometimes you don’t notice a rogue glob of filament or that you’re trying to put the wrong pieces together, and you accidentally glue the right parts together halfway or the wrong pieces together. Not fun!
Instructions:
- Remove all support structures and brims from all pieces.
- Put one of the BladePegs into the Core2 (in the hole next to the reversed “1”), and use that to attach it to the Core1, in the face that has the none-reversed “1” on it. All the Core pieces have non-reversed numbers written on the faces that correspond with reversed numbers on other Core pieces. While they are symmetrical, you can use these numbers as a guide to tell which piece goes where.
- Attach the Left and Right Blade1s to the sides of the assembly. They should be clamping the two Core pieces together.
- Take the Center, and put the CenterCollar around it. It’s a pretty loose fit.
- Insert the Blade assembly into the Center assembly. The Blade edges should insert into the depressions in the CenterCollar.
- Insert the Handle into the bottom of the assembly. The diamond-shaped holes in the sides should line up with the ones in the blade’s Core, and should be visible through the round holes in the side of the Center.
- Insert the two CrossguardPegs in either side of the Assembly, into the holes in the Center and all the way through the holes in the Core1 and the Handle. Make sure it goes all the way in. These pegs prevent the handle or Core from falling out of the Center.
- Insert the CrossguardRods into the holes in the side of the Center and CenterCollar, thick side in. Make sure they are oriented correctly; the two triangles protruding from the circular hole in the Center are different sizes. Once inserted all the way, you should no longer be able to see the triangular slots in the side of the Rods. The CrossguardPegs should still be sticking out.
- Insert the 2 Arms onto the ends of the Rods/Pegs. These are symmetrical, so it doesn’t matter which way they go on.
- Insert the 4 Red pieces into their slots on the Arms. These don’t fit in snugly, so they’ll need some glue. The crossguard is done!
- Moving back to the Blade, each of the 4 remaining Core pieces can be joined by BladePegs, and then secured together with their corresponding Blade pieces. Each of the Core pieces’ faces are numbered, and are clearly separate sizes, so use that information to match them up appropriately. All of the Blade pieces also have differently-sized/shaped holes in them, so it’s rather difficult to put them in the wrong places.
- Slide the Blade7 over the tip of the assembly. You may want to glue this one in place.
- Let’s shift back to the Handle. Insert the final BladePeg into the Handle, then slide on the HandleEnd, and finally the Gem. These should fit snugly into each other via the nubs protruding from the Handle and HandleEnd. The handle is done!
- Lastly for the actual sword, lay the 2 RedTrims on either side of the Center around the dragon insignia. There’s a little divot there to help line it up, but you’ll need to glue it down to prevent it from falling off.
- Finally, finishing up the WallHanger, flip it over and insert its two pegs into the holes in the back. The fit is really snug, so you may need to use a mallet to tap it down in. These pegs help reinforce the arms, to prevent them from snapping along the layer lines.
- Measure the space in between the holes in the back of the WallHanger and pound in nails/attach adhesive hooks on the wall to match the space between the holes. Use them to attach the WallHanger to the wall, and hang Durandal up by the CenterCollar as seen in the attached photos.
- Enjoy your new sword!
Conclusion:
This took me wayyy longer than I originally anticipated; I created it in about two weeks initially, and then only after I literally printed the entire thing out, I found the Japanese box art with the clear-as-day profile of the original, official sword. So, I took another week to readjust it to look better as well as to make it much sturdier. I reprinted the entire thing in white to check, and even then had to make some final adjustments to the design of some pieces to put them together.
Only then, finally, I was able to create the version that is available for download, so I would really appreciate any support I can get! Please like, share, boost, and print this model so that it can get as many eyes on it as possible.
Thanks as always for checking out my stuff, and I’ll see ya next time!
Byyyyyyyyeee~
Comment & Rating (0)