Teleprompter for tablet, phone or screen (Modular)


Print Profile(5)


Description
Overview
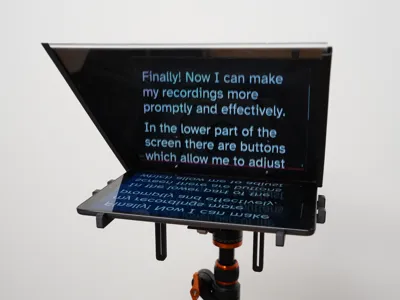
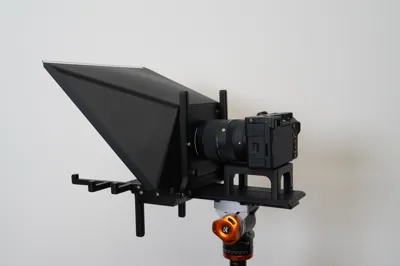
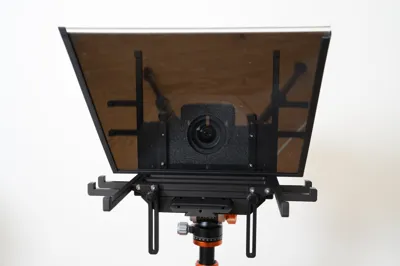
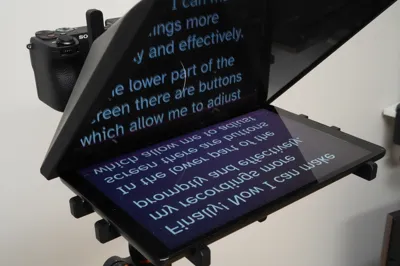
This teleprompter is a modular solution designed to work with various devices and setups. Put your screen (tablet/phone) in the holder and your camera on the mount. You will be able to read the mirrored image of the screen from the front while the camera will not see it from the back.
Compatibility & Features:
- Dual Mounting: Options for mounting on the camera lens or a tripod.
- Camera Compatibility: Adjustable for different camera sizes and heights.
- Screen Compatibility: Works with mobile phones, tablets (iPad, Galaxy Tab, etc.), and various other screens.
- Adjustable: Supports both larger and smaller displays (I use a 10.1" Samsung SM-T510).
- Modular: Exchange parts for different mounting options and screen sizes.
- Customizable: The design can be scaled or modified to fit your specific needs.
Hardware & Requirements:
- Supports: None (All parts are designed to print support-free).
- Material: Black PLA recommended (to minimize internal reflections).
- Fasteners: M3 screws and nuts.
- Glass: 2 mm Acrylic or Plexiglass (tested and works perfectly).
Mounting
The teleprompter is modular and can be built for different mountings. Two major mounting configurations are described below but you can mix and match parts to find your own mounting.
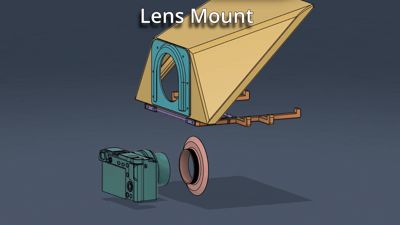
Lens mount
Using this mount the teleprompter will hang off the camera lens. This makes it easy to attach and remove the teleprompter without having to move the camera. This is great if you are using a light weight screen such as a mobile phone. It also works with larger screens but more weight will be put on the camera lens.
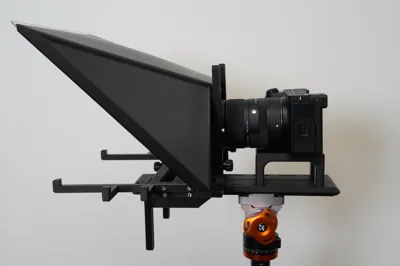
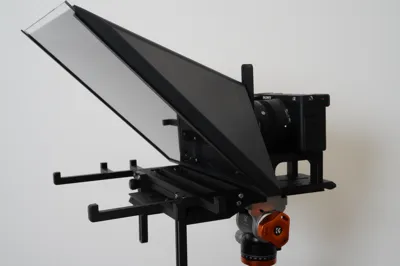
Tripod mount
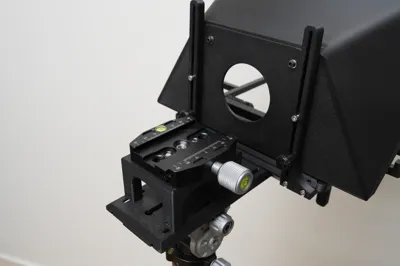
Using this mount both the camera and the teleprompter is attached to an Arca-Swiss style mount on a tripod or something else that supports Arca-Swiss style. The printed "Swoosh Plate" part is mounted on the tripod and then both the camera and the teleprompter are mounted on the "Swoosh Plate" part. This allows for attaching and removing the teleprompter while still keeping the camera mounted to the tripod. It also allows access to the camera so it can be operated while the teleprompter is attached which significantly improves the workflow. This mounting type is very stable and can be used for large and heavy screens.
Printing
What to print depends on which mount (lens or tripod) you will be using. The description here is for the standard models but it is also possible to make a custom sized model (see more below). There are several files:
Complete Lens Mounted Teleprompter
This file has all the parts needed to print a teleprompter that is mounted to the camera lens. It holds a screen of max 190 x 100 mm. The included ring works for 55 mm diameter lenses. The glass size needed for the included hood is 180 x 180 mm. If your lens has a different diameter or your screen is larger then check below for more options.
Complete Tripod Mounted Teleprompter
This file has all the parts needed to print a teleprompter that is mounted to an Arca-Swiss style tripod. It holds a screen of max size 247 x 152 mm. The included backplate is for 55 mm diameter lenses. The glass size needed for the included hood is 250 x 240 mm. If your lens has a different diameter or your screen is larger then check below for more options.
Lens Ring Alternative Diameters
This file has lens rings for 49, 52, 55, 58, 62, 67, 72, 77, 82 mm diameter lenses. These are used for the lens mounting type. I couldn't enable other diameters using customize button because customization of threads did not work. Let me know in the comments if you need a different diameter.
Plain Backplate Alternative Diameters
This file has plain backplates for 49, 52, 55, 58, 62, 67, 72, 77, 82 mm diameter lenses. These are used for the tripod mounting type. If your camera sits lower than the hole placement or your lens have a different diameter you can create any hole placement and diameter using the customize button.
Swoosh Plate Alternative Lengths
This file has swoosh plates of length 100, 150, 200, and 250 mm. You can connect multiple swoosh plates with M3 screws and nuts to make it longer. If you need other lengths, use the customize button.
Assembly
Common Assembly
The assembly differs depending on the mounting type but this first phase is the same. For this phase of the assembly you will need:
Printed parts:
- 1 pcs Printed "Hood" part.
- 1 pcs Printed "Screen Plate" part.
- 2 pcs Printed "Screen Arm" parts right/left.
Hardware:
- 7 pcs M3 nuts.
- 3 pcs M3x10 screws.
- 4 pcs M3x14 screws.
- 1 pcs of glass 2 mm thick (Acrylic/Plexiglass works well). For the tablet the size is 25x25 cm, for phone the size is 18x18 cm. If you customized the "Hood" part then use the size you entered there.
Instructions:
- Insert 3 pcs of M3 nuts to the bottom of the "Hood" part.
- Mount the "Screen Plate" part onto the "Hood" part using 3 pcs of M3x10 screws that engage with the previously inserted nuts.
- Insert nuts into the inside of both sides of the "Screen Plate" part.
- Mount the "Screen Arm" parts to both sides of the "Screen Plate" part using 4 pcs of M3x14 screws that engage with the previously mounted nuts.
- Cut the glass to the required size.
- Slide the glass into the "Hood" part (after all assembly below is completed).
After you complete this assembly continue with either the Lens or Tripod mount assembly below.
Lens Mount Assembly
Printed Parts:
- Common assembly as described above.
- 1 pcs Printed "Lens Backplate" part.
- 1 pcs Printed "Lens Ring" part that fits your camera.
Hardware:
- 6 pcs M3x8 screws.
- 6 pcs M3 nuts.
To find the correct size for the "Lens Ring" part check your camera's lens. In most cases there is a diameter written somewhere on the lens.
Instructions:
- Insert the 6 pcs M3 nuts to the inside of the "Hood" part.
- Mount the "Lens Backplate" part to the "Hood" part using 6 pcs M3x8 screws that engage with the previously inserted nuts.
- Screw the "Lens Ring" part to the Camera's lens.
- Slide the "Lens Backplate" part onto the "Lens Ring" part.
Tripod Mount Assembly
Printed Parts:
- Common assembly as described above.
- 1 pcs Printed "Plain Backplate" part.
- 2 pcs Printed "Slider Front" parts left/right.
- 1 pcs Printed "Screen Plate" part.
- 2 pcs Printed "Slider Back" parts left/right.
- 1 pcs Printed "Swoosh Mount" part.
- 1 pcs Printed "Swoosh Plate" part.
- 1 pcs Printed "Camera Riser" part.
Hardware:
- 22 pcs M3 nuts.
- 2 pcs M3x8 screws.
- 4 pcs M3x14 screws.
- 16 pcs M3x16 screws.
Instructions:
- Insert the 6 pcs M3 nuts to the inside of the "Hood" part.
- Mount the "Plain Backplate" part to the "Hood" part in the top 2 holes using 2 pcs M3x8 screws that engage with the previously inserted nuts. Leave the other 4 holes empty for now.
- Slide 4 pcs M3 nuts into the holes at the front of the existing top "Screen Plate" part that was previously mounted onto the "Hood" part during the common assembly. Make sure an edge of the nut points upwards so the sides of the nut are flat against the hole's sides, otherwise the nut will not fit in the hole.
- Attach "Slider Front" parts to both sides of the same top "Screen Plate" part using M3x14 screws that engage with the previously inserted nuts. See pictures for left/right orientation.
- Insert 4 pcs M3 nuts into the holes at the back of the bottom "Screen Plate" part that is new for this assembly.
- Insert 2 pcs M3 nuts into the inner front holes of the bottom "Screen Plate" part. These will be used for the front sliders later.
- Attach "Slider Back" parts to both sides of the bottom "Screen Plate" part using 4 pcs M3x16 screws that engage with the previously inserted nuts. See pictures for left/right orientation.
- Insert 4 pcs M3 nuts into the inside of both sides of the "Swoosh Mount" part.
- Attach the "Swoosh Mount" part to the bottom "Screen Plate" part and secure it using 4 pcs M3x16 screws that engage with the previously inserted nuts.
- Attach the "Plain backplate" part to the "Slider Back" left/right parts by putting 4 pcs M3x16 screws loosely in place in the remaining holes so the "Hood" part can slide up and down along the "Slider Back" parts. When the hood is at the desired height tighten these screws. You can also use thumbscrews for two of the screws to make it easier to adjust the height later.
- Secure the front sliders using 2 pcs M3x16mm screws. Or if you used thumbscrews for the back then use thumbscrews here also.
- Insert 4 pcs M3 nuts into the legs of the "Camera Riser" part.
- Attach the "Camera Riser" part to the "Swoosh Plate" part using 4 pcs M3x16 screws from the underside that engage with the previously inserted nuts.
- Attach the Camera onto the "Camera Riser" part using for example a 1/4" x 20 screw. Fix the "Swoosh Plate" part to the tripod using the Arca-Swiss style clamp. Slide the teleprompter assembly onto the "Swoosh Plate".
Custom Measurements
You can use the customize button to generate a new model that fits your camera and screen perfectly. Although you can customize many parameters the intended use is for these cases:
- Different screen holder size. Adjust parameter screen_width and screen_height and then print only the "Screen Arm Right/Left" from the customized model.
- Different Glass size. Adjust parameters hood_glass_width and hood_glass_height and then print only the "Hood" part from the customized model.
- Plain backplate lens alignment (tripod mount only). If your camera sits too low for the hole in the plain backplate, adjust parameter plain_backplate_hole_pos and then print only the "Plain Backplate" part from the customized model.
Tools and tips
To make it easier to attach and remove the camera you can buy an Arca-Swiss plate and attach that to the "Camera Riser" part. See below for a link where to purchase. There are also models of this you can print like this one: https://makerworld.com/en/models/557659
In many places you can use longer screws than specified. In some places you can use washers for better durability, for example the 2 permanently fasted screws of the backplate and the attachment of front and back sliders.
It is preferable for the nuts and screws visible inside the teleprompter to be of black color because they will be seen through the glass and may be distracting. You can also paint regular screws with a black marker.
If you want the sliders to be easier to adjust you can get thumb screws for the bottom of the back slider screws and for the front sliders (4 thumb screws in total).
Suggested Material and Tools (affiliate links):
- Arca-Swiss plate: https://amzn.to/3Nz0TRP
- Acrylic glass cutter: https://amzn.to/4t36Ar9
- Thumb screws: https://amzn.to/4jZpH1r
- Black M3 screws: https://amzn.to/49FoCZ2
- Acrylic glass: https://amzn.to/3NCEQcV
- Regular M3 Screws: https://amzn.to/4rjol44
How to use
An easy way to get started is to use the free Teleprompter Mirror site. But there are many other apps and sites that can be used. If you want to advance the text using speech I found that speakflow works well (not sponsored).
To show the image on the tablet/phone you can either use an app directly on the device or you can use it as a second screen for your PC. On Samsung tablets, the "Second Screen" feature is available for free. However, I have found that the SuperDisplay app is more stable for this purpose, though it is a paid app (not sponsored).
To display the text on your PC monitor and also have it on the second screen you can use OBS projection. To use this set up a scene in OBS with display capture on your primary display, choose flip vertical, then right click and select project to the tablet display. Now you can have the text on your primary display and also the same mirrored text on the tablet.
License
You may create derivative works based on this object, provided that all such derivative works are published exclusively on the MakerWorld platform and include proper attribution to the original creator. You may not share, upload, host, distribute, or publish this object—or any derivative work of this object—on any other digital platform, marketplace, or distribution channel. Commercial use of this object and any derivative works is strictly prohibited. This includes, but is not limited to, selling, renting, sublicensing, or using the object in any context in which you receive monetary compensation or other financial benefits.
Comment & Rating (13)