Zipper Slider Replacement - V3


Print Profile(2)

Description
This is a 3D printable replacement slider for both standard and reverse bale zippers. A key feature is that it can be installed without needing to unsew the zipper ends. Reverse bale zippers (identified by the U-shaped bottom) are are usually found in water resistant zippers.
This is a complete redesign. The primary weakness of the previous version was the connecting pin's reliance on Z-layer adhesion for strength. This has been addressed by printing the pin in the upright (vertical) orientation, dramatically increasing its strength. To support this print orientation, integrated support structure is included in the model. The built-in support generally works better than slicer-generated supports, but can easily be removed if you prefer to use your slicer's supports.
To make slightly more room for the connecting pin I changed the design to use a rounded head. This also gave the option to increase the length of the rails for improved zipper guidance for smoother operation.
Another improvement is that all the different parts are now provided as a single, unified STEP file for each different dimension, simplifying slicing and printing.
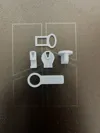
There are two different pullers included: a large one which can be used standalone and a smaller one with a loop for attaching a puller cord.
For those interested in the previous version, it can be found here for the Standard version and here for Reverse.
Dimensions:
The replacement sliders are available in multiple dimensions to accommodate different zipper sizes. The following measurements have been tested and found to be effective. If the slider doesn't fit perfectly, slight scaling in the X-axis (0.1-0.2mm increments) can often resolve the issue.
Standard Bale Dimensions (mm):
- 4.20 W x 2.00 H
- 5.50 W x 2.20 H
- 6.60 W x 2.60 H
- 6.80 W x 2.80 H
- 7.20 W x 2.80 H
- 9.80 W x 3.80 H
Reverse Bale Dimensions (mm):
- 4.60 W x 2.20 H
- 5.20 W x 2.20 H
- 6.50 W x 2.40 H
- 7.00 W x 2.80 H

Printing Instructions:
These parts are small and require precise printing. A well-tuned printer is highly recommended.
- Nozzle: Standard 0.4mm nozzle
- Walls: 3 walls
- Layers: 5 top layers and 5 bottom layers for a fully solid infill
- Layer Height: 0.2mm (the model is designed in increments of 0.2mm)
- Wall Generator: Arachne recommended
Assembly Instructions:
Due to the print orientation of the top and bottom slider halves, slight sanding of the connecting pin may be necessary for a smooth fit.
- Place the bottom slider half underneath the zipper teeth.
- Slide the top slider half over the bottom half and onto the zipper.
- While holding the two halves together, attempt to close the zipper. Having a section of the zipper closed can aid in assembly.
- Gluing: If the fit is satisfactory, apply a small amount of glue to the connecting surfaces of both slider halves and the handle attachment area. Carefully avoid getting glue on the zipper teeth. Do not use thin or runny glue.
- Attach the puller to the handle and place the handle on the zipper.
- Allow the glue to dry completely.
Depending on your printer's accuracy, the slider halves may already fit snugly enough to eliminate the need for glue. However, gluing the handle is always recommended.
Tip: Applying a silicone spray lubricant will help the slider glide smoothly!
Boost Me (for free)
Like this model? Give me a boost, encouraging me to make more useful models. Thanks for your support.
Comment & Rating (113)