Slot Machine Entrance Decoration Key Holder - Every day out is a gamble!


Print Profile(2)
Bill of Materials


Description
Boost Me (for free)
1. If you decide to print, be sure to check the installation notes and pictures in the model description. If you find installation difficult, you can watch the mechanical principle explanation in the last few minutes of the video, or private message me directly, and I will reply when I see it.
2. If you have any questions, feel free to private message me. Model making is not easy, please do not leave bad reviews casually.
3. Common sense: [Factors affecting model printing and installation tolerance: 1. Model file, 2. filament, 3. 3D Printer (build plate), 4. Printing ambient temperature. Everyone's files are the same, the difference lies in the latter three variables. If there is a problem with the file, everyone will fail. If others succeed but you encounter printer or tolerance issues, please check the latter 3 variable factors. The model file is an invariant and cannot interfere with these factors (especially evident in winter).]
- Update (January 30, 2026): Optimized gear spacing to prevent potential jamming when multiple "7"s are rolled. (Yes... I've been shaking it non-stop these past few days... Friends who still have installation issues are welcome to private message me, I'll help you solve them~)
- Update (January 29, 2026): Modified gear shape to reduce the possibility of gear collision caused by excessive spring force, making pattern rotation more durable and smoother. (Friends who have already printed can directly trim the original parts with flush cutters. If you need help, you can private message me~)
- Update (January 28, 2026): A short rod has been added to the operating lever (shorter than shown in the pictures). If you want to wall-mount it, it is recommended to choose the short rod to better prevent the lever from rebounding and hitting the wall when wall-mounted, which might cause it not to reset. Friends who have already printed the long rod and glued it in place and wish to shorten it can directly cut the rod with flush cutters about 3 cm from the bottom edge of the top red ball and print a new red ball to attach.
Model Introduction:
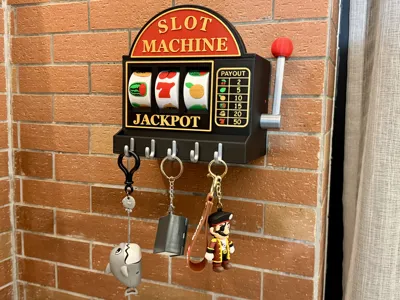
- A long time ago, I stumbled upon an AI video featuring a decorative key holder for an entrance door, with the caption "Every day out is a gamble." I found it very evocative. Every day before leaving, you can shake it to see your fortune; or shake it to decide what transportation to take or what car to drive. When you get home, you can also shake it to see who cooks, who mops, or who washes dishes today... At the time, I wanted to buy one, but upon inquiry, I learned it wasn't a real product but an AI video, so I gave up. This lottery machine contest reminded me of it, so I decided to bring it to life with 3D printing:
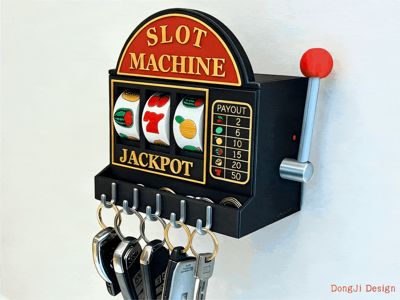
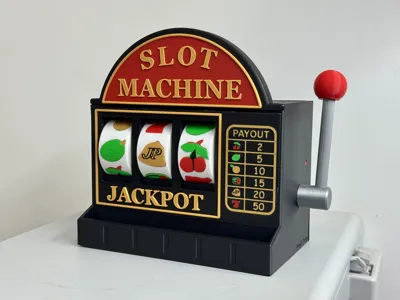
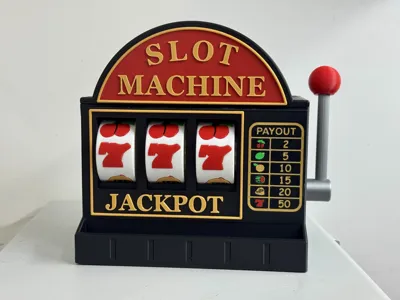
- It simulates the slot machines we played in arcades as kids: pulling the lever all the way down simultaneously activates 3 lottery windows to spin independently (instead of spinning only when released and rebounded). Releasing the lever allows it to reset, ready for the next draw, and so on. It also ensures that all fruit patterns stop in the correct position each time you draw: facing directly towards you.
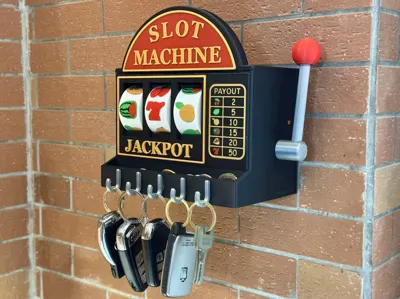
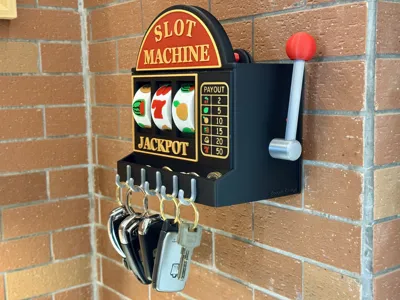
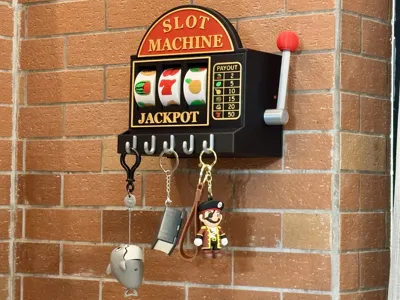
- The model can be wall-mounted (with screw holes or using strong double-sided tape, or nail-free adhesive), or placed directly on a desktop for play or as a decoration (without hooks). In front of the model, there is a row of hooks for conveniently grabbing keys or small items when entering or leaving. Above the hooks, there is a small storage slot for storing loose change, coins, various cards, and other small personal belongings.
- The model is entirely 3D Printed, requiring only super glue and magnets (magnets cannot be replaced; it's the most reliable and simple method I could think of).
- The movable top and back plates facilitate installation and disassembly (and removal from the wall), or allow for opening and replacement if internal parts show wear.
Gameplay Introduction (Usage Instructions):
- Gameplay: Pull the lever down firmly. The moment it reaches the bottom, three sets of rollers simultaneously begin to spin randomly and independently. Wait for them to stop naturally to see your luck. Release the lever, the lever resets, and prepares for the next "gamble".
- Note for wall mounting: Springs printed with different brands or types of PETG may have varying elasticity. After mounting on the wall, if the rebound force is too strong when releasing the lever, the lever might hit the wall, potentially causing reset failure. Solution: If the lever does not reset and engage, gently push it back with your hand to engage it. If the spring force is too strong, simply pull back a little when releasing the lever before letting go. For wall mounting, it is recommended to choose the short rod, which can better prevent the lever from rebounding and hitting the wall when wall-mounted, which might cause it not to reset.

Installation Instructions: (Newcomers or those unsure about their printing results can spend a few minutes printing the tolerance test file. If too tight or too loose, you can appropriately increase or decrease the X-Y inner contour dimension compensation. It is recommended to always have a windproof lighter on hand to solve all tolerance issues ღ( ´・ᴗ・` ))
- Model installation requires: super glue (oil-based original glue for a few dollars is recommended, cheap and effective), 23 magnets of 6X2MM in total (official strong magnets are recommended, many cheap magnets online have a huge difference in magnetic force! You can compare them yourself, too little magnetic force may cause the model to malfunction. For instructions on how to modify the magnet to be thicker or larger in the slicer software, see the tutorial below; smaller sizes can be glued directly to the center of the existing holes)
- One plate of parts in the file needs to be printed with PETG (springs and structural parts)
- Detailed installation diagrams are included in the appendix, please follow the steps one by one to ensure correct installation!
- Regarding spaghetti and warping: Mostly caused by decreased build plate adhesion (especially in winter when filament shrinkage intensifies, requiring higher adhesion). A frosted plate can be cleaned with a sponge and dish soap for a few minutes to restore adhesion. For large ambient temperature differences, it is recommended to use adhesive spray or a low-temperature plate.
- Regarding multi-color printing: Requires 4 types of filament that can fuse with each other! It is essential to use the same type of filament; PLA is recommended. Some PETG has poorer fusion than PLA, and colors can easily delaminate and not bond. Note! Some filaments (especially low-quality ones) have poor fusion due to the addition of many other ingredients. For example, some brands cannot fuse with Bambu Lab. Please choose brands with guaranteed quality.
- Regarding filament: It is recommended to use PLA Basic for the main body. Filaments like Lite, Matte, Wood, Silk, and some PETG have larger shrinkage tolerances (especially in winter); shrinkage strength increases from left to right. If you want to use these filaments, please increase the hole compensation (X-Y inner contour dimension) by 0.05-0.2MM in the slicer software. (Heating the holes with a lighter or heat gun can solve common installation tolerances)
Regarding the 3D Printer: For un-enclosed 3D Printers (A series), printing in winter leads to increased cooling of filament upon extrusion into cold air, causing a sharp increase in shrinkage. It is recommended to appropriately increase hole compensation (X-Y inner contour dimension) by 0.05-0.1MM based on your room temperature. It is also advised to maintain a stable ambient temperature during printing. (Heating the holes with a lighter or heat gun can solve common installation tolerances)

See appendix for detailed installation diagrams and notes
Since users' magnet specifications vary and may not match the author's preset specifications, a tutorial on how to modify the magnet installation holes to your required specifications is provided below:
I. Open this model's 3MF file with Bambu Studio slicer software on your computer, create a new negative part on the plate, and adjust it to your desired magnet size, for example, 5.1X3MM (requiring 0.1 to 0.2 tolerance);
II. Simultaneously select the newly created negative part and the model body to be modified, then click the assembly function button; selecting only the negative part is not allowed;
III. In the assembly function, select Face 1 (fixed) as the bottom face of the model's original hole, and Face 2 (movable) as the top face of the negative part, then click "center align." At this point, the negative part will be positioned at the opening;
IV. The original hole depth is 2MM. If the negative part height is 3MM, use the move function to move it 1MM towards the hole, making the hole depth 3MM;
V. Slice and print, and you will see the hole change to your required size in the slicing preview.
Documentation (1)
License
You shall not share, sub-license, sell, rent, host, transfer, or distribute in any way the digital or 3D printed versions of this object, nor any other derivative work of this object in its digital or physical format (including - but not limited to - remixes of this object, and hosting on other digital platforms). The objects may not be used without permission in any way whatsoever in which you charge money, or collect fees.
Comment & Rating (19)