Iris PokeBall fidget container


Print Profile(2)

Description
Overview
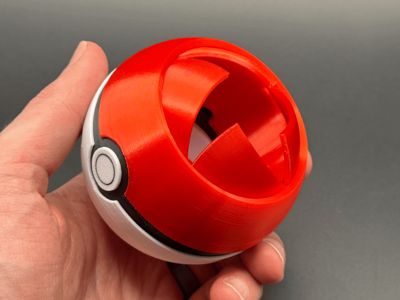
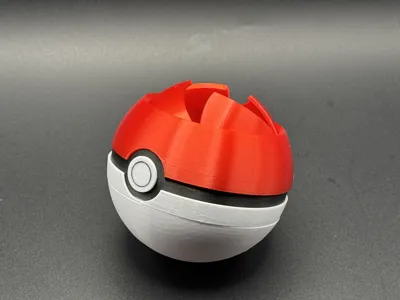
I've made a few other models that incorporate a spherical iris - As always It's a mesmerizing mechanism and a cool example of geometry that can be achieved with 3d printing.
A Pokeball is a great use for this mechanism, and I hope you enjoy it! This is a great fidget, container, or just something to show off!
This print requires several different colored pieces assembled together to get the final characteristic Pokeball colors. Read on for printing recommendations and assembly instructions.
Printing
Use my print profile for settings and orientation. This prints best at 0.16mm layer height - its worth the extra time, and ensures that the motion and curves come out smooth.
There is a print profile for printers with AMS and without:
- AMS profile, has a couple filament changes in each of the black and white plates
- Black ring on button
- white ring on bottom of black trim, just so its harder to see the layers when assembled.
 |  |
Without AMS profile is missing the black ring on the button, but is otherwise nearly the same.
Make sure your build plate is nice and clean! Any oil or grease from your fingers etc. that has made its way to your buildplate will try its best to cause mess up adhesion on the small parts.
- Since you can't see inside after its printed, these are a little tricky to trouble shoot. The most common issues causing the iris to be fused together are:
- Not enough cooling - Increase part cooling and/or slow down the max volumetric flow rate in filament settings.
- Make sure you're not over extruding! Run a flow rate calibration if you need to
- Flow dynamics needs to be dialed in too! it will help you get nice clean corners on the blades that don't fuse to the nearby surfaces
Wet filament can be stringy and blobby - not good properties for print in place parts.
Assembly
Remove supports off the outside of the Iris core
- Break tabs on iris (this is quick and easy, I promise!)
Don't use a knife for this! The easiest way is to shove a flexible scraper between the parts to break the connections.
(the images below are copied from a different model as its a little easier to see with the grey filament)

- Assemble the colors iris half
- Slide the black sleeve onto the iris
- slide the white sleeve onto the iris
- Insert the “button” into the center. (Use a little super glue if needed to secure)
 |
4. Click retainer ring into the iris side using the protruding tabs.

5. Install the white lower half onto the iris half as follows:
Locate the two tabs furthest from the clip's open side. Angle one or both of these into the corresponding holes in the back half of the bottom of the Pokeball. It should look like this:

- Push the two ends flat together to click the remaining two tabs into place
- With the iris open, check that all of the inner tabs are in place. You can push into place with a finger if needed.
Rotate the iris open and closed a few times to loosen it up
License
You shall not share, sub-license, sell, rent, host, transfer, or distribute in any way the digital or 3D printed versions of this object, nor any other derivative work of this object in its digital or physical format (including - but not limited to - remixes of this object, and hosting on other digital platforms). The objects may not be used without permission in any way whatsoever in which you charge money, or collect fees.
Comment & Rating (87)