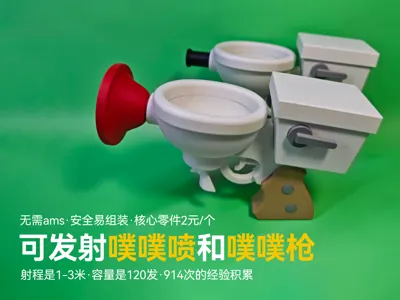
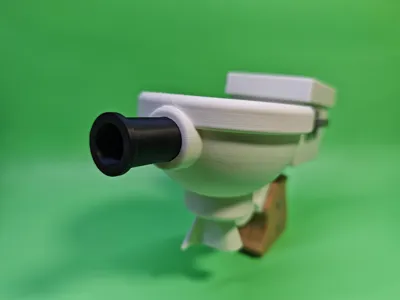
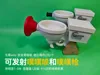
launchable Poo-Poo Spray and Poo-Poo Gun


Print Profile(1)
Description
Foreword:
Hello everyone, I am Qinglu Ge, a multi-platform award-winning 3D printing competition designer. This time, I bring you merchandise from "Escape from Tarkov"—the launchable Poo-Poo Spray and Poo-Poo Gun.
Here are the main features of the model:
1. Safety first, easy to assemble.
2. No AMS required.
3. Launchable, range of 1-3 meters, capacity of 120 shots.
4. Core component—water pump, average 2 yuan/piece.
5. Over 914 iterations of accumulated experience.
These models are shared with all of you out of a love for gaming and 3D printing, so that everyone can experience the same joy as I do. These models also took a lot of my effort, time, thought, hair, and money, and I hope you like them.
Main Content:
Previously, I spent half a year designing a game merchandise item—the Hormone Gun (water gun)—which received widespread recognition and support from fellow enthusiasts, boasting an approval rate of over 98%.
My design philosophy is to combine the characteristics of 3D printing to achieve the highest possible fidelity, while also incorporating creative and fun ideas. This involves refining creativity within various limitations, truly like dancing in shackles.
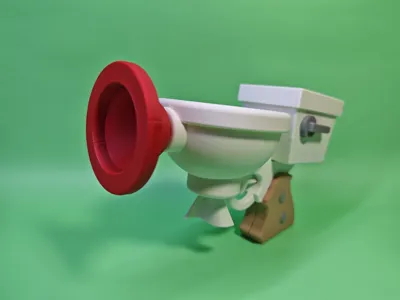
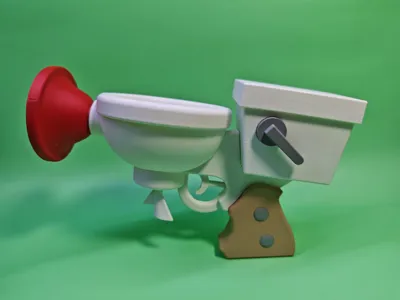
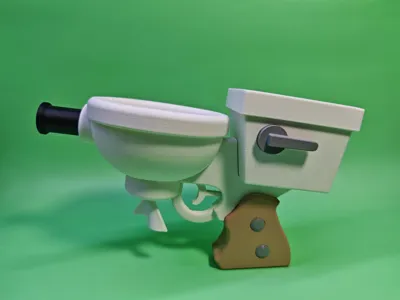
For this competition, I chose the distinctive Poo-Poo Spray and Poo-Poo Gun from "Escape from Tarkov" as my creative prototypes. Combining 914 iterations of design and production experience from the Hormone Gun, I designed this launchable Poo-Poo Spray and Poo-Poo Gun. The design strives for high fidelity to the original appearance, meticulously refining the part separation and pre-arranged plates to minimize layer lines and optimize texture, while also ensuring ease of assembly. Through my tests, this size balances printing time and feel, making it suitable for a wider range of ages.

Illustrated Assembly Tutorial (Video Tutorial in progress)
1. First, print all parts, and prepare 502 super glue, scissors, and a water pump assembly. If available, also prepare a pair of needle-nose pliers and Kafuter 705 (clear) silicone rubber waterproof adhesive. (Red text indicates required items, black text indicates optional items)
PS:
Water pump purchase link. Also, send the following phrase to the seller: "No Trigger, Small Spring, Single Nozzle, Short-tail Water Pump + 20cm Outlet Pipe + Nozzle". It is safer to buy more than 3, 【Manufacturing and Supplying High-Quality Toy Water Gun Pumps, Children's Toy Water Gun Pumping Nozzle Accessories】Copy ¥ojNNIw500otam¥, open 【Mobile Alibaba】 or 【Alipay - click Home to search】to view: https://qr.1688.com/s/9IE66qIy CZ0117
Kafuter 705 (clear, thin, 45g) silicone rubber waterproof adhesive purchase link: 【Taobao】Big promotion price guarantee https://e.tb.cn/h.7M2G4QPSeURekUy?tk=w6K1U5tvLhZ CZ007. The reason to buy 705 adhesive is that every user's printer, filament, temperature presets, etc., will have different tolerances, and using 705 adhesive can significantly improve waterproofing.
2. Take out the water tank, flush handle, and TPU waterproof ring for the handle

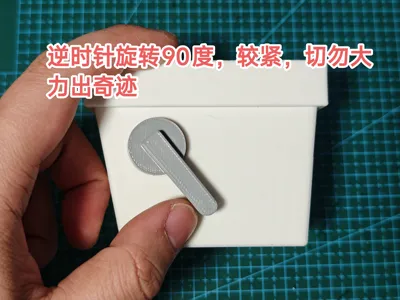
3. Use 502 super glue to attach the TPU to the flush handle (round hole), install it on the water tank, and tighten it counter-clockwise.


4. Use 502 super glue to attach the handle on the other side (square hole)

5. Take out the trigger, water pump, water pipe, and the thicker TPU waterproof ring

6. Forcefully insert the trigger into the water pump until it locks securely and does not easily fall out.

7. Insert the thicker TPU waterproof ring into the water pipe

8. Insert the water inlet at the tail of the water pump into the TPU waterproof ring inside the water pipe

9. Take out the thinner TPU waterproof ring and insert it into the round hole below the water tank

10. Insert the assembled water pump and water pipe module into the water tank's TPU waterproof ring. (Note the orientation)
10. If you are applying 705 adhesive, apply it to all connections and water pipes, let it air dry for 1 hour, then assemble.


11. Take out 8 connectors, 1 L-shaped connector, the right grip shell, the right grip interior, and 2 grip decorations.
12. Use 502 super glue to assemble the decorations

13. Use 502 super glue to attach the 8 connectors and the L-shaped connector to the holes on the grip

14. Take out the integrated water tank, water pipe, and water pump module, and connect it to the L-shaped connector using 502 super glue.

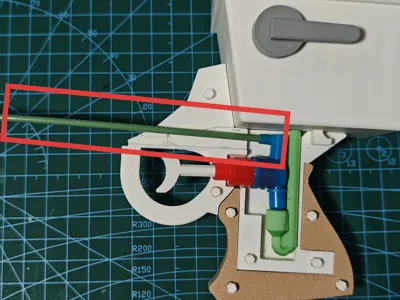
15. Take out the water pipe and insert it onto the water pump outlet

16. Take out the left grip (assembled beforehand), which has no connectors on it, and combine it with the right grip

17. When combining, note that the water pipe extends from here

18. Take out the toilet, insert the water pipe (the inside of the toilet has a curved channel, so there will be some resistance when inserting the water pipe), and pull it out from the other end of the toilet.


19. Align with the toilet's opening and connect them (pre-assemble first to get a feel for it, then pull it out, apply 502 super glue, and connect again)


20. Take out the muzzle of the Poo-Poo Spray, apply 502 super glue, and install it on the front end of the toilet. Then, cut off the excess water pipe and attach the nozzle.


20. If yours is a Poo-Poo Gun, it's slightly different. First, cut off the excess water pipe, attach the nozzle, then use 502 super glue to attach the muzzle to the front end of the toilet.


21. Finally, use 502 super glue to attach the toilet paper decoration part below the toilet.
Boost Me (for free)
Thank you for reading this far. If you like it, please give me a like, a favorite, and download it for support. This is very important to me as it motivates me to create more. You can also rate the work and leave your suggestions and photos in the comments section. There are other great models on my homepage that you can check out. Thank you!
License
You shall not share, sub-license, sell, rent, host, transfer, or distribute in any way the digital or 3D printed versions of this object, nor any other derivative work of this object in its digital or physical format (including - but not limited to - remixes of this object, and hosting on other digital platforms). The objects may not be used without permission in any way whatsoever in which you charge money, or collect fees.
Comment & Rating (1)