Indoor Discone Antenna 400/433 MHz (70cm band)


Print Profile(1)
Description
This is a discone antenna for the 70cm band and up. It was calculated for 400MHz and above, so it perfectly covers the 70cm ham radio band as well as 433MHz ect.. The base fits a 20mm PVC pipe as a “mast”.
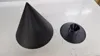
The main print profile contains the two main parts for the antenna (the cone and the top/disk). I also uploaded a raw file for optional parts, which includes a reinforcement ring for the bottom of the cone, a little cover for the top and an adapter pipe for the very bottom.
Parts you'll need
- ~30cm RG316 coax cable with a female SMA connector
- For the cone: self adhesive copper foil ~0,0025mm. I used 3 sheets 300mm x 200mm each. It must be real copper.
- For the disk: I used a 150mm x 150mm sheet of 0,3mm/28gauge coper. I didn't use the foil because I had to solder on it.
- a bit conductive silver paste to ensure a good connection between the coax shield and the cone
- a bit of CA glue and some solder
Instructions
- Print the cone and top/disk, ideally in PETG or ABS. Do not use any material containing carbon fibers (as PETG-CF or the like)
- Carefully cover the cone with the self-adhesive copper foil. Work in pieces and make sure there are as few and as little wrinkles as possible. Use a flexible plastic spatula to smoothen the surface afterwards, but be careful not to rip the foil. To be safe, use a multimeter to make sure the whole area of the cone is conductive.
- Glue the 0,3mm copper sheet onto the disk. Cut it round matching the printed disk using workshop or kitchen scissors. Use a file and/or sandpaper to make it perfect. Drill or poke a hole in the middle matching the existing hole in the printed disk.
- Measure the needed length of the coax cable Push the open end through the top hole of the cone and place the SMA connector in the provided mounting hole. There should be around 3cm of coax looking out the top of the cone. Mark the cable exactly where it leaves to top of the cone. Pull the cable out a few more centimeters from the top and remove the outer insulation from where you marked it.
- Fold back the outer shield of the coax and push/pull the cable back into the conein such a way that the folded back shield makes electrical contact with the copper surface of the cone. At this point, I used the conductive silver paste to ensure good connection between the copper cone and the coax shield (see image below). Again, use a multimeter to check perfect conductivity between the outer part of the SMA connector and the copper surface of the cone.
- Place the top part over the cone so the center wire of the coax looks out over the disk. Try this first before glueing the top onto the cone.
- Finally, solder the center wire of the coax onto the copper disk, again making sure perfect contact.
- Try out the antenna!
- If you want to, print out the optional parts to give the antenna a better look and a bit more stability.
If you like this project, please give it a LIKE and a Boost - I'd really be happy about it!

Boost Me (for free)
2026/01/23: I posted V2 with a minor improvement - a sturdier top part.
License
You may create derivative works based on this object, provided that all such derivative works are published exclusively on the MakerWorld platform and include proper attribution to the original creator. You may not share, upload, host, distribute, or publish this object—or any derivative work of this object—on any other digital platform, marketplace, or distribution channel. Commercial use of this object and any derivative works is strictly prohibited. This includes, but is not limited to, selling, renting, sublicensing, or using the object in any context in which you receive monetary compensation or other financial benefits.
Comment & Rating (0)