Avatar-Inspired Na’vi Ceremonial Bow


Print Profile(3)


Description
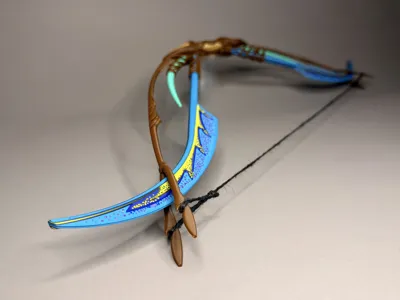
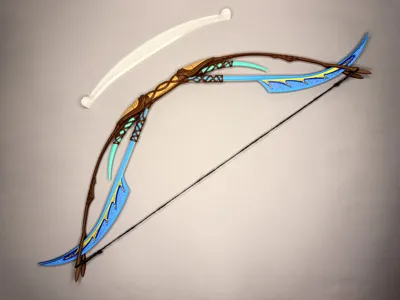
🔵 Na’vi Ceremonial Bow 🟣
Na’vi Ceremonial Bow is a decorative piece inspired by the aesthetics of Pandora and the culture of the Na’vi from the film Avatar. The project was designed with a focus on organic forms, a modular construction, and rich visual details. An important element of the bow are the colorful Ikran feathers, which in Na’vi lore symbolize a bond with nature and a spiritual connection to Eywa.
The project includes a wall mount that allows for an elegant display of the bow, mounted using double-sided mounting tape.
This model is purely decorative and is not intended for use as a functional bow.
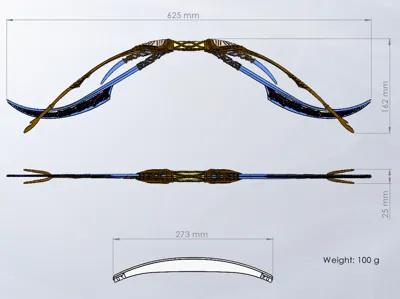
A complete parts list with detailed illustrations and dimensions is available in the gallery.
Assembly
1. Insert the Ikran Rachis into the slot in the Bow Limb. Make sure the tab is properly aligned with the groove before joining the parts.
2. Slide Leather Strap A onto the Ikran Rachis.
3. Take the two halves of the Ikran Vane (A and B), join them along their rear surfaces, then slide Leather Strap B over them.
Optionally, you may glue the tips of the Vane pieces — it is recommended to do this at the very end of the bow assembly.

4. Seat the assembled Ikran Vane into the slot in the Bow Limb.
5. Insert the Connector into the slot in the Bow Limb, then slide Wood Decor A onto it. Make sure the Connector does not protrude beyond Wood Decor A.
6. Seat Wood Decor B, then push the Connector all the way in.

7. The first half of the bow is now complete. Repeat steps 1–6 to assemble the second half of the bow.
8. Join both halves of the bow using the Bow Handle. Before joining, slide Leather Strap C onto the Bow Handle from both sides.
9. The bow is complete. You can now attach the bowstring.

10. To make the bowstring, you will need a thicker cord approximately 1.2 meters long.
11. Tie a loop at one end of the cord and trim off any excess length.
12. Fold the cord to form a loop and tie a knot as shown in the illustration.
13. Tighten the knot. If the loop can move, tie a second knot to secure it in place.
14. Place both loops onto the bow tips.
15. Move to the other end of the bow. Repeat steps 12 and 13. To determine the correct length, tie the cord directly on the bow tip, then cut off the excess cord.

May Eywa guide your hands 🌌
StudioPrint.3D
Boost Me (for free)
Thanks for checking the design Boost & follow for more 🚀
License
You shall not share, sub-license, sell, rent, host, transfer, or distribute in any way the digital or 3D printed versions of this object, nor any other derivative work of this object in its digital or physical format (including - but not limited to - remixes of this object, and hosting on other digital platforms). The objects may not be used without permission in any way whatsoever in which you charge money, or collect fees.
Comment & Rating (35)