Search models, users, collections, and posts
Rifle Brass Marking
IP Report

Print Profile(1)

0.2mm layer, 2 walls, 15% infill
Designer
46 min
1 plate
Open in Bambu Studio
Boost
26
69
3
1
24
13
Released
Description
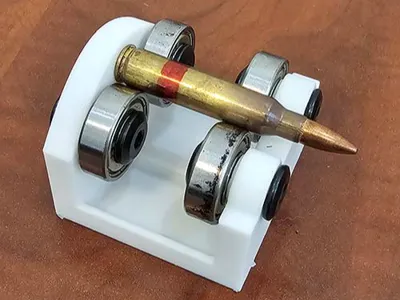
Tired of uneven or smudged markings on your brass casings? This Brass Marker Tool acts as a stable holder that lets you spin the casing smoothly while applying your favorite permanent marker. It's ideal for handgun or rifle reloaders who need clear, consistent labels around the circumference of the brass.
How It Works:
- Insert the Brass: Simply place your empty ammo casing into the holder (the "brass maker" base). It securely grips most common calibers like, .223, or .308—check the model variants for size options. The built-in back stop ensures consistent placement every time.
- Position the Marker: Rest your favorite permanent marker (Sharpie or similar) against the brass at the desired height.
- Spin and Mark: Gently rotate the casing using the built-in spinner mechanism. The tool keeps everything steady, ensuring a clean, even line or text all the way around.
No batteries, no complex setup—just pure mechanical simplicity. This tool helps prevent mix-ups in your reloading setup and adds a professional touch to your brass organization.
Features
- Universal Fit: Modular design with adapters for different casing sizes (included in the STL files).
- Smooth Rotation: Integrated bearing-like groove for effortless spinning without wobbling, enhanced with 4 bearings for ultra-smooth action.
- Compact and Portable: Fits in your toolbox or range bag—print multiple for your workbench.
- Customizable: Easy to remix in your favorite CAD software if you need tweaks for specific calibers.
- Safe and Simple: No sharp edges; designed for easy handling.
- Consistent Placement: Includes a back stop to provide reliable and repeatable positioning of the brass.
- Durability Boost: Bearings can be placed on the tube and, for longevity, on the outside of the brass marking tool as well.
Required Hardware
- 4 bearings
- 4 Chicago screws (8mm diameter, measured 7.8mm by calipers; 15mm length for the tube/nut) These parts can easily be found on Amazon or hardware stores.
Assembly Instructions
- Print the main components from the STL files.
- Install the 4 bearings: Place them on the tube for the core rotation mechanism.
- For added longevity, position bearings on the outside of the brass marking tool.
- Secure everything using the 4 Chicago screws.
- Test the spin for smoothness before use.
Printing Instructions
- Download the STL files below.
- Use a brim—it seems to work better for adhesion.
- use support Tree (on build plate only)
- Test print with scrap filament to ensure fit for your casings.
- Post-processing: Light sanding on the spinner for ultra-smooth action.
License
This user content is licensed under a
Creative Commons Attribution-Share Alike
Comment & Rating (3)