Modular Plant Terrarium / Bottle Garden


Print Profile(1)

Description
Description
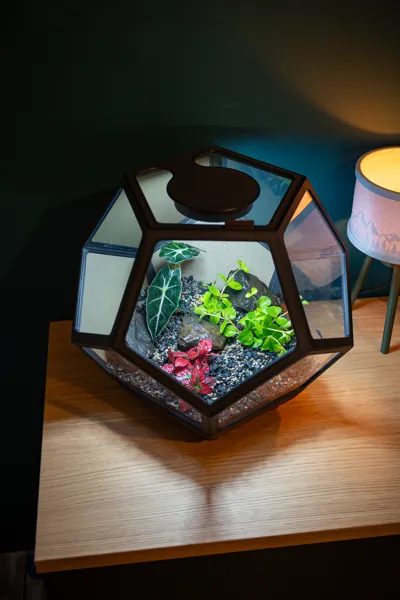
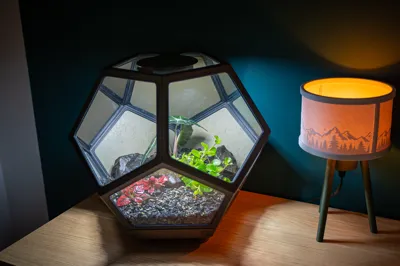
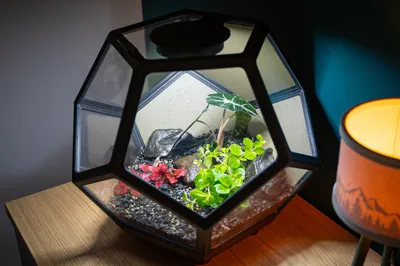
Modular Plant Terrarium in a modern, geometric design. The frame construction consists of several individual parts and, when assembled, results in a terrarium with an approximate base area of 31 × 31 cm.
The side panels can be flexibly designed: either with printed panels or with acrylic glass or real glass. The top lid rests loosely and allows easy access to the interior – ideal for watering, caring for, or rearranging plants.
Optionally, a small USB plant light can be installed in the lid, allowing light-loving plants to thrive inside. The terrarium is perfect for bottle gardens, small tropical plants, mosses, or mini landscapes.
Print Settings
- Material: PLA (PETG possible)
- Layer height: 0.2 mm
- Walls: 3 perimeter
- Infill: approx. 10 % (GyroGrid)
- Top/Bottom Layers: 5 layers each
- Supports: not required
- Optional: Fuzzy Skin (e.g., for base plate or accents)
- Print orientation: print all parts flat
Additional Information
- The model consists of a frame construction with multiple segments that are connected to each other.
- Additional parts required (not printable):
- Acrylic glass or real glass (3–4 mm thickness recommended)
- In total, there are 11 panels for side inserts:
- 5 × panels Panel Format 1
- 6 × panels Panel Format 2
- Fewer panels can also be used (e.g., a combination of glass and printed panels).
- The lid rests loosely and provides space for a small USB plant light (optional).
- The frame parts of the upper construction are connected with small connecting pins. It is recommended to print a test piece and check the fit before printing all parts completely. Tolerances may vary slightly depending on the printer and material. If the connection is too tight or too loose, the pins can be scaled minimally in the slicer.
- The panels (acrylic glass or real glass) are generally clamped by the frames. Here, too, a quick fit test is recommended, as the clamping force is tolerance-dependent. My panels held well. In areas like the lid, I additionally glued individual panels to securely prevent them from falling out.
Assembly Instructions – Modular Plant Terrarium
Overview of Components
- Part 1: Bottom Frame (5× identical)
- Part 2: Top Frame (4× Standard + 1× with cable cutout)
- Part 3: Lid (rests loosely)
- Part 4: Base Plate
- Part 5: Feet (5×)
- Connecting Pins: for the frame elements (50x)
- Panels / Plates: Acrylic glass, real glass, or printed panels (optional)
- Panel 1 (5x)
- Panel 2 (6x)

Step 1 – Assemble Bottom Frame (Part 1)
- Part 1 is needed a total of 5 times.
- The long side of the parts faces downward – as shown in the sketch.
- The five frame parts are connected sideways with the connecting pins.
- This creates the bottom ring of the upper sphere.
👉 Note:
First, only insert the parts, do not glue yet.

Step 2 – Prepare Top Frame (Part 2)
- Part 2 is used 5 times:
- 4× Standard
- 1× with cable cutout (marked in red in the sketch)
- The side without pin holes faces upward – this is important for correct alignment.
- The frame parts can also be initially loosely connected with pins.

Step 3 – Connect Top and Bottom Frames
- Now, the top frame (Part 2) is placed onto the bottom frame (Part 1).
- All parts are designed to fit only in the correct position.
- Once everything is correctly seated, gently pull the entire ring apart
(e.g., create minimal space with a toothpick).
Gluing
- Use a slower-curing adhesive (superglue not recommended).
- Apply adhesive to the pin connections.
- Then press the entire ring together evenly.
Step 4 – Assemble Base and Feet (Part 4 & Part 5)

- Part 5 (Feet) is needed 5 times.
- The feet are inserted from below into the designated receptacles of Part 4 (Base Plate).
- The fit is usually already snug – additional gluing is recommended, especially for permanent stability.
Step 5 – Place Frame Sphere onto the Base
- The previously glued frame construction (Part 1 + Part 2) is now
with the pin connections onto the base plate. - Here too, the pins can be additionally glued.
- After this, you have the complete basic structure of the terrarium.

Step 6 – Assemble Lid (Part 3)
- Part 3 is the lid and is placed loosely.
- A small USB plant light can be attached to the round surface on top
with double-sided adhesive tape. - The cable cutout ensures that the lid rests flush.
👉 Recommendation:
Glue the top frame to the lid, as it can otherwise be lifted more easily.
Step 7 – Insert Panels & Plates
- There are a total of 11 panels:
- 5× Panel Format 1
- 6× Panel Format 2
- Possible options are:
- Acrylic glass (3–4 mm)
- real glass
- printed panels (STL included)
- The panels are clamped


Important Notes
- First, insert a test panel to check the clamping force.
- If panels are too loose:
- spot glue (especially recommended in the lid area)
- The bottom row usually holds well without glue, depending on tolerances.
Step 8 – Planting
- After the adhesive has fully cured, the terrarium can be planted.
- Ideal for:
- Mosses
- small tropical plants
- bottle garden setups
Have fun printing and planting! 🌱
If any problems arise or you notice an error, feel free to let me know in the comments – feedback and suggestions for improvement are always welcome.
Boost Me (for free)
Did you like this model? Then I would be happy about a Boost, a Like or a Follow.
Every support helps me realize new ideas – thank you! 🙌
License
You shall not share, sub-license, sell, rent, host, transfer, or distribute in any way the digital or 3D printed versions of this object, nor any other derivative work of this object in its digital or physical format (including - but not limited to - remixes of this object, and hosting on other digital platforms). The objects may not be used without permission in any way whatsoever in which you charge money, or collect fees.
Comment & Rating (4)