Maglev Floating Spinning Top


Print Profile(1)

Bill of Materials

Description
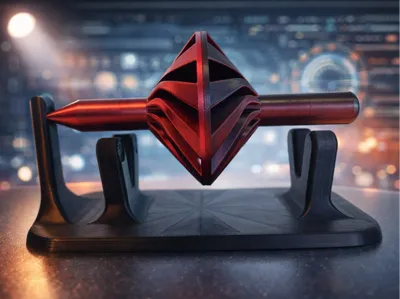
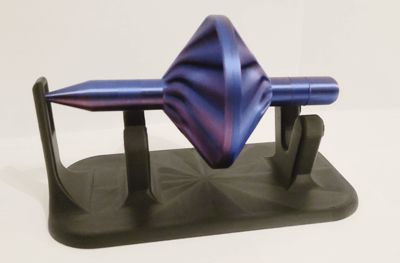
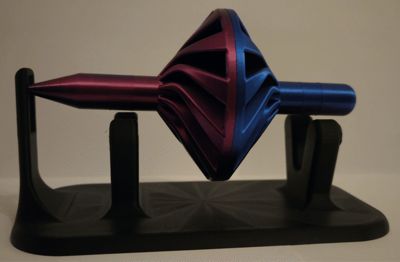
The floating maglev spinning top
This spinning top relies on magnetic repulsion to float in the air and spin with almost no friction. This does NOT require the Maker Supply maglev base, or any kind of power. It relies on simple permanent magnets only.
Magnets in the base repel magnets in the shaft, in order to hold it up and push the point of the shaft slightly into the base. This leaves almost no friction, allowing the top to spin for a very long time with just a gentle input.
The spiral part of the shaft is very good at catching air in one direction. This allows you to gently blow on the spiral, which can get the top spinning very quickly (see pictures/gifs).
If you enjoyed this print please do let me know, and leave a review, a couple of photos, or even a boost. It would be great to see people enjoying this as much as I have after spending many hours dialling in the design.
Filaments
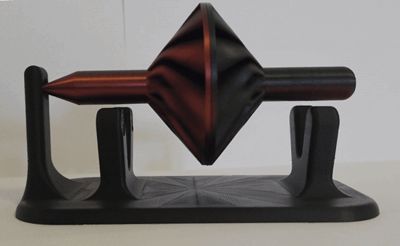
I used PLA for all parts - it is best to use PLA rather than PETG or similar as PLAhas high stiffness resulting in lower friction at the contact point. I prefer to print the base in a simple colour like black, then have the top itself in a nice multi-colour filament so that you can clearly see it spinning. If a multi-colour filament is used, spinning the top quickly by blowing on the fins can get the colours to blend into one.
Assembly
The top prints in two halves, which need to be glued together. This is a critical step and must be done properly. The print profile has scarf seams to better balance the shaft. When gluing together, the two scarfed seams should be as close to directly opposite eachother as possible to keep weight distribution even. Of course you also need to make sure the halves are perfectly lined up - any error here will result in an unevenly weighted shaft which will bounce a lot.
The profile for the top has a pause for you to insert the magnets, around 15 minutes before the end of the print. Refer to the guide below for magnet orientation. NOTE that hardened steel nozzles can stick to the magnets and pull them out or even dislodge the print, so if you use a hardened steel nozzle use this at your own risk. Normal nozzles are non-magnetic so this is not an issue unless you have upgraded your nozzle.
Magnet Orientation & Fitting Guide
Magnets used are 10x3mm, in stacks of 3. All magnets must be facing the same direction (north or south) in the final assembly. Note that due to the print orientation of the two halves of the spinning top, the stacks of 3 magnets must be inserted in opposite directions.
The best method for this is to get your stack of 18 magnets, and stick them to something metal, which gives you a fixed orientation so you can't accidentally flip the stack. Now you designate the top of the stack as “North” (it doesn't matter if it is actually north or south). When you insert the magnets, they all need to end up with “North” facing the front of the assembly where the point of the shaft sits.
Spinning Top
The profile has a pause (around 15 minutes before the end) when the magnets can be inserted. Note that the front of the shaft is on the left of the build plate when looking from the front of the printer, and the rear of the shaft is on the right. When the printer pauses, first put a VERY SMALL drop of superglue in the two holes (this is not strictly necessary, but will make sure the magnets don't move around when the shaft is spinning if there are any tolerance issues).
Now take 3 magnets from the top of your stack and insert them in the left-hand piece (front of the shaft) with the side we designated “North” facing up.
Next take 3 magnets from the stack, flip them over, and insert them in the right-hand piece (rear of the shaft) so that “North” is facing down.
Make sure to push the magnets down firmly, and check to make sure the top layer clears the top of the magnets before resuming the print.
Base
The base magnets are inserted after the print is finished. Before inserting, again apply a small drop of superglue to each of the four holes. Take the stack of magnets we set up earlier, and insert a stack of 3 magnets into each post of the base, with “North” facing towards the front wall of the base. Make sure to push the magnets all the way into the hole, and make sure they are in the correct orientation or the levitation will not work properly. After this you can insert one of the small cover pieces with a tiny bit of glue on the back to cover the magnets.
Usage
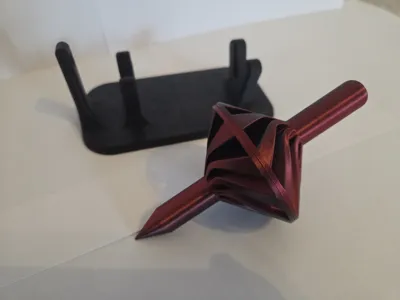
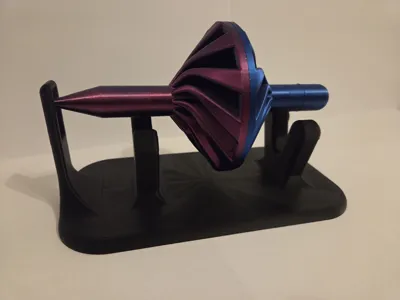
Take the shaft with the point facing down around 45 degrees, and push the point into the receiving slot in the end of the base. Now lower down the back end of the shaft gently until it rests on the magnetic field and becomes weightless. Much harder to say than it is to do and you'll pick it up very quickly - see images if you're not sure.
To get a good spin going with your fingers, it's important not to push the shaft around when you spin it. That will cause a bounce which will slow down the spin and make everything unstable. You can get a good amount of spin with a much gentler input than you would think.
To spin by blowing, simply blow gently across the top of the spiral, taking care not to blow too hard and cause bouncing. You can get it spinning very quickly like this.
Boost Me (for free)
If you enjoy my designs, please comment and review, and if you particularly like something, a boost is very much appreciated!
Membership
Want to sell prints of this design? Offer your customers proven, high-quality models and build your brand with confidence. A commercial license gives you the rights to sell, plus access to assets and flexibility depending on your tier. Click here to find out more.
License
You may create derivative works based on this object, provided that all such derivative works are published exclusively on the MakerWorld platform and include proper attribution to the original creator. You may not share, upload, host, distribute, or publish this object—or any derivative work of this object—on any other digital platform, marketplace, or distribution channel. Commercial use of this object and any derivative works is strictly prohibited. This includes, but is not limited to, selling, renting, sublicensing, or using the object in any context in which you receive monetary compensation or other financial benefits.
Comment & Rating (102)