A1mini Manual Filament Change Module Z-axis Fixed Version


Print Profile(1)
Description
Description:
I found that existing models could not meet my needs, so I re-modeled and designed it according to my own requirements, all dimensions were manually measured against the A1 mini machine
Design optimizations:
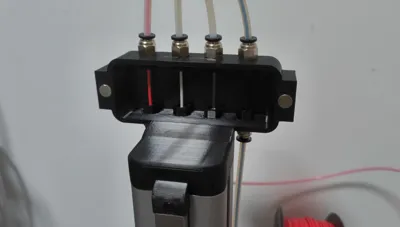
- The accessories are on the Z-axis and do not move, so there is no need to worry about the length of the PTFE tube during operation
- Good positioning, not on the three-axis motion path, no need to worry about the machine touching the filament during movement
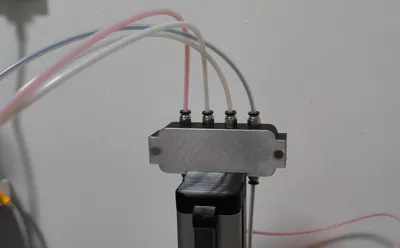
- No exposed filament, magnetic panel, the filament is usually enclosed
- Increased spacing between pneumatic connectors, making it easier to pull and install filament with one hand
- No assembly required, simply remove the original cap and replace it with the new one
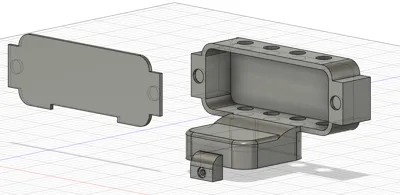
- Simple model, consisting only of the main body and a magnetic cover, two part
Required materials and tools list:
No | Model | Size | Quantity | Notes |
|---|---|---|---|---|
| 1 | Pneumatic Connector PC4-M6 | - | 8 | Used to secure the PTFE tube |
| 2 | PTFE Tube (also known as Teflon Tube) | Outer diameter 4mm Inner diameter 2.5mm | - | Used for filament guide, length adjusted according to your filament position |
| 3 | Hex Wrench | - | Bambu Lab standard wrench, used to replace the main model | |
| 4 | Magnet | Diameter 8mm, actual thickness 1.6 | 4 | Magnetic suction magnet, plenty on Pinduoduo, advertised thickness 1.86, actual measured 1.6mm |
Installation tutorial:
- After printing, install the pneumatic connectors (the model opening has no threads, use the nuts that come with the pneumatic connectors to secure them), install the magnets, the magnets can be pressed firmly to prevent them from falling off
- Use the original Bambu Lab wrench to remove the existing cover plate
- Install the new one and tighten the fixing screws
- Thread the filament, and you're done!!
Notes:
How to use?
It is recommended to use it with a dry box for filament changes: remove the magnetic panel, pull out the old filament (no need to pull it out completely, just out of the 5-way connector), push in the new filament, and close the magnetic panel
Will it affect the drying of the filament?
No need to worry, with PTFE tubes and magnetic cover plates throughout, there is no exposed filament
What material should I print with?
I used PETG, but PLA can also be used. The accessories only serve as connections for the filament guide, they do not move, and do not need to bear any weight
Why not draw threads for easy manual installation of pneumatic connectors?
It's not necessary, usually, when you buy pneumatic connectors, matching nuts are provided. I don't know why mine didn't come with any... I had to print them myself. The printed nuts haven't been deleted and are still in the files, you can delete them if not needed
Will it affect printer accuracy?
No, the accessories are on the Z-axis casing and are not involved in the three-axis movement of the printer
Is the magnetic suction strong?
Two magnets attract each other, it's very firm and won't fall off, it can be slid upwards for easier removal
Boost Me (for free)
Want more support? Leave a boost message for your users!
License
You shall not share, sub-license, sell, rent, host, transfer, or distribute in any way the digital or 3D printed versions of this object, nor any other derivative work of this object in its digital or physical format (including - but not limited to - remixes of this object, and hosting on other digital platforms). The objects may not be used without permission in any way whatsoever in which you charge money, or collect fees.
Comment & Rating (0)