Search models, users, collections, and posts

Customizable Boxes with Hinged Lids

IP Report

Print Profile(1)

All
P2S
H2S
H2C
A1
H2D Pro
H2D
X2D
A2L

3 Boxes, Lid with Magnets,  Fixed Latch, & Hinged Latch
3 Boxes, Lid with Magnets, Fixed Latch, & Hinged Latch
Designer
9.9 h
3 plates
4.9(24)

Open in Bambu Studio
Boost
1004
3661
57
59
2.1 k
583
Released 

Bill of Materials

Maker's Supply Kits and Parts
Select all
D6x2 mm Round Magnet (20PCS) - CA004
D8x2 mm Round Magnet (20PCS) - CA005
Bambu Filaments
Select all
Matte Ice Blue (11601) / Refill / 1kg
Matte Lemon Yellow (11400) / Refill / 1kg
Blue Grey (10602) / Refill / 1kg

Description

https://makerworld.com/en/models/607596-simple-pencil-holder-with-magnetic-hinged-lid#profileId-530531

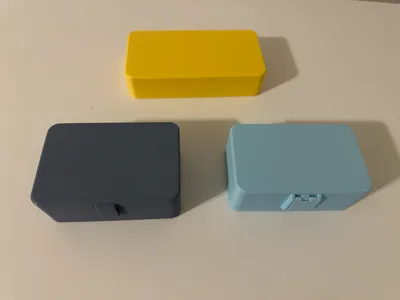
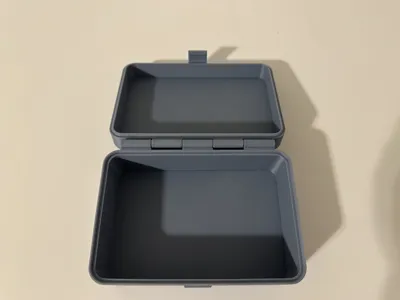
I have wanted to update my simple pencil holder and make it customizable. So I redrew this box in Fusion 360 and made it parametric and I provided 3 different options; Lid with Magnets, Lid with Fixed Latch, and Lid with Hinged Latch.


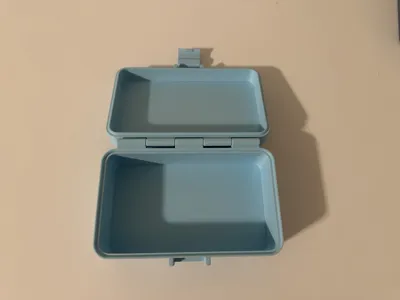
You have options to control the overall size of the box, radius corners, add dividers, etc.  There are three customizable options, so you just choose which lid attachment type you want, then change the parameters to your liking.  I will add more information in the future to help explain all the different adjustments, but I wanted to release this to get people to look at it.


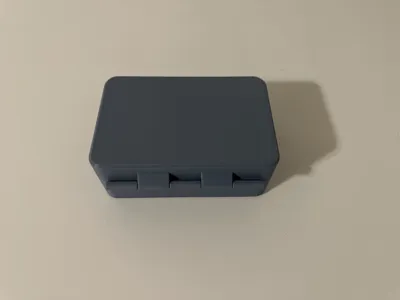
After you make all your modifications in the customization page download the file and open in Bambu Studios.  The box, lid, and hinged latch will show up as one object.  You will need to select the object, then right click and choose “Split”, then select “To objects”.  This will make all the bodies their own object, and you can move the lid, box, and hinged latch wherever you need to on your build plate.  


If you have a hinged latch, you will want to place it on the build plate on its edge by selecting “Lay on Face”. You will also want supports turned on for that part.  You can see in the sample print profile how the hinged latch is on its face


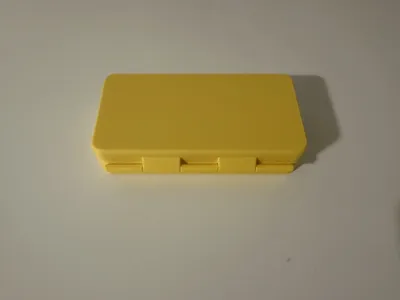
After the lid and box are printed, you can join them together at the hinge with 1.7mm filament.  It is a snug fit, but once you put the filament through the holes, it creates a smooth swinging motion.  (Let me know if I should add a parameter to control the diameter of the hinge pin if you like to use another type of cylindrical material like metal.)


Parameters for Lid with Magnets:

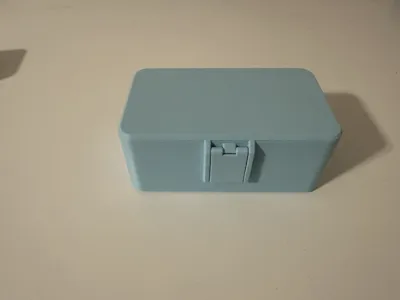
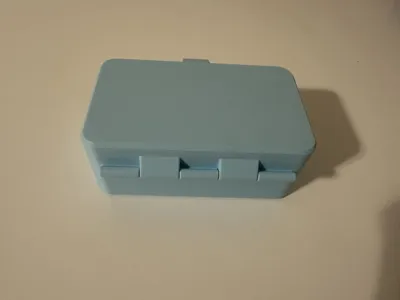
Parameters for Lid with Fixed Latch:

Parameters for Lid with Hinged Latch:


Membership

If you want to use my designs to sell commercially, join my commercial membership .  

Join

Boost Me (for free)

Send me a boost if you like my work.  They are much appreciated.

If you like my work and want to give me a tip here are some options:

Cash App: https://cash.app/$BrianRalls6

Venmo: https://venmo.com/u/Brian-Ralls

PayPal: https://www.paypal.me/rallzy79


Comment & Rating (57)

(0/1000)

Updated size of box to what I needed and printed just fine, but latch is just too short to actually latch closed. I printed on its side with supports as recommended and seemed to print just fine. Box is 72mm tall, 72mm deep and 125mm wide. If I needed to adjust latch, I didn't do that. Photos show too short for latch tab to reach latch slot on box to secure. Great model though and very useful for me! Printed a couple custom sizes for my needs at home.
(Edited)
The designer has replied
0
Reply
When you added the latch did it click in place? I am out of town until Sunday, so I am not able to make any adjustments until I get back. Sorry this did not work on the first try.
0
Reply
Replying to @Rallzy_Design :
It did click in place but was still too short. I did realize you have a put a little pressure on making sure it's in place. I did change the length of just the latch by 102% in Bambu Studio and it seem to be perfect now.
0
Reply
Replying to @MontanaIrish :
Great! I am glad you were able to save the print. Again I am sorry it did not work the first time.
0
Reply
would it be possible to have a 3mm diameter hinge so I can put some metal in it instead of filament
The designer has replied
Show original
0
Reply
Yes, I should be able to add a parameter to change the diameter of the hinge pin hole. Give me a little bit of time and I will add it to the parameters
0
Reply
Replying to @Rallzy_Design :
Is there any forecast more or less
Show original
0
Reply
Replying to @lucasbrit :
I am working on it right now. Maybe 30 minutes
0
Reply
Print Profile
3 Boxes, Lid with Magnets, Fixed Latch, & Hinged Latch
great project with hinge with filament super rich
Show original
profile
1
Reply
Any thoughts on printing the lid vertical to minimize need for supports? Great project!
The designer has replied
0
Reply
This should be printed without supports. The lid should be split into its own object and lay directly to the build plate. Are you printing it directly from the Parametric Builder?
0
Reply
Replying to @Rallzy_Design :
Hello, yes it was downloaded directly from the Parametric Builder. I did solve the problem by separating the pieces in Bambu Studio with the split function. Thank you for the reply.
0
Reply
Replying to @user_503755739 :
No problem. Do you think I should change how it shows up in the Parametric Editor to have all pieces show up on the build plate? I made it so you can see the lid change sizes with the box to confirm the hinges align with each other.
0
Reply
box looks pretty good and I like the customization option, the problem is that I am going for the 5th of print the latch (PLA). The latch is not fitting in and I can't get the 2 hooks to get in the right position that will allow them to rotate and they just snap.
The designer has replied
0
Reply
How are you orientating the latch when you are printing it?
0
Reply
Replying to @Rallzy_Design :
I tried flat and on it's side. The only solution to still salvage the whole project was to print on TPU. I really like your project here, but I'd suggest to have the latches like in this one: https://makerworld.com/en/models/1766347-customizable-snap-lock-box-parametric There are much more reliable and easier to print than the little hooks.
0
Reply
When you customize the box with a depth of less than 70mm, the bottom hinges are no longer attached to the bottom of the box. Those hinges then become an object unto themselves.
The designer has replied
0
Reply
I will take a look at the fusion file to see if I can fix it. thank you for letting me know!
0
Reply
It looks like I was able to resolve the issue. You should be able to make the box depth 40mm, and the hinge remains attached to the bottom.
0
Reply
When trying to customize a box, the lid is attached to the box at the hinges. Unless I am missing something, the lid becomes floating and does not appear that it can be separated from box? It seems that the lid really needs to be separated from the box for printing. Let me know how to accomplish this if possible using the current parameters or whether adjustments to the model to separate the lid from the box need to be made? Thanks
The designer has replied
0
Reply
Correct it starts out as floating in the customization page, but once you bring it into Bambu Studio you need to right click on the object and choose "Split", then select "To objects". This will separate all the bodies, so you will have a lid, a box, and possibly your hinged latch. Then you can move the parts wherever you want on your build plate. If you are using the hinged latch, you will want to rotate the latch on its edge, similar to how it is shown on the example print profile. Hopefully this will get you what you need.
1
Reply
Replying to @Rallzy_Design :
Thanks, must have missed a step somewhere? Thought I tried to split it. In any event, working as noted. though now I need to make some size adjustments now... appreciate the feedback and the tool....
designer
1
Reply
Boosted
Great design and explanation.
The designer has replied
0
Reply
Thank you for the feedback! It is much appreciated.
0
Reply
hi what’s the best way to put dividers in please
The designer has replied
0
Reply
Select the "Customize" button and go the "Parametric Model Maker". Scroll all the way towards the bottom and you will find the "Divider_D_Qty" and "Divider_W_Qty". That is where you select how many dividers you want in the depth and width.
0
Reply
anyways to separate the floating lid in the maker world app?
0
Reply

License

If you want to use this model commercially, please join my membership.
Join Now
This user content is licensed under the MakerWorld Exclusive License.

You may create derivative works based on this object, provided that all such derivative works are published exclusively on the MakerWorld platform and include proper attribution to the original creator. You may not share, upload, host, distribute, or publish this object—or any derivative work of this object—on any other digital platform, marketplace, or distribution channel. Commercial use of this object and any derivative works is strictly prohibited. This includes, but is not limited to, selling, renting, sublicensing, or using the object in any context in which you receive monetary compensation or other financial benefits.