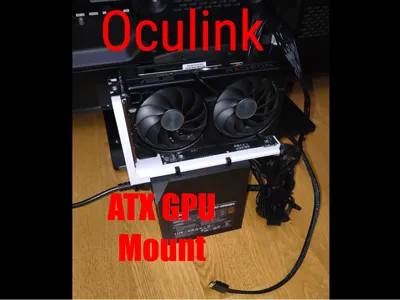
Oculink Adapter ATX GPU Stand Holder egpu


Print Profile(3)


Description
Simple bracket for mounting GPU on ATX power supply to save space
UPDATE June 10, 2026:
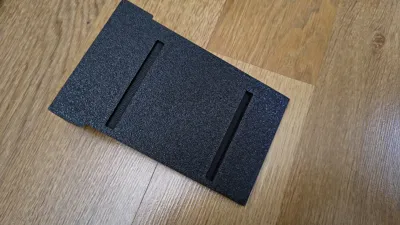
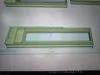
Alternative slide added in a single print profile and as stl "alt slide gpu longer"
longer, with an open end and slots for screws instead of holes for various dimensions
(since I only had 2 boards with the same dimensions, I couldn't precisely adapt the model for other boards, which is why I created one with slots for the screws, hoping it fits various boards. Please provide feedback.)
Suitable for the NFHK adapter and the chenyang adapter which are available on Amazon. (Details at the very bottom)
Both are Oculink adapters for external GPUs, so you can connect an external GPU to an nvme m.2 interface or, as in my case, connect it directly to a Mini-PC with an Oculink port. (both work with 4.0, by the way, I tested it, the more expensive adapter is not faster even if the cheaper one only states 3.0) I came across trying this with Oculink on a Mini PC through a video from ETA PRIME on Youtube, if you want to check that out
The base bracket is attached to the ATX power supply with 2 screws so that the graphics card stands stably on the power supply and does not tip over
The part with the adapter board and GPU can be moved so that all graphics card sizes fit without too much weight being on one side
Before you print if you are not using my print profile:
Since long parts tend to warp, slow down the print a bit, especially the outer walls and the first layer
I have specifically added a 0.4mm nozzle and a 0.6mm nozzle print profile (0.6 prints significantly faster, which is what is shown in the pictures)
Since the slide is specifically adjusted to not be too loose, depending on printer settings, you might need to slightly deburr the edges (unfortunately, it's not possible to find one setting for all, as different filaments and printers lead to variations)
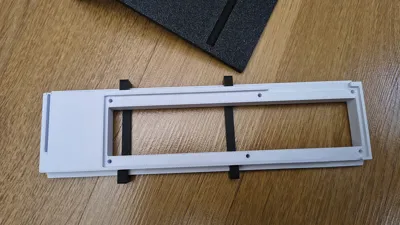
Assembly:
1)
The power supply is placed on its side, the base plate is attached using 2 screws included with the power supply
Now you will see the 2 slots at the top, glue goes in there
2)
Now place the 2 identical-looking clips onto the slide (the part for the board) and push the 2 clips into the 2 slots of the base plate
(It is important to place the clips onto the slide before they are glued, so that the gap dimensions fit afterwards! Otherwise, you won't be able to move the slide afterwards or even get it in)
Check that no glue has squeezed out and glued the slide, or carefully pull it out until it is dry
3)
The adapter board can now be inserted into the slide
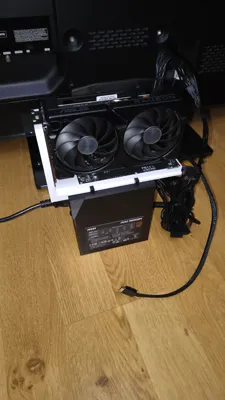
4)
Now, from the front, place the bracket with the large curve onto the slide
5)
The slide can now be inserted onto the base plate into the clips
6)
Connect all cables (Oculink, 24-pin), attach the GPU, and secure it with a screw on the top bracket
Connect HDMI or DP cables, power cable to the GPU, set the board's switch to “ON”
For using external GPUs, you need to pay attention to a few details; I take no responsibility for this. There are plenty of corresponding videos on Youtube
If anyone wants an example of performance via Oculink:
I have an Aoostar Gem10 with Ryzen 7840hs, 16GB LPDDR5 6400MHz, (Time Spy graphics score from the 780m iGPU: 2943 points )
An Asus Dual RX 9060 XT 8gb is connected via Oculink
Score in Time Spy without any tuning or overclocking:
Time Spy Total: 14442 points
Time Spy graphics: 15844 points
Time Spy CPU: 9620 points
If you achieve a low GPU Score, remember to completely remove the old graphics drivers (with DDU for example) and then completely reinstall the drivers. Before I did that, my graphics score was around 5200 points
Amazon Asin NFHK Adapter: B0BZVW9VWL
Amazon Asin chenyang Adapter: B0BZW1G87R
License
You shall not share, sub-license, sell, rent, host, transfer, or distribute in any way the digital or 3D printed versions of this object, nor any other derivative work of this object in its digital or physical format (including, but not limited to, publishing derivative works outside the Makerworld platform or hosting on other digital platforms). The objects may not be used without permission in any way whatsoever in which you charge money or collect fees. Subject to the above restrictions, derivative works may be published only within the Makerworld platform, and all such derivative works must be licensed under the same SDFL‑C license, without modification or additional terms. You may download the digital versions of this object, 3D print it, and display images, videos, or usage demonstrations of 3D printed versions of the object on personal social media platforms or Makerworld official channels, provided that no digital versions of the object are shared or distributed.
Comment & Rating (12)