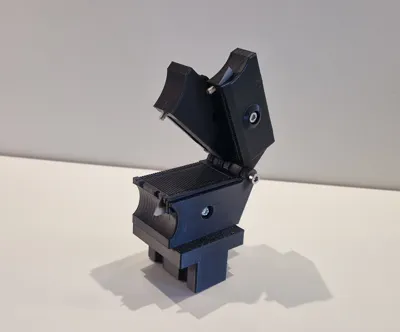
Flat cable 2.54 stripper & wire separator V2 Beta


Print Profile(1)

Description
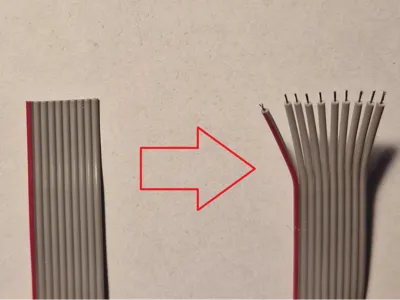
I have built a small tool here to help advance other projects.
I was tired of laboriously stripping ribbon cables wire by wire, and the cables always looked
very messy afterwards. With this tool, it's now a breeze.
I have been developing it for quite a while and can now share it with a clear conscience.
I wouldn't want to be without it now!!!
Please note, however, that parts, screws, or materials may change further.
What you need:
- First, the printed parts, 6 in total.
- Then a few screws. I made sure to use ones that most people should have.
- Two ballpoint pen springs, preferably two of the same.
- And a few cutter blades.
The springs should be 4x20mm
You will need, 8x 10mm M3 Allen screws, 3x 20mm M3 Allen screws, 1x 30mm M3 Allen screw.
2x M3 nuts (or nylon lock nuts)
For the blades, you need the 10mm blades for the small cutters, not the large ones!!!

The following images always show what you need for each step.
ASSEMBLY
Preparing the body:

2x 10mm, 1x 20mm, 1x30mm, 1x Nut, 1x Blade whit 4 residual breakage blades (the other on we need for the slitter)
Sort the screw to the right holes:

Screw the two 10mm screws into the bottom just enough so that their heads are inside the housing. NOT DEEPER!!!!!!!!!!!!!!!!!!
The 20 mm screw is used to clamp the knife in place. Don't turn this one tight yet!!!!!! Same for the 30mm!!!!!!!!!!
The Nut is for the 20mm screw to give here more power, and sits opposite in the housing.
Insert the knife with the cutting edge facing up and the tip facing backward. CAUTION: PLEASE DO NOT CUT YOURSELF!!!!!


Now you can tighten the 20 mm screw slightly to secure the blade. This will be adjusted later using the two 10 mm screws in the base.
Preparing the Stripper:

3x 10mm, 1x 20mm, 1x Nut, 1x Blade whit 4 residual breakage blades (the other on we need for the slitter)
Sort the screw to the right holes:

In the current Version up to V2 is the Screw for the Blade from the other side, and here sits a Nut!!
Screw in the 20 mm screw as far as it will go; it should then protrude 2-3 mm on the other side. For securing the flaps for lateral loads
Preparing the Slitter:

1x 10mm , 1x 20mm, 2 Springs, 29 Cutter blades break off's.
Start whit the Bladeholder:


Be very careful, and please do not cut yourself! I used very flat, non-serrated pliers to insert it. A good pair of tweezers should also do the trick. I would recommend using a piece of wood or plastic to press it in. Then I applied a drop of glue to each blade on the lower blade corner.

This is how it should look afterward.
Now insert the two springs into the recesses and insert the headpiece into the slitted body.
Be sure to insert the knives above the lower recess.
You now need to press the knife in slightly to screw in the screw from the side.
CAUTION: THE BLADES WILL COME OUT AT THE BOTTOM, DO NOT HOLD IT THERE WITH YOUR FINGERS!!!!
VERY HIGH RISK OF INJURY!!!!!!!!!!!!!!!!!!

Then screw in the last 20 mm screw from above so that it protrudes 2-3 mm again.


Assembly all:


After that, you must adjust the knives correctly.
This step is a little tricky and requires a lot of sensitivity. Turn the screws in 1/8 increments to adjust.
The more precisely you work here, the better the result will be.
Test how far the blades cut into the cable when closing. Make sure to adjust both blades, not just one! The more precisely you work here, the easier it will be to pull out the cable after cutting. Also make sure that the two upper parts are completely flush when closed. Sometimes there may be a slight gap. This is often due to the 20 mm screw that locks into the body.

This image shows a good blade setting.

After finishing, don't forget the cable stop, to push in.
There is also an optional base for vice attachment. I use a small vice myself to hold the tool so that I can work freely with both hands.


Use 3x 10mm Screws.

And that's it. Play around with it a little, test it out.
If you have any suggestions for improvement, please write to me.
I am still developing and improving it, so please refrain from giving it bad reviews.
Boost Me (for free)
if you like what I do. That helps me a lot.
License
You shall not share, sub-license, sell, rent, host, transfer, or distribute in any way the digital or 3D printed versions of this object, nor any other derivative work of this object in its digital or physical format (including - but not limited to - remixes of this object, and hosting on other digital platforms). The objects may not be used without permission in any way whatsoever in which you charge money, or collect fees.
Comment & Rating (0)