Search models, users, collections, and posts

The Dark Tower - Book nook

IP Report

Print Profile(2)

All
P1S
X1E
P1P
P2S
A1
X1 Carbon
H2C
H2D
X1
H2D Pro
H2S
X2D
A2L
A1 mini

14 plates - 19,7 hours - 621g filament
Designer
19.7 h
14 plates
5.0(13)

Add-on - Rose bushes
Designer
38 min
2 plates
5.0(7)

Open in Bambu Studio
Boost
388
1037
102
48
190
72
Released 

Bill of Materials

Maker's Supply Kits and Parts
Select all
LED Lamp Kit (1pcs) - MH001

Description

Those who have not yet read the Dark Tower-series by Stephen King
has forgotten the face of their fathers.
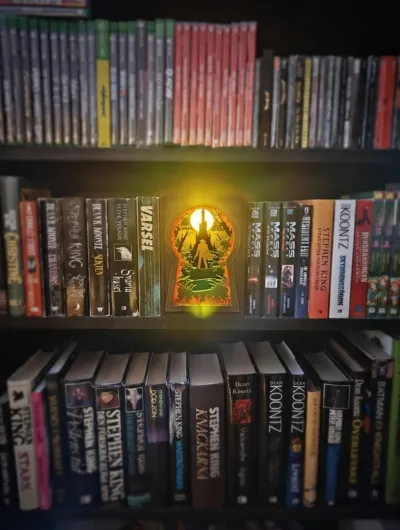
To celebrate my favourite books and also make en entry in the book nook contest,
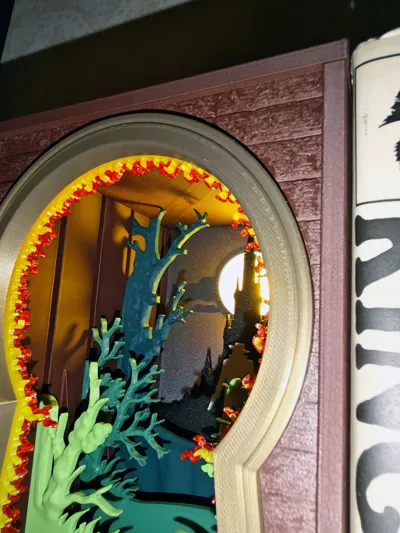
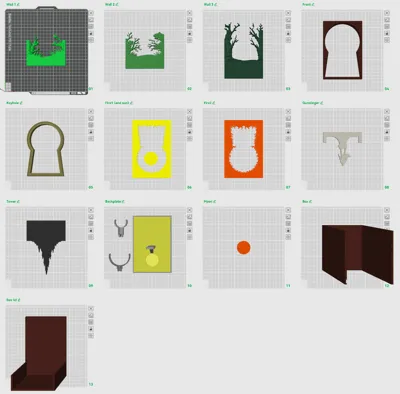
here is a Shadow Box Diorama of Roland, on his quest to find the Dark Tower.


With 14 plates of different prints this is kind of a project, but an easy one!

No AMS is needed and everything prints easy. Not much supports anywhere. A bit of glue maybe.
All settings already set in the profile!

There's variable layer heights, concentric top surface patterns and more to ensure a bit
of smootheness when it comes to the sculpted parts.

IF YOU ARE HAVING TROUBLE WITH WALL 2, SELECT IT, PRESS M AND LOWER Z AXIS TO 2.0
ALSO; MAKE SURE VARIABLE LAYER HIGHTS IS ENABLED ON PLATE 1-5! 

This smoothens out the walls of bushes, branches and trees.


Alignment: If the model is placed upsidedown on the plate,
that means the downward side is the one preferably used outwards.
This is important for the gunslinger to be aligned properly.
And also for those who know; Roland is left handed at that point. 


All parts have a pretty loose fit, to ensure everyone can print it properly! 

It's powered by either IKEA Kapplake or Bambulab LED Lamp
DISCLAIMER: I do not own the actual Bambulab lamp and thus, can not test the holder.
The cradle is made to the specification of the officiall Lamp Kit 001, and thus should fit.
LED Lamp Kit Collection


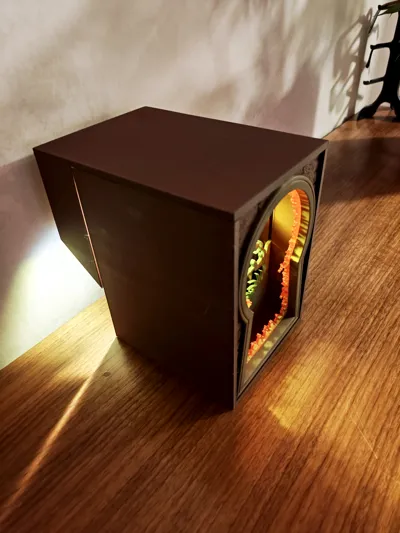
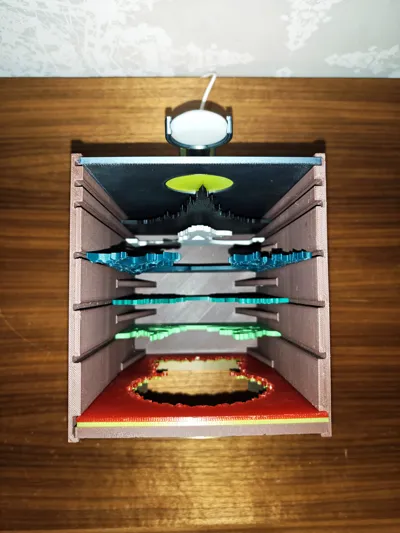
Assembly is fairly easy, just slide the various plates into the slots and put the lid on top.
Keyhole, wooden panel and fireplates go together in the first slot.
This can be closer observed in the Assembly View


As for the background, there are several options to set the tone of the scene. Here is some examples of mine where I've been experimenting a bit. Since I don't own every filament in existence I had to do with .. less.

1: White background and yellow transparent sun. Daytime setting, maybe a little dawn.
2: White background and blue moon, really don't know what time of day that would be! 
3: Gray background and red moon. The blood moon is rising.. 
3: Gray background and blue moon: Dusk is creeping closer.
5: Light blue background and yellow sun: It's a beautiful day in Mid-world.
I can imagine a wide array of different settings, imagination and access to filaments is the limit! 


Additional stand for standard books (It lacks a bit of hight)
Fits perfectly for pocket books and somewhat bigger, but for paperbacks one can use the stand.
No fastening device, if you want it stuck on there, use glue 👌


Introducing a small rose bush that glues onto the Tower plate.
The roses and bush fit together with small outcroppings, fitting onto the stems.
(See picture in print profile)

Big thank you to Alfeetoe for the idea and advice.
 

Comment & Rating (102)

(0/1000)

Boosted
Print Profile
14 plates - 19,7 hours - 621g filament
Not only is this a great representation of my favorite series, but the creator graciously helped answer my questions, listened to my rambling and ideas, and actually implemented a suggestion that I made. I am super impressed with how it turned out, and while the photos taken don’t do it justice (mostly cause we’re trying to coordinate a spot in our library) the depth and dimension and mood set is very impressive. My biggest recommendation is an RGB variation of the Bambu light that you can find on Amazon. It fits perfectly and allows you to cycle the lighting via remote so you only have to print one translucent sun/moon and then change the light itself. Again, super well made, well designed, and painless. While I did have trouble with Wall 2, I got an instant fix/response and I see it’s already part of the notes so you shouldn’t run into any issues. Thanks again, and keep up the great work!
The profile uploader has replied
profile
7
Reply
Means the world to me to share my work, and my passion included in the projects. So glad you like it! And thank you for all your work :)
(Edited)
2
Reply
What color did you use for your backplate?
(Edited)
profile
1
Reply
Boosted
Replying to @Yellowleader :
it was Bambu Tough+ gray. I also tried a translucent PETG but honestly you NEED the diffusion that the muted gray backplate provides
(Edited)
profile
2
Reply
You have not forgotten the face of your father. Long days and pleasant nights.
The designer has replied
designer
5
Reply
Thankee sai 🐢
3
Reply
Replying to @betterthanraw :
I'm in the process of printing this, though I'm confused about the back plate. Bear in mind, I'm very new to printing. The plate looks like it's translucent and shows clouds around the Tower. How is that effect achieved with a solid color print?
designer
1
Reply
Replying to @jacknifetoaswan :
The backplate is a very thin sort of membrane with thicker clouds printed upon it. When you add the light behind it shines through the membrane with 90% effect, but only like 10% effect on the clouds, creating the illusion.
0
Reply
I created a separate DarkTower insert based on Michael Whelan's painting. Im also trying to figure how to do a doorway instead of keyhole. I havent bought the lamp yet, looking for it today.
The designer has replied
0
Reply
Woah! That's awesome. If you wanna upload your print profiles and take credit, be free to do so. Kinda want that one myself :) For a door, I guess there's "just" two pieces needing to be replaced. Keyhole and wooden frame. Are you going to do it yourself or would you like for me to try it?
0
Reply
Replying to @betterthanraw :
Thanks for the compliment! If you want to take a shot at it, i bet it will look better than mine. I can upload the file, im playing around with a few more and ill included them in a pack.
0
Reply
Replying to @InstagatorBooks :
How about you make as much as you want/can first, and if you want to after that, i'll have a look. Got some other projects going right now I wanna finish up. But after that i'm free to have a go and see if we can make something happen.
0
Reply
Boosted
Print Profile
14 plates - 19,7 hours - 621g filament
many thanks to the creator of This Nook I was so pleased & happy to find I haven't seen no one do a King Nook at all & The Dark Tower is one of my favs I'm hoping the Creator will do one for the stand another great book I printed everything & I took a few Liberties on the color schemes especially on the greens mint green regular green & olive green I did a Terra Brown for case and coffee latte for the entrance I used gold silk pla for the keyhole I hope everybody enjoys I did the 2nd print that's an add-on of the Roses if U look you'll see the last photo zoomed in a bit ordered the light kit so once that's done I will add the photo with the light one picture that has some light me shining a flashlight through the back it doesn't give it justice but I hoped to give at least idea of how it comes out I redid Roland in a silk silver so he stands ou the silver wasnt bright enough I did last panel in red & blue moon to give more ominous feel Also made little Logo for it 😁 UPDATE got light
(Edited)
The profile uploader has replied
profile
3
Reply
Thank you so much for printing! It looks good, I like the colors. It's really up to each and everyone what color they want! Tho I have to say, the way I made it and it is supposed to be printed your keyhole is mounted the wrong way up :) Still looks good and if you want it that way, entirely up to you.
0
Reply
Hile Bedslinger, we have been well-met! Thankee-sai, for this awesome model from my favorite book series. Long days and pleasant nights, hope you win the contest!
The designer has replied
designer
2
Reply
Thank you! It doesn't matter, sharing this book and nook with people is a reward in itself.
0
Reply
Print Profile
14 plates - 19,7 hours - 621g filament
Incredible build. love the way it turned out.
The profile uploader has replied
profile
1
Reply
Thank you! Looks awesome!
(Edited)
1
Reply
I finally got around to printing this…had some trouble with one of the tree layers but then I saw that you uploaded a fixed version. The current one works perfectly! It looks fantastic, thanks again for making this. Now to print the roses…
The designer has replied
0
Reply
Thanks man! Love to see it. One note would be to flip Roland since he was made to be left handed (for story reasons) :D But keep it so if you like it.
1
Reply
Replying to @betterthanraw :
Good call, did-a-chick and all that, noted. I'll flip him around once I print a brighter back plate and get some glue for the roses. I did the back plate in Bambu silver PLA which somehow made it blue when backlit...and also very dim. Hoping to get a bit more light through with a brighter color.
0
Reply
I made this for my husband for Valentines and he loves it! I am not a Stephen King reader but I could tell the amount of care that went into building this amazing piece of art! Thank you for sharing this with us!
The designer has replied
designer
1
Reply
Delighted to hear! Yes, since I'm a big fan myself I couldn't bare to do this half heartedly. And it bring me so much joy that others feel as I do about it ♥️
0
Reply
Dude, This is amazing!! It is what I love about 3D printing, you spent time and love to make something and just gave it to the world to enjoy! The print is too big for an A1 mini but I shank the plates to 95% and it worked out great! you do need to keep the top of the light clip at full size and shrink the bottom. Thankee sai
The designer has replied
designer
1
Reply
Yes, it sadly didn't make it to the A1 mini, got an error message when uploading so had to remove it. If you wanna upload a A1 mini 95% print profile, feel free! That's exactly it. I made this cause I want it myself, but to share it with my fellow ka-tet is just priceless. Thank you for printing and I do love your light settings!
0
Reply
Print Profile
Add-on - Rose bushes
Absolutely stunning. Printed this as a gift for a friend and I am very excited to give it to her. Only minor quibble I had was that when using transparent PETG, the sun/moon inserts were a little to big to snap into the hole easily. After some sanding it's better.
(Edited)
The profile uploader has replied
profile
1
Reply
Thank you so much! I had the opposite when printing in transparent PETG, mine kept falling out! But it was a cheaper, non-bambu filament. So I didn't dare change any of the dimensions, both the insert and heavenly bodies are 40mm/1,57"
(Edited)
1
Reply

License

This user content is licensed under a Standard Digital File License.

You shall not share, sub-license, sell, rent, host, transfer, or distribute in any way the digital or 3D printed versions of this object, nor any other derivative work of this object in its digital or physical format (including - but not limited to - remixes of this object, and hosting on other digital platforms). The objects may not be used without permission in any way whatsoever in which you charge money, or collect fees.