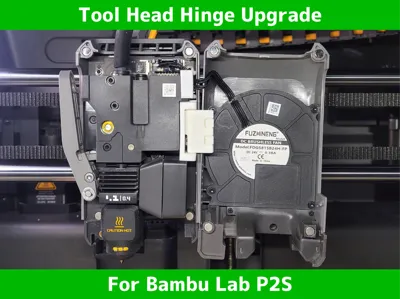
Toolhead Cover Holder & Flip-Hinge for P2S


Print Profile(4)


Description
The model details are just below—feel free to scroll down!
Boost Me (for free)
Thanks for checking out my design! If you liked it, a Boost would mean a lot. I truly appreciate every follow, download, like, and boost. Thank you for your support!

- Making 3D Printing More Fun & Functional. -
◀ Printer Upgrade Collection ▶


🚀 Looking for the Toolhead Flip-Hinge Upgrade for Bambu Lab Series? This is available here.
👉 P1S Toolhead Cover Holder & Flip-Hinge
👉 X2D Toolhead Cover Holder & Flip-Hinge
Update Log
- [2026-04-04] v2.1 Early Access: Stability and Precision Update This update focuses on further enhancing stability. The tab geometry has been optimized to eliminate front cover wobble, ensuring a solid and secure fit. Please let me know what you thinks!
Why I Created This
I always felt uneasy letting the toolhead cover dangle by its wires during maintenance. I wanted a permanent, integrated solution that feels like a built-in feature of the printer while minimizing stress on the cables. By making it a part of the toolhead itself, you can start maintenance smoothly at any time.
Overview
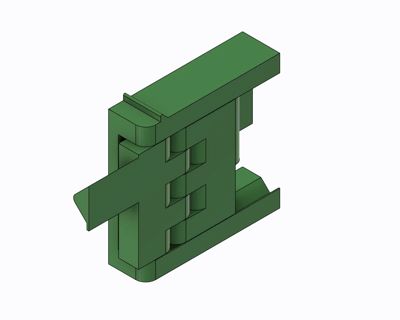
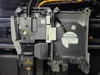
This swing hinge upgrade for the Bambu Lab P2S transforms your cover into a swinging door. You can fully access the nozzle and extruder without the stress of the cover dangling by its wires.

🛡️ Cable Protection: Anti-Pinch Cable Guide
Consider using this with my Tool Head Cable Guide.
The hinge makes opening easy, while the Cable Guide helps manage wires for a smoother closing experience. Using them together provides a more complete setup.
Key Features
- Easy Access: Opens wide to stay out of your way during nozzle swaps or cleaning.
- Zero Interference: Designed to avoid blocking the hotend cooling fan vents, ensuring your printer's thermal performance remains optimal.
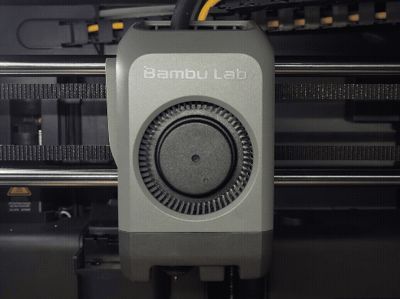
- Sleek & Integrated: The low-profile design is completely hidden when the cover is closed, maintaining the printer's original clean aesthetic without any external bulk.
- 100% Tool-Free: No screws, magnets, or extra hardware required.
Tips for Use
Due to the extremely limited space within the toolhead, here is a small tip for the best experience:
- Operation Tip: Grip the cover with your right hand and pull it slightly toward you while rotating your wrist.
- Self-Smoothing via Operation: You may feel resistance in the hinge and locking mechanism initially. Please repeat the opening and closing movement to allow the parts to polish each other and achieve your preferred smoothness.
- Lubrication: If the movement remains stiff, apply a small amount of silicone spray to the hinge and locking points to further reduce friction.
Design Story
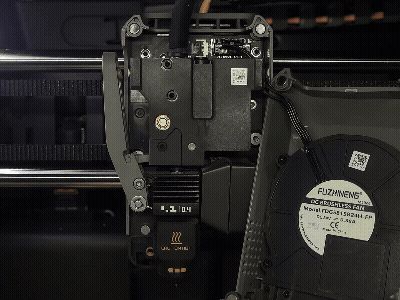
- The Role of the Triangular Tab: The internal space of the toolhead is actually too small to fully house a standard hinge mechanism. To solve this, I designed the triangular tab to act as a buffer that adjusts the effective length of the arm during movement. Don't be concerned if the tab becomes exposed during operation—this is a deliberate design choice to enable a full range of motion in a tight space.
⚠️ IMPORTANT - Before You Use
- Manual Break-in: This model uses tight tolerances for precision. Before installation, move the hinge back and forth several times by hand. This ensures the movement is smooth and prevents unnecessary stress on the toolhead during first use.
- Fitment Adjustment: If the fit is too loose or tight due to printer tolerances, slightly adjust the scale of the triangular insertion tab on the Hinge Arm in Bambu Studio.
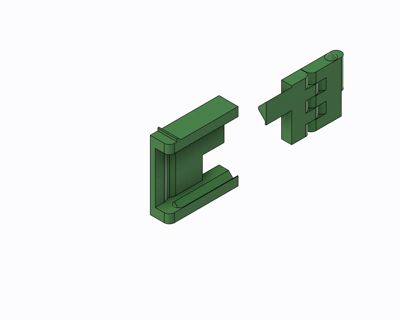
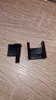
- Orientation: Refer to the photos to combine the Mount Base and Hinge Arm correctly.
Installation Guide
- Combine: Slide the Hinge Arm into the Mount Base guide.
- Insert: Slide the unit into the toolhead frame gap and push it all the way in until you hear or feel a clear click. Ensure the top tab is securely snapped onto the frame to lock it.
- Attach: Insert the triangular tab at the hinge tip into the gap between the front cover and the internal fan.
- Cable Check: Ensure the fan cable is not strained or pinched during movement.
Print Notes
- Thermal Design Basis: Based on temperature measurements specifically at the installation site, the part's surface temperature remains nearly identical to the ambient chamber temperature and is virtually unaffected by nozzle heat.
- Recommended Materials: While PLA functions perfectly fine for general printing, PETG, ABS, or ASA is recommended for those who prioritize extra durability, or if you frequently print high-temperature filaments where the chamber temperature exceeds the glass transition temperature of PLA.
- 🛑 Disclaimer: Use at your own risk. The designer is not responsible for any damage caused by use or misuse.
🔥 my favorite printer upgrade for P2S 🔥 | |
 |  |
 |  |
 |  |
 |  |
 |  |
 |  |

License
You shall not share, sub-license, sell, rent, host, transfer, or distribute in any way the digital or 3D printed versions of this object, nor any other derivative work of this object in its digital or physical format (including - but not limited to - remixes of this object, and hosting on other digital platforms). The objects may not be used without permission in any way whatsoever in which you charge money, or collect fees.
Comment & Rating (542)