Search models, users, collections, and posts

Spacerless - Gridfinity Baseplate Generator

IP Report
GIF

Print Profile(2)

All
A1
H2D
H2C
H2S
P2S
H2D Pro
X2D
A2L

PLA Pin diameter test 0.2mm layer, 2 walls, 15% infill
Designer
2.8 h
2 plates
5.0(1)

PETG Pin diameter test 0.2mm layer, 2 walls, 15% infill
Designer
3 h
2 plates
5.0(1)

Open in Bambu Studio
Boost
546
2472
58
81
1.6 k
889
Released 

Description

Spacerless - Gridfinity Baseplate Generator

🔥 UPDATE: The matching Spacerless Bin Generator is now LIVE! Create custom bins (and crazy shapes) that fit this baseplate perfectly without gaps:

👉 Spacerless - Gridfinity Bin Generator

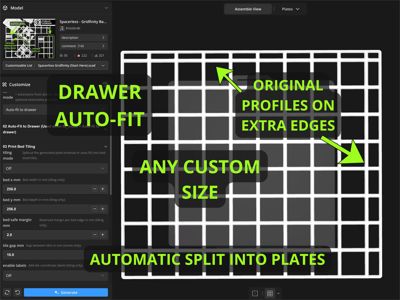
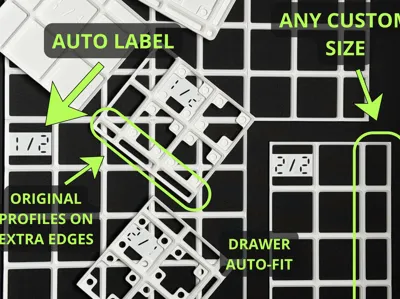
📐 Auto-Fit to Drawer • 🧩 Print-Bed Tiling • 📍 Filament Pins • 🧲 Magnets • 🏷️ Labels

This parametric generator creates Gridfinity-compatible baseplates with one clear goal: zero wasted space in real drawers.

Most Gridfinity tools generate wasted space by filling gaps with useless "spacers" or filler blocks. This generator supports true spacerless fitting. It extends the functional baseplate geometry from 1 to 41 mm in 1 mm steps, matching your actual inner drawer size and avoiding dead zones entirely.

🚨 Important: MakerWorld limitation + Extra Large Grids

MakerWorld has a parametric limitation when the model is generated as separate build plates.

If MakerWorld shows a critical error:

  1. Switch to the Extra Large Grids customizer profile (the one where objects are not distributed across separate build plates by MakerWorld).
  2. The generator will still cut/tile the baseplate, but in this mode, you must do the final distribution yourself:

✅ Extra Large Grids steps (Bambu Studio / OrcaSlicer):

  1. Download the STL.
  2. Split to objects (separate tiles into individual parts).
  3. Use Auto Arrange to place tiles on build plates (press A on the keyboard).

This is a MakerWorld parametric constraint, not a model geometry issue.

🚀 Quick Start (Recommended)

1️⃣ Pick the sizing method Go to [01 Sizing Mode]

  • Auto-fit to drawer ✅ (Recommended)
  • Manual (set grid size + extensions yourself)

2️⃣ Auto-Fit to Drawer (best for real drawers) Go to [02 Auto-Fit to Drawer]

  • drawer_x_mm / drawer_y_mm → inner drawer width/depth (mm)
  • clearance_per_side_mm → Clearance default is now 0.0 mm per side (exact sizing by default; add 0.5-1.0 mm per side if you need easier insertion or your measurements are uncertain or you make a very large drawer)
  • fit_x_distribution / fit_y_distribution → choose where the leftover space goes.
    • Symmetric: Splits space evenly.
    • Left / Right / Top / Bottom: Pushes the grid to one side and puts all extensions on the opposite side.

How it works: Fits the largest possible full 42 mm Gridfinity grid and uses the leftover area as spacerless extensions (1–41 mm) instead of generating separate filler blocks.

3️⃣ Print-Bed Tiling (when the plate is larger than your bed) Go to [03 Print Bed Tiling]

  • tiling_mode = On
  • Set bed_x_mm / bed_y_mm and bed_safe_margin_mm
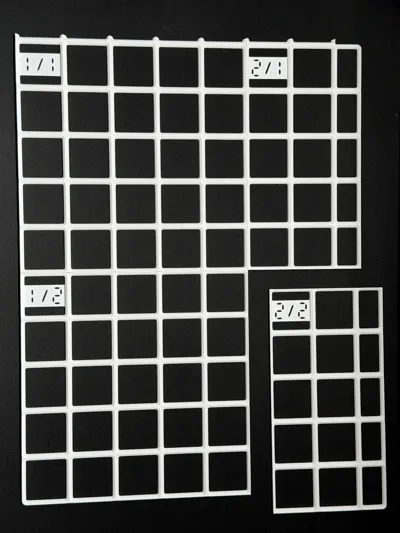
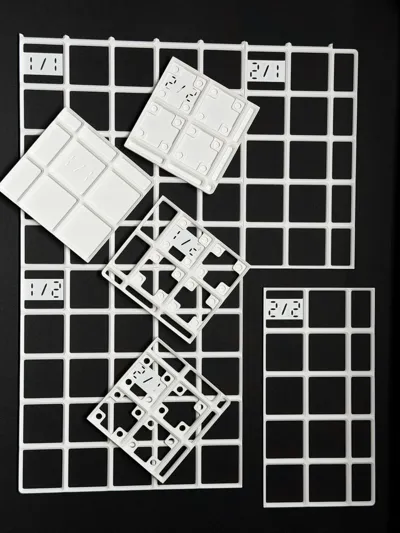
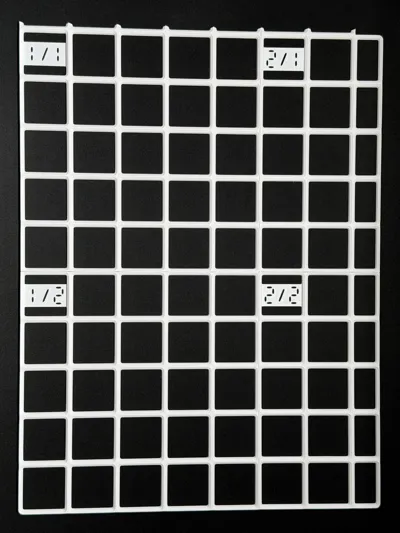
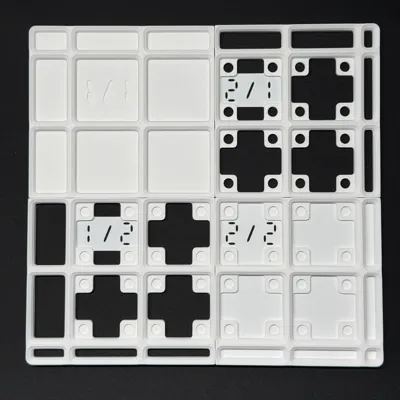
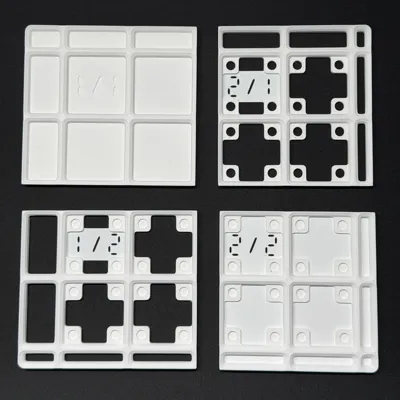
🏷️ Label Logic:

  • Labels are always generated in the top-left corner of the tile.
  • Format is Column / Row (e.g., 1/2 means 1st Tile in the 2nd Row).

✂️ Tiling Tip: If the generator produces a useless fragment (e.g., a single small 42x42 block or a thin strip) in the corner of the layout, simply slightly reduce your bed_x_mm or bed_y_mm setting. This forces the cut line to shift, merging that small piece into a larger, more stable tile.

📏 Spacerless Extensions (The Key Feature)

Extensions are designed to eliminate the need for useless "spacer" blocks:

  • Works in Auto-Fit and Manual modes.
  • Supports 1–41 mm extensions with 1 mm precision.
  • Includes corner logic so side extensions meet cleanly.
  • Design Note: For extensions under 11 mm, the outer wall is intentionally left open without an edge rim. This prevents visual clutter and ensures the walls don't merge poorly.

Why it matters: Real drawers almost never match perfect multiples of 42 mm. Coarse solutions waste space with fillers. This one lets you dial in the fit down to the millimeter using functional baseplate area.

📍 Filament Assembly Pins (Tile Alignment)

Go to [08 Filament Assembly Pins] This section controls the filament-based alignment pin system used to precisely align tiles when printing large baseplates in multiple parts.

You define the pin hole depth and a tapered two-diameter hole. Because the hole narrows inward, a piece of standard filament can be pushed in and will seat snugly (the taper self-centers and tightens as you insert it).

⚙️ Tolerance Testing: Based on my testing, the optimal settings for assembly are an outer hole of 2.25 mm and a hole end of 1.75 mm. To connect the parts, use filament segments approximately 20–24 mm in length for PLA. For PETG, you may want slightly longer segments—around 24–27 mm—to achieve a similarly snug fit.

I have also included a test plate print profile so you can test these tolerances yourself and see what works best for your specific printer setup.

🧲 Magnet Holes

Go to [07 Magnet Holes]

  • Off
  • On (Blind holes) → pockets with a solid floor.
  • On (Through holes) → open through. You can tune diameter, depth, wall thickness, and fillet radius around the magnet “ears”.

🧱 Base Extra Thickness (Stiffness)

Go to [09 Base Extra Thickness]

  • Off: standard.
  • Solid: full solid layer under the plate.
  • Skeleton: adds thickness while keeping the underside open (lighter). Use Solid for maximum stiffness, or Skeleton when you want extra strength without filling everything.

⚙️ Printing Recommendations

Safe practical defaults (adjust to your printer/material):

  • Layer height: 0.20 mm (or 0.16 mm for extra clean edges).
  • Walls: Min 2.
  • Top/Bottom: 4–6.
  • Infill: 10–20% (more if you want extreme stiffness).
  • Supports: Not required.
  • Material: PLA works well; PETG if you want higher heat resistance.

🛠️ Assembly Tips (Tiled Mode)

  1. Wait at least 1 minute after printing before removing the tiles from the build plate. Letting them cool down prevents warping, ensuring a perfectly flat base.
  2. Use Filament Assembly Pins (if enabled) to align seams.
  3. Optional: glue seams for a permanent baseplate.
  4. Place the assembled baseplate into the drawer and verify clearance.


Update (12.01.2026)

  • Profile geometry fixed (matches the reference profile consistently across the model).
  • Clearance default is now 0.0 mm per side (exact sizing by default; add 0.5–1.0 mm per side only if you need easier insertion or your measurements are uncertain)

Comment & Rating (58)

(0/1000)

Boosted
Print Profile
PLA Pin diameter test 0.2mm layer, 2 walls, 15% infill
Great work. Perfect functionality. Highly recommend printing the "pin diameter test" first. Thanks
The profile uploader has replied
Show original
profile
2
Reply
Thanks a lot for the boost and the 5 star rating! 🙌 I agree, and from what I’m seeing, almost nobody prints the “pin diameter test” first😅 Really glad it’s working perfectly for you. Thanks again! 😊
0
Reply
Worked perfectly, I like it
The designer has replied
Show original
designer
2
Reply
Awesome, glad it worked perfectly🙂 Thanks for sharing the photo!
0
Reply
I’m having trouble getting started. using Bambu handy from my iPhone. if I go to customize and choose either the standard or extra large, select auto and go through the steps as outlined in the instructions, after I click generate, then export I get the following error. I’m not sure how to bring it over to Bambu studio to split it into separate plates (because it is larger than a single plate)
The designer has replied
0
Reply
I just moved to makerworld on the web and it worked fine. amazing model! came out perfectly!
designer
1
Reply
Replying to @user_2880911640 :
Thank you so much for the boost! I’m really glad it worked fine through MakerWorld on the web and that the model came out perfectly. The generator is quite complex, so using it through the web version on a computer is definitely the safest option, especially for larger or more advanced baseplates.
0
Reply
The same base that is customized will have cells with widths of 33.7 and 37.7 appearing simultaneously, wasting printing time
(Edited)
The designer has replied
Show original
0
Reply
The dimensions differ because this baseplate uses the Extension feature, which is an intended function of the generator. Extensions let you add a custom extra size to a selected edge of the baseplate. So if you measure near an extended edge, some visible dimensions can differ. That does not mean the baseplate is incorrect. It means the extension is doing exactly what it is supposed to do. Also, this is not the correct way to check the original Gridfinity spacing. Measuring only the visible inner opening depends on the profile shape, chamfers and clearances. The correct way to check it in the slicer is to measure from one cell edge to the matching edge of the next cell, as shown in the screenshots. This cancels out the profile thickness between cells and shows the correct original Gridfinity spacing. The original grid remains correct, and the extension has the requested custom dimension.
0
Reply
Perfect...
0
Reply
Boosted
The print came out well. An organised draw brings me more joy than is probably normal. A Boost well earned.
0
Reply
Great generator! I was able to fill my Husky workbench drawers edge to edge with your Spacerless Grid and Bin combo. Thanks for sharing.
The designer has replied
designer
2
Reply
Thanks a lot for the boost💪 I really appreciate it! I’m glad the generator is working well for you. If you run into anything you’d like improved or added, just let me know. I’d love to see a photo of your setup, real-world examples are super helpful.
0
Reply
Replying to @KrissGrab :
Here are a couple of pics of the grid installed in the drawer. Fit was perfect, I used a .5mm on the clearance per side parameter. I failed to take into consideration the lip at the top of the drawer, but your Bin Generator saved to day! Thanks again for an awesome model!!
designer
2
Reply
Replying to @user_1170813635 :
Thanks a lot for the photos! I’m really happy the generator helped you out😊
1
Reply
I love the concept, but this is not working for me. I just printed a baseplate for a drawer and I have two immediate issues: The first one is likely my error. There is a setting for clearance per side and the default is 1 mm. I didn't mess with it (I didn't want to change settings I wasn't sure about) but my baseplate printed too small by at least 2 mm. I think it's even more than that, but if I understand the setting, it should be exactly 2 mm too small. Why is clearance a desired setting, and why is the default not zero? When I put in the exact desired width and depth of the baseplate, that is what I expect to get. The second issue, more important than my first, is that gridfinity bins don't seem to nest fully in the baseplate. They ride up somewhat on the edges of the baseplate. I have bins from various sources and they all fit very nicely in other baseplates I've printed, but they don't fit quite right in these ones. It's like they are not fully nesting down into the square.
The designer has replied
2
Reply
I'm very sorry for the trouble. You were absolutely right about these issues, and I appreciate your feedback. I have just pushed an update to fix everything: 1. Clearance: I’ve changed the default value to 0 mm so the plate will print at exactly the dimensions you input. I also updated the description to make this setting clearer. 2. Nesting Issue: I found and fixed a bug in the geometry that prevented bins from seating fully. They should now nest perfectly into the baseplate. Please try generating a small test piece again it should be 100% correct now. Thanks for helping me improve the tool💪
8
Reply
Replying to @KrissGrab :
Thank you! I reprinted one and it works perfectly. Most importantly, bins fit correctly now. The tapered holes for joining sections larger than a single build plate with some filament is clever, and a little glue on that filament permanently secures it. I do prefer the interlock joining that some other designs have (such as at https://gridfinity.perplexinglabs.com/pr/gridplates/0/0 ) but yours has the benefit of producing a partial grid where the one I linked will only do a half or full grid, with any extra being just wasted space.
(Edited)
3
Reply
How can I find out exactly what size the smaller grid section is so that I can make custom bins for that stretch of grid? Basically, how do I determine the exact measurements I need to create the Spacerless Extensions?
(Edited)
The designer has replied
designer
1
Reply
you can do this by measuring the distance in the slicer as in the picture. This dimension matches the extension 🙂
2
Reply
Replying to @KrissGrab :
Amazing! Thank you so much!
0
Reply
any chance of adding ability to print grids in bulk (stacked)? ive seen this in a few models on maker world but none can be customized.
The designer has replied
designer
2
Reply
Yeah, that’s a good idea. I’ll look into an option to print grids stacked. The standard grid has a sharp top edge, so clean stacking would probably need a small design tweak. Another option is to add an alternative “stackable” grid design next to the original. I’ll test how the stacked grids work and see what I can add.
1
Reply

License

This user content is licensed under the MakerWorld Exclusive License.

You may create derivative works based on this object, provided that all such derivative works are published exclusively on the MakerWorld platform and include proper attribution to the original creator. You may not share, upload, host, distribute, or publish this object—or any derivative work of this object—on any other digital platform, marketplace, or distribution channel. Commercial use of this object and any derivative works is strictly prohibited. This includes, but is not limited to, selling, renting, sublicensing, or using the object in any context in which you receive monetary compensation or other financial benefits.