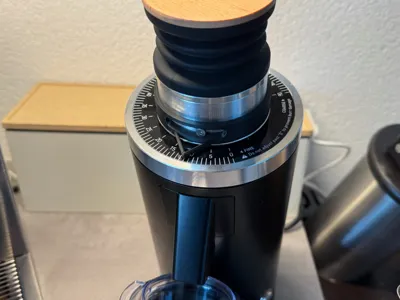
DF 54 true zero indicator


Print Profile(1)

Description
True Zero Indicator for DF54
This model is designed to replace the original dial indicator that comes stock on your DF54 coffee grinder. With this design you can set your zero point to the true zero of your grinder. I was also not satisfied with the size of the stock indicator, because the needle was to small for my liking and it was hard to determine the number, the grinder was set to.
I have resolved this problem by making the indicator needle bigger. For usability there is a cutout in the centre of the needle, so you are still able to red the numbers on the grind size adjuster.
The adjuster can be used with the original M3 screw, because I have designed this model to have the same wall thickness as the original (small) grind size indicator. Thats why the fit is lose if you do not tighten the screw.
With this indicator your indicator dial can range into the smaller grind sizes and it will help you to find the consistent grind size after cleaning your grinder.
How to use this model
Installation:
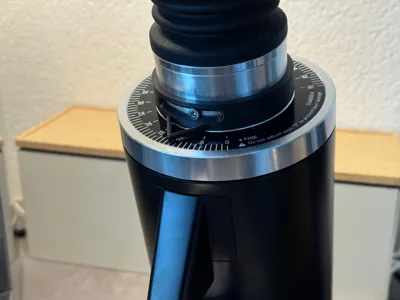
To install this indicator it is best to remove the bellows and the anti popcorning insert. Then you need to remove the old indicator by unscrewing the M3 screw in the centre. Set the screw by side, it will be needed for the installation of your “true zero indicator”.
Slide the printed indicator over the top and secure it with the original screw. Do not tighten it all the way.
Adjustment:
If your new “true zero indicator” is secured you can assemble the top part again. Now switch on your grinder and SLOWLY move the grind size dial to “fine”. If you start to hear a chirping noise, stop and set the needle to the position of the number 0 and tighten the screw carefully. This is the finest your grinder can go without the burrs touching. (Do not worry! The sound wont harm them for this short time period. The burrs are flat on top, so you can not dull with this procedure.) If you clean your grinder, this procedure has to be done again, but your grind sizes will be close to before the cleaning.
Feedback
If you like the model and want to help me Improve what I post on here, please like this post, rate this model and leave a comment on what you like to see improved in future models.
Boost Me (for free)
If you want to support my work!
License
You shall not share, sub-license, sell, rent, host, transfer, or distribute in any way the digital or 3D printed versions of this object, nor any other derivative work of this object in its digital or physical format (including - but not limited to - remixes of this object, and hosting on other digital platforms). The objects may not be used without permission in any way whatsoever in which you charge money, or collect fees.
Comment & Rating (1)