Rear Bracket – 9070 XT Prime – NCASE T1 V2.5


Print Profile(1)

Description
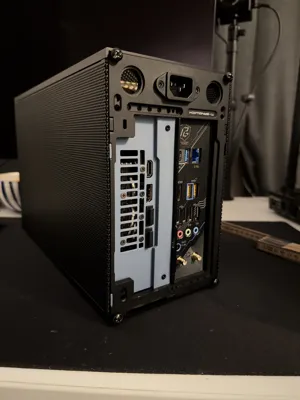
NCASE T1 Rear GPU Bracket / Rear Plate – 9070 XT PRIME
This is a replacement rear GPU bracket for the NCASE T1, designed specifically for the AMD 9070 XT PRIME. It replaces the original metal GPU bracket and fully covers the rear opening of the case, giving a much cleaner and more finished look once assembled.
The plate is 1.5 mm thick, making it slim enough to slide the GPU into the case with or without my anti-sag bracket installed.
Compatibility & Hardware
- Designed for 9070 XT PRIME
- Uses only the screws included with your NCASE T1
- the screws already holding the original GPU bracket
- No extra hardware required
- Highly recommended to use together with my anti-sag bracket for maximum rigidity
Versions / Offset
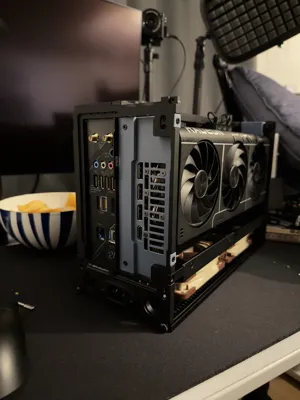
The current version uses a 16 mm offset between the GPU and motherboard.
More offset variants will be added to better support different layouts and tolerances.
Venting
The rear plate includes a breathing vent aligned with the rear of the GPU.
- Air-cooled GPU: leave the vent open
- Water-cooled GPU: the vent can be closed off for a cleaner look
(or easily remixed with a beveled or decorative design)
Filament & Materials
The rear of the GPU can get warm. While I don’t yet have exact temperature measurements:
- PETG is the recommended safe choice
- ABS / ASA also suitable
- PLA may work — I will test PLA in my own build and report back
Installation (Important notes first)
- Do not secure the riser cable fully until the very end
- Do not install the standard metal GPU retention tab
(the usual case piece held by a thumb screw)
Installation (Short version)
- Remove the two flat metal pieces at the top and bottom of the rear of the case.
- Insert the printed rear plate from inside the case, slide it out through the rear opening, and rotate it into position.
- Some force is required to snap it in
- Secure the plate using two flat NCASE screws (top-left and bottom-left).
- Loosen the riser cable slightly to avoid strain.
- Remove the original GPU bracket:
- Unscrew the 6 rear screws
- Remove the 2 longer screws on the underside
- Remove the metal bracket
- Reinstall the two underside screws (gently! overtightening can bend the PCB)
- (Optional but recommended) Install the anti-sag bracket on the GPU.
- Slide the GPU into the case in its final orientation.
- It’s a very snug fit
- You may need to gently flex the anti-sag bracket ~0.5–1 mm to clear the case frame. Use the case frame as leverage and give the GPU a tiny push towards the anti-sag bracket.
- Once past the case frame, rotate the GPU carefully and seat it into the riser cable.
- Reinstall the 6 rear GPU screws.
- Lift the card slightly at first to align the holes
- Align the GPU so it’s parallel to the motherboard, then tighten the anti-sag bracket.
- Finally, secure the riser cable.
Notes
- Tighten GPU screws gently — watch for PCB flex
- This plate + anti-sag bracket creates a very solid GPU mounting solution
- Feedback, remixes, and suggestions are welcome
Boost Me (for free)
If it helps you, a boost would be appreciated ❤️
Comment & Rating (8)