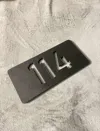
House Number – Fully Editable


Print Profile(5)


Description
House Number – Fully Editable
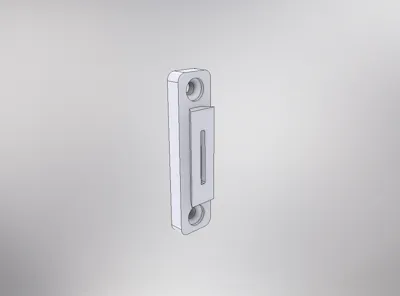
This is a 3D-printable house number designed for mounting on a fence.
For outdoor use, PETG or ASA is recommended due to better weather resistance. I personally printed it in PLA and finished it with paint (PLA is primarily intended for indoor use, and it is important to keep that in mind because it can deform or warp when exposed to direct sunlight and higher temperatures).
The numbers are fully editable in Bambu Studio – you can easily change the size, font, and other parameters to fit your needs.
Size:
250 mm (height) × 120 mm (width) × 5 mm (depth)
9.84 in (height) × 4.72 in (width) × 0.20 in (depth)
How to edit numbers:
Go to the Process tab and select Objects > Select text_shape > Right-click and choose Edit text
Make your changes as needed!
Tip:
For easier and more precise mount placement, use the included guide. Simply insert the mounts into the guide, place a level on top, and you're ready to screw!
⚠️ Important:
When printing numbers or letters with floating parts (like 8, 0, 9, 4, 6), use a font with connected elements or add a thin backing plate and glue the parts afterward. You can also add custom supports in Bambu Studio by clicking on the plate object, selecting Add Part, and then manually adjusting the supports to match the font.
Make sure the number is facing the build plate (mirrored correctly) before printing.
The mounting system is designed to be firm and secure, but the final fit depends on the material you use and its properties (thermal expansion/shrinkage).
- If the fit is too loose, gently squeeze the edges of the counterpart against a hard surface.
- If the fit is too tight, lightly sand the edges of the counterpart until it fits.
I used a textured build plate, but if you want a smooth surface finish, use a Smooth plate.
The mount is modelled for standard M4 screws (the holes diameter of the mount is 4.5 mm).
If you prefer to glue the mounts instead, you can remove the built-in mounting clips from the number plate using the Slice tool in Bambu Studio, then print the separate mounting clips file and attach them with cyanoacrylate (super glue).
You can also print or add a background plate behind the number for a different look.
License
You shall not share, sub-license, sell, rent, host, transfer, or distribute in any way the digital or 3D printed versions of this object, nor any other derivative work of this object in its digital or physical format (including - but not limited to - remixes of this object, and hosting on other digital platforms). The objects may not be used without permission in any way whatsoever in which you charge money, or collect fees.
Comment & Rating (18)