


Print Profile(1)


Description
Thanks for checking out my model! Interested in supporting my work or selling prints?
Support Crew – Show some love and help keep the projects flowing
Galactic Maker Foundry – Sell physical prints of my original designs
Foundry License+ – Sell prints and use my photos for listings
🎉 Supporter-only Discord coming soon – get early access, tips, and sneak peeks!
Membership
Join here to support or get a license
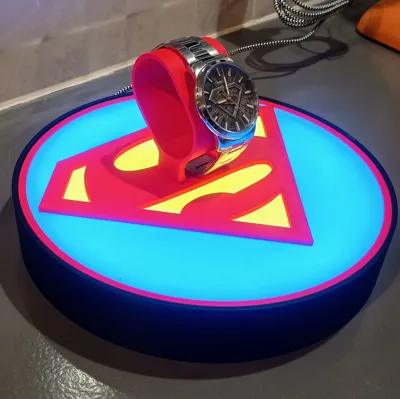
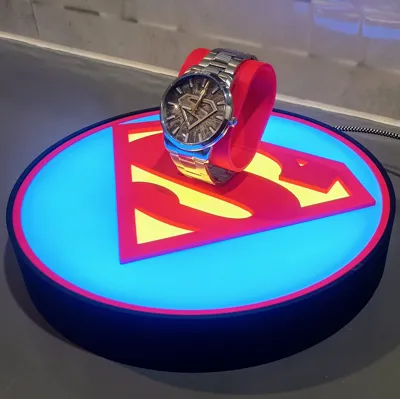
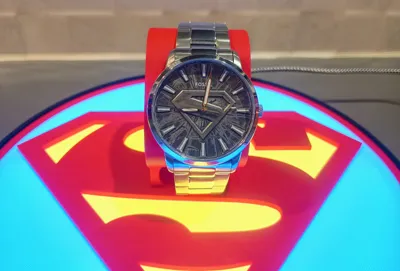
This is a Superman-themed watch display stand designed to show off a single watch with a bold, clean presentation and fully controllable RGB lighting.
The base uses WLED and is split into two independent LED segments, allowing separate colour control for the Superman shield and the outer ring. A white diffuser sits on top of the LEDs to give an even, soft glow with no visible hotspots.
The watch holder itself is glued into the top diffuser, keeping the design solid and clean with no visible fasteners or mounts. This makes it ideal as a permanent display piece rather than a removable stand.
Features
- Designed for WLED (ESP8266 / ESP32 compatible)
- Two LED segments for independent colour control
- Superman logo
- Outer ring
- White diffuser for smooth, even lighting
- Fixed watch stand glued into the top diffuser
- Sized to suit standard metal or silicone watch bands
- Clean, bold Superman logo presentation
Assembly Guide
Step 1: Flash WLED to Your D1 Mini (ESP8266)
- Go to install.wled.me and flash WLED to the D1 Mini
- Optional: set Wi-Fi now, or leave it in AP mode for later
Step 2: Prepare the USB Power Cable
- Feed a USB cable through the hole in the base
- Strip back the red (5V) and black (GND) wires
- Cut and strip two short extra wires (one red, one black)
- Twist:
- extra red with USB 5V
- extra black with USB GND
- Cut and strip one signal wire for LED data
This lets the LED strip get power directly from USB while the D1 Mini taps into the same lines.
Step 3: Wire the First LED Strip (Outer Ring)
Solder to the outer ring strip input pads:
- 5V → 5V
- GND → GND
- Signal → DIN
Don’t stick anything down permanently yet — do a quick test first.
Step 4: Wire the Bridge From Outer Ring → Inner Logo (3-Wire Link)
Your design uses two separate LED runs:
- Outer ring strip
- Inner Superman logo strip
To link them, solder three wires from the end of the outer ring strip to the start of the inner logo strip:
- Outer ring 5V → inner 5V
- Outer ring GND → inner GND
- Outer ring DOUT → inner DIN
(So the inner strip continues the data chain from the outer strip.)
Step 5: Wire the D1 Mini
- USB tapped 5V → 5V on D1 Mini
- USB tapped GND → G on D1 Mini
- LED signal wire → GPIO2 (D4) on D1 Mini
Step 6: Secure the Electronics
- Use double-sided tape to hold the D1 Mini and wires in place
- Do not glue anything yet — you want full access for testing/config
Step 7: Power On & Basic Test (Before Assembly)
- Plug into a 5V / 2A USB power source
- LEDs should light up in WLED default pattern
- If not:
- check LED direction arrows
- verify DIN/DOUT bridge is correct
- recheck solder joints
- confirm WLED LED pin is set correctly (GPIO2 / D4)
Step 8: Find Total LED Count (Quick & Reliable)
Because LED counts vary depending on strip length and cut points, set this in WLED manually:
- In WLED, start with a rough number (ex: 50–100)
- Use a solid effect and raise/lower the count until:
- the last LED is the last physical LED on the inner logo
- no “missing” LEDs, no extra “ghost” LEDs
This gives you the correct total for your build.
Step 9: Segment Setup (General Method)
Your goal is 2 segments:
- Segment A: Outer ring
- Segment B: Inner Superman logo
How to find the split point:
- In WLED, set Segment 0 to a solid colour and slowly adjust the Stop value until the outer ring is fully covered and the inner logo is still off.
- Then create Segment 1 starting at that Stop value through to the total LED count.
This way the segment boundary matches your actual wiring/LED layout.
Step 10: Dry Fit the Diffuser & Check Light Spread
- Place the white diffuser on top (no glue)
- Confirm:
- colour separation looks clean
- no dark spots
- no wire shadows
- Adjust LED placement/foil/diffuser alignment if needed
Step 11: Final Glue-Up (LAST STEP)
Only after everything is tested and configured:
- Glue the diffuser into place
- Glue the watch stand into the top diffuser
⚠️ Once glued, electronics access is basically gone — so don’t rush this step.
Step 12: Enjoy
Your Superman watch display stand is now sealed, finished, and fully controllable via WLED.
Bill of Materials (BOM)
Item | Quantity | Links |
|---|---|---|
| D1 Mini (ESP8266) | 1 | https://www.aliexpress.com/item/1005006235653025.html |
| WS2812B LED strip | 60 per Meter | https://www.aliexpress.com/item/1005006766819624.html |
| USB cable | 1 | https://www.aliexpress.com/item/1005008045179029.html |
| Wire 26 AWG Red, Black, Yellow | as needed | https://www.aliexpress.com/item/4001283806251.html |
| VHB Tape | as needed | https://www.aliexpress.com/item/1005008305877251.html |
| Soldering Iron | 1 | https://www.aliexpress.com/item/1005007099216072.html |
| Solder | as needed | https://www.aliexpress.com/item/1005008695639704.html |
| Hot glue | as needed | https://www.aliexpress.com/item/1005008055271799.html? |
| CA glue | as needed | https://www.aliexpress.com/item/1005003643576389.html? |
License
You shall not share, sub-license, sell, rent, host, transfer, or distribute in any way the digital or 3D printed versions of this object, nor any other derivative work of this object in its digital or physical format (including - but not limited to - remixes of this object, and hosting on other digital platforms). The objects may not be used without permission in any way whatsoever in which you charge money, or collect fees.
Comment & Rating (1)