Closed loop carbon+HEPA filter for your 3D printer


Print Profile(1)

Description
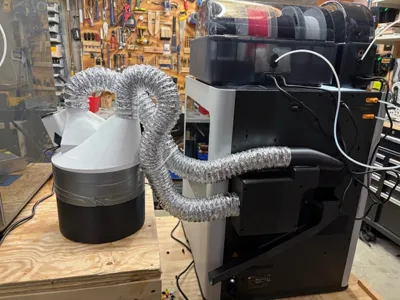
I made this to filter the air in my printer enclosure. It cycles the air through a HEPA filter and a bunch of activated carbon. It creates a negative pressure inside the enclosure to ensure you capture all the fumes that otherwise would be leaking out into your room.
You can see the size of the filter inside this thing in comparison to a H2D printer:

It's quite large so lasts a long time and gives good filtration. Fill the entire interior of the filter with activated carbon too. That's way more carbon than you get in most filters. With it I can print stuff like ABS and there is no smell at all. It's designed to contain this specific HEPA filter, which is the filter you see in the above picture.
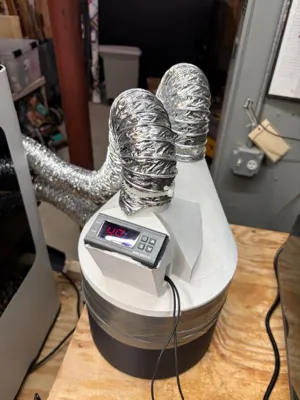
There are two versions of this filter bottle. One with a heater and one without. To use the non-heated version you need these components:
- Activated carbon: https://www.amazon.com/gp/product/B00GKVNI8E
- 120mm fan: https://www.digikey.com/en/products/detail/delta-electronics/AFB1212VH/2560462
- Power supply for fan: https://www.amazon.com/gp/product/B06Y64QLBM
- 2 inch air ducting: https://www.amazon.com/gp/product/B00KQPCE8A
You print all three parts, screw the fan into the middle plate, stuff the filter inside, fill the HEPA filter's interior with activated carbon, lay some thin cloth over the top to keep it in there, then stick the cap on and it should lock it all together. Finally, put the 3 parts together and wrap the seam in duct tape. It's really straightforward.
Use some 2 inch ducting to connect it to your enclosure. There are two ports on the nozzle attachment, pipe both to your enclosure so it will run in a closed loop cycling the air inside your enclosure. This way your enclosure won't struggle to maintain temperature when printing high temp filaments.
You can use any 120mm fan so long as it has decent static pressure. The one linked above is the one I used, which I pulled from an old server. It's a 0.371 in H2O static pressure fan. Anything like that should be fine. I wouldn't worry about noise as the fan is embedded pretty solidly behind a decent amount of plastic. I can hardly hear it when running even though it's a loud fan out in the open.
The non-heater version prints without supports. Print the nozzle attachment part upside down so that supports aren't needed. The version with the heater does need supports for the bump out that contains the thermostat. If you print the heated version you need to get:
- This temperature controller: https://www.amazon.com/gp/product/B019I3YCFS
- A decent 12V power supply. I like this 240W one: https://www.amazon.com/gp/product/B078RTV41D
- A 100W, 60mm heater: https://www.amazon.com/dp/B07B26KKH7
Note that the power supply I suggested above for the non-heater version isn't enough to run the heater and the fans. So if you are going to make the heating version get a beefier 12V power supply like the 240W I suggest, or some other equivalently beefy one. I sealed the holes around the cabling with some sugru and used 5 minute epoxy to glue the heater into position.
If printing the non-heating version PLA is fine. But if you are printing the heater you definitely want to use ASA or ABS or something that can handle high temperatures when printing the cap. I recommend ASA. I also wouldn't use PLA if you are pairing this with a printer that can reach high enclosure temperatures. E.g. The H2D gets hot enough that you should print this with ASA and not PLA regardless of which version you print.
For H2D owners, get my H2D mounting adapter so you can attach this filter to your H2D.
When printing the top part (the part with the two hose ports) you print it upside down. That is, with the hose ports touching the build plate. It's designed to be printed in that orientation to minimize the need for supports. The non-heated version shouldn't require any supports, but the heated one benefits a bit from some supports.
Comment & Rating (8)