Search models, users, collections, and posts

Snapmaker U1 PTFE Adapter (M6, M10, ECAS04)

Print Profile(3)

All
P1S
H2S
P1P
H2D Pro
H2C
H2D
P2S
A1 mini
X1E
X1
A1
X1 Carbon
X2D
A2L

2x PTFE Adapters M6 thread
Designer
42 min
1 plate
5.0(25)

2x PTFE Adapters M10 thread
Designer
47 min
1 plate
5.0(23)

2x PTFE Adapters ECAS04
Designer
45 min
1 plate
5.0(8)

Open in Bambu Studio
Boost
416
1201
131
40
2.1 k
568
Released 

Bill of Materials

Maker's Supply Kits and Parts
Select all
PC4-M6 Pneumatic Connector (5PCS) - FC001
Bambu Filaments
Select all
Black (33102) / Filament with spool / 1 kg

Description

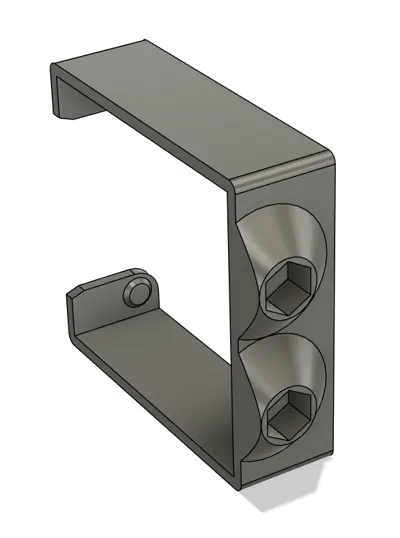
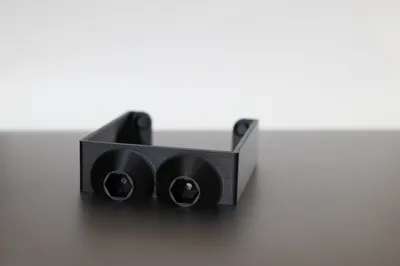
Snapmaker U1 Adapter for PTFE Tube Pneumatic Connector 

This adapter snaps onto the automatic feeders of your Snapmaker U1 and allows you to connect PTFE tubes to the feeders. Makes feeding filament from filament dryers quick, easy, and reliable! Plus, it's easily installed and removed without any mounting hardware. No modifications of your printer hardware!


Note: M6 vs M10 vs ECAS04

Pneumatic Connectors are required. I recommend either the ECAS04 for the lowest profile or the common PC4-M6 to pair with the corresponding model/profile. 


ECAS04 design accommodates connectors 8mm in diameter and a depth of 7.3mm


Buy from common vendor below or anywhere else you would get similar items.

ECAS04: Buy from Amazon or eBay or AliExpress 

PC4-M6: Buy from Bambu Lab's Maker's Supply Store or Amazon or eBay or AliExpress or Microcenter


Key Highlights:

  • Uses pneumatic connectors to securely hold your PTFE tubes.
  • Same design works for both left (1 & 2) and right (3 & 4) automatic feeders.
  • Doesn't obstruct the toolhead numbers or the status LEDs.
  • Printing is quick and easy: ~35 minutes for 2 copies. No supports.
  • Installation is quick, easy, & secure: No mounting hardware required.
  • Removal is quick & easy.

Directions:

  1. Print one adapter for each feeder. The included profile already has 2 copies for your convenience. PETG recommended (some material flex required for installation and removal).
  2. Thread in an appropriate Pneumatic Connector (e.g. PC4-M6 or PC4-M10) or press-in the ECAS04 connector into each opening. You may need to use a pair of pliers or clamp to full seat them.
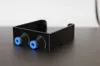
  3. Slide the adapter over the feeder from the front, align the front and then snap the rear tabs into the corresponding holes of the feeder.


Comment & Rating (131)

(0/1000)

Great idea! I had to resize the model to 102% to be able to get the connectors to fit properly without mangling the plastic.
The designer has replied
designer
1
Reply
Thanks for the feedback! I'm monitoring comments to see if others have issues with fitment too. My ECAS04 connectors come in two pieces where the plastic piece is separate from the metal piece. I use smooth jaw pliers (long Knipex pliers) to gently press the metal body in. Then push in the plastic part by hand. Is yours different? Can you measure the diameter of the main body with calipers? It should be 8.00mm as standard. The designed hole is 8.2mm in diameter with a 60° taper and flat top for the printer to bridge across. This mean a properly tuned printer and filament profile on a 0.4mm nozzle and 0.2mm layer height should produce an opening no smaller than 8mm all around. If I start to see others with the same issue, I may test enlarging the hole by the 2% you suggest (~8.36mm).
designer
1
Reply
Replying to @ken830 :
I have two types. One has metal with ridges, and the other is all plastic. The plastic all plastic type seem to fit better and is what I used in the photo. I will add a photo of both to show the difference.
0
Reply
Replying to @ken830 :
Here's a photo of the connectors that I tried. After scaling up the model a little bit I found that the connector on the right was a better fit.
0
Reply
Print Profile
2x PTFE Adapters M10 thread
perfect print. I love that it uses less material that others but gets the job done. only issue I had was one of the four filament locations is difficult to get started like the hole is a little offset or too small, but with some persistence it works.
The profile uploader has replied
profile
1
Reply
Thanks. I think there are two things. The hole is a hexagon and sized to be 2.5mm from edge to edge, so it should be plenty big enough for 1.75mm filament to pass unobstructed. I noticed that your connectors are not screwed down all the way until they are fully seated against the adapter. The gap is probably what's giving you trouble getting the filament to pass through the hole. They are designed to be tight, so you should expect to have to use a pair of pliers to screw them all the way in. However, I noticed that your print is splitting. What type of filament did you print with? I've designed this for PETG. PLA may be too brittle. Do you have well-tuned profiles and good layer-adhesion? I'm monitoring comments here for common issues to judge whether I need to adjust the size of the hole for the threads.
(Edited)
profile
1
Reply
Replying to @ken830 :
I printed in PLA. The layer adhesion is really good for PLA, but yes there was cracking. I think my fittings are longer than others because they bottomed out when threading in. My theory is that the PTFE tube needs to come into the front more strait on or it gets jammed. when I hold the tube in a straight line the filament goes in easily. Maybe you could put a small taper on the hex part to help [funnel] the filament into place? I could print in PETG as well, just didn't have any loaded in the A1 when I was printing this.
(Edited)
profile
1
Reply
Replying to @user_1015805181 :
How long are the threads of your fittings? The adapter is designed with 7.0mm of depth. I've only ever seen 7mm. Are your fittings pass-through or non-pass-through? I'll consider a slight taper, but the hexagon hole is 2.9mm corner to corner, which is just 1.1mm smaller than the 4mm OD of the PTFE tube. If it gets close to 4mm, there is risk of it pushing into the tapered hole and getting squeezed. It's better to seat the PTFE tube flush (when using pass-through connectors).
(Edited)
profile
1
Reply
Fits perfectly. With an alternative holder, I had the problem that the filament wouldn't go into the feeder when threading. Now everything fits 100%
The designer has replied
Show original
designer
1
Reply
Thanks for your comment! I'm glad to hear this works well for you, but in your photo, I noticed that the adapter is starting to split at a layer line. What material did you print with? And are you having issues with layer adhesion or did you overtighten the PC connectors?
designer
1
Reply
Replying to @ken830 :
Same here. Flawless print, but the adapter is starting to split. I used black PETG from Sunlu and dried it before use. It already started to split, when the connector was about half way in.
0
Reply
Replying to @user_3400307395 :
@user_3400307395 : Are you using my print profile? Can you re-print and measure the size of the hex opening? What temp are you printing at? Or try to increase wall-loops beyond the 3 that I have set in the print profile.
0
Reply
Nice design, clean and easy print. SUNLU PLA, 0.2 layer high, 3 walls, 10% infill. PLA print tested, installing and removing several times with no issues. Connectors really tight but easy to snap with Jaw pliers. A must have if dryer boxes are used. Thank you for sharing
The designer has replied
designer
3
Reply
Looks great! Thanks for sharing your experience with printing it in PLA.
designer
1
Reply
Print Profile
2x PTFE Adapters ECAS04
Printed great! :) The ECAS04 connector fit very snugly! Used some flat jaw pliers to press them in vertically. Added some double sided connectors on the end of my PTFE tubes to make it easier to insert the filament. Perhaps there's something better for that out there though.
The profile uploader has replied
profile
3
Reply
I love it! Again, thank you so much for the suggestion of an ECAS04 variant!
(Edited)
profile
2
Reply
Superb model. Printed in 40min on U1. SnapSpeed PLA, 0,2mm layer height. I had issues loading the 3MF file in SnOrca (got bunch of Bambu-related errors) so i just imported STL and adjusted my PLA profile. The ECAS04 connectors snapped in like a charm with slight press against the table (with a little wiggle). Same for the blue plastic pieces. Now i can print directly from my drybox all the way using the auto-loader.
(Edited)
The designer has replied
designer
1
Reply
Looks great! Thanks for sharing photos. So PLA worked well for you? I used and recommend PETG because the model needs to be flexed during installation and removal, but glad to hear PLA will do as well. I'm curious about why you needed XY hole compensation. All the holes in the design are to be printed in the Z-X plane. BTW, I thought I had responded to your comment earlier, but somehow I don't see it. Perhaps I didn't hit the send reply button. But just in case, I apologize if you get double replies.
designer
1
Reply
Print Profile
2x PTFE Adapters M6 thread
Perfect!!!
The profile uploader has replied
profile
1
Reply
Wonderful!
(Edited)
profile
1
Reply
Print Profile
2x PTFE Adapters M6 thread
Works great this is exactly what I needed. BTW, this is what I bought to go with this: https://www.amazon.com/dp/B0FCX9ZK9Y?ref=ppx_yo2ov_dt_b_fed_asin_title
The profile uploader has replied
profile
1
Reply
Looks great!
(Edited)
profile
1
Reply
Boosted
Print Profile
2x PTFE Adapters M6 thread
Seems good. Just waiting for mu U1 to show up now.
The profile uploader has replied
profile
1
Reply
Love the color! Thanks for sharing the picture of the print and for the boost! Hope your U1 shows up soon! It's a great printer!
(Edited)
profile
1
Reply
Print Profile
2x PTFE Adapters M10 thread
Function & Design top
The profile uploader has replied
Show original
profile
1
Reply
Looks good!
(Edited)
profile
1
Reply

License

This user content is licensed under the MakerWorld Exclusive License.

You may create derivative works based on this object, provided that all such derivative works are published exclusively on the MakerWorld platform and include proper attribution to the original creator. You may not share, upload, host, distribute, or publish this object—or any derivative work of this object—on any other digital platform, marketplace, or distribution channel. Commercial use of this object and any derivative works is strictly prohibited. This includes, but is not limited to, selling, renting, sublicensing, or using the object in any context in which you receive monetary compensation or other financial benefits.