Parametric Dehydrator Filament Dryer (Homcom / UK)


Print Profile(1)

Description
Overview
I created this model after wanting to dry some filament on the cheap and not finding any way to get a Severin OD2940 or Elite Gourmet EFD319 which are covered extensively by this OG model by @SJB4127. The model that is readily available here in the UK seems to be a HOMCOM BY1102.
If you found this useful, feel free to boost the model below.
Boost Me (for free)
Disclaimer
Whilst this is my original, built from the ground up, model that I made and re-made back in 2024, it draws heavy inspiration from the original work by @SJB4127, so go take a look at his model - it's likely what you want / need anyways: Parametric Dehydrator Filament Dryer (Up to 10 x 1kg Spools!)
Some credit also goes to @Haprog for his similar model Filament dryer extension for SilverCrest dehydrator that inspired the interlocking mechanism.
In case you're in the UK, can't get your hands on the Severin / Elite Gourmet model and happen to have access to the HOMCOM one - keep on reading!
I used this model as a learning ground for Fusion, stretching my legs with modelling and discovering many new approaches and concepts. Whilst this was good for me, the resulting model is utterly unoptimised, and due to the repeating hexagonal pattern is rather heavy on parameter re-application, so bear that in mind.
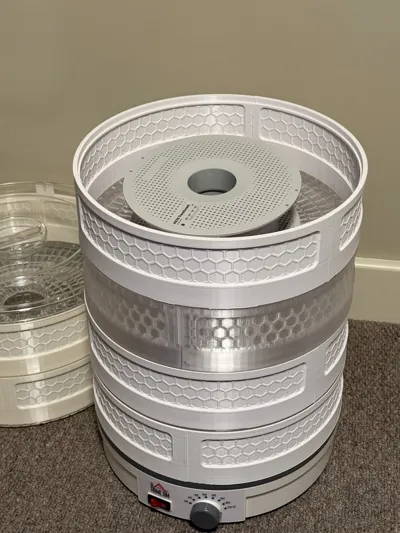
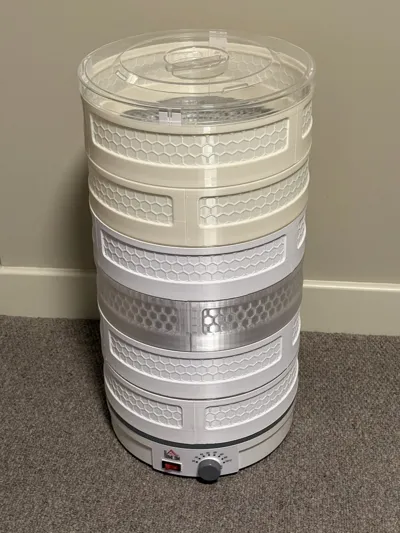
The dehydrator / dryer of choice
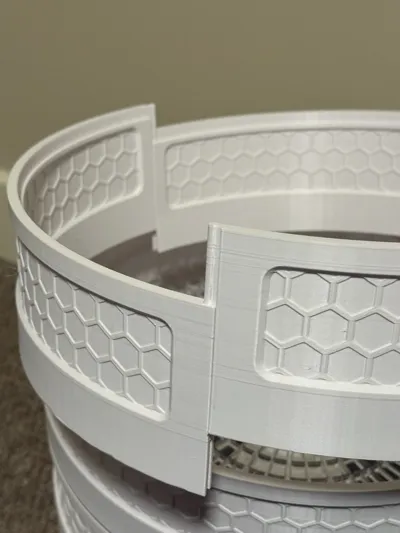
The "HOMCOM 5 Tier Food Dehydrator" (HOMCOM BY1102) has two particular design features that separate it from other, more commonly encountered models:
- Each tray has a "wall" that's slightly offset from the edge, forming foundation for next level's tray "insertion"
- The lid has four pieces and an "inverted" lip that lets it slot right into the lid.
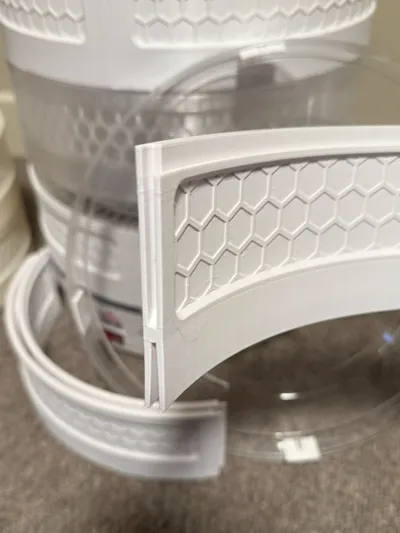
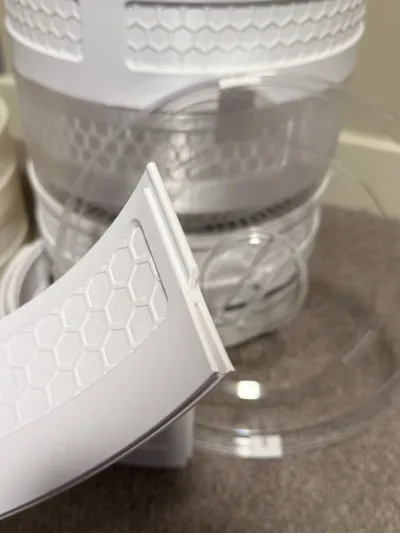
For those reasons, most of the existing, even parametric, models are a poor fit. This means we need something custom, something that we'd be able to reliably mount onto the tray, preserve the stacking feature and somehow close down the lid.

You can see it in action on the two images below: both the interlocking (heavily inspired by the approach @SJB4127 showcased), and the way it fits with the unique HOMCOM tray design.
 |  |
Accessories
This model currently includes a single accessory: Lid Adapter.
Lid Adapter
This small insert is intended to be slotted in the lid's openings and adds back the "stacking" functionality, allowing the lid to shut on top of either the riser OR the tray - in cases when you're not using all of the trays for filament.
I do recommend printing those with 0.4mm nozzle and supports, upside-down:

Spool Adapter
The idea is to have a small round insert that would "adapt" from the tray's central round cut-out to the spool's radial internal cut-out. For now I just throw them onto the tray and it works. If you want to contribute - feel free to, it should be an easy add for a competent modeller!
Printing guidelines
The included Fusion / STEP files have number of parameters to help you tweak it to your case, preference and/or printer. Default (and the way the files are uploaded) is a 320mm diameter, 120 degree across, 85mm high segment with 1.5mm wall thickness.
The wall thickness is set to prevent heat loss through plastic to occur too rapidly, and generally I find it to be a good balance between filament efficiency, print time and performance.
This configuration is also great because one can, with some creativity, fit three such models onto a 256x256 build plate, meaning a single plate at 300g of filament will give you a single drying layer. Neat.

For smaller build plates, i.e. A1 Mini's 180x180mm ones, you'd be better off printing 90 degree sections. I managed to get 2 to fit on each plate, meaning it's a 2-plate print per level.

The only real guideline is to keep the brim, otherwise it'll be a rather poor experience on any bed slinger. CoreXY printers could do without one, however, I don't own one so can't vouch for it first-hand.
This print requires no supports and is modelled to be print-in-place to good quality, with only assembly being needed is to lock together the parts after they're printed.
The only finishing action that might be required is using a deburring tool to remove the brim, but if anything - that's a satisfying bit, especially over longer curves.
Recommended material & deformation concerns
By default I'd recommend PETG / PETG HF / PETG-CF.
I cannot stress this enough - print this a material with Heat Deflection Temperature at least 5 °C higher than one you're drying. Failing that, HDT of the material should be at least 60 °C or above. This is because, the lower walls of the risers will start to deform under stress if you're drying the same filament and because the bottom insert is friction-fit, it'll likely stop being so, instead expanding and sliding on the tray wall freely.

For reference, below are Heat Deflection Temperature values for four Bambu filaments:
- Bambu PLA Matte HDT: 52 °C
- Bambu PLA Basic HDT: 54 °C
- Bambu PETG HF HDT: 62 °C
- Bambu PETG-CF HDT: 68 °C
Naturally, it's hard to go higher than PETG CF with the materials some of the open printers are rated for. And, albeit I do say to go 5 °C higher, in practice PETG HF is perfectly reasonable to use when drying PETG HF itself on all but the most excessive temperature settings, and PETG CF is likely to be sufficient for maximum power this dryer is capable of producing (70 °C, albeit in reality it's lower).
It's worth noting that the higher you go in the tiers, the lower the temperature will be. From my findings, it's mostly safe to start using PLA from about layer 3 onwards, but YMMV.
0.4mm vs 0.6mm, 0.8mm nozzles
Some I'm sure would be tempted to print this with a 0.6 or even a 0.8mm nozzle. Top-level slicer readings for 3x120deg option would say:
- 0.4mm: 9h52m @ 292g
- 0.6mm: 7h51m @ 364g
- 0.8mm: 5h11m @ 355g
Whilst the 0.6mm and especially the 0.8mm options are very attractive time-wise, even if there's more filament spent, I would generally NOT recommend those options without tweaking the tolerances on the bottom insert and the interlocking mechanism - but all the power to you!
On the hygrometers / sensors
Many models available online, and the OG model too, include cutouts for sensors/hygrometers. I opted to not go with this, primarily because the CR2032 battery goes haywire at temperatures over 50 °C which makes it, at best, unreliable, and at worst - entirely unreadable.
And generally thinking about heating batteries to 70 °C does not spark joy in me for whatever reason. If you really want to - feel free to contribute and I'll consider adding those to the files (or remixing the thing - that works too!)
Comment & Rating (8)