


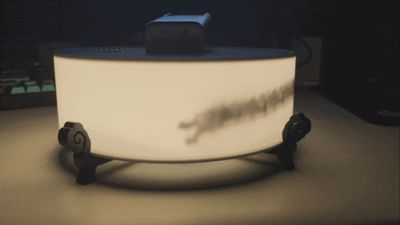

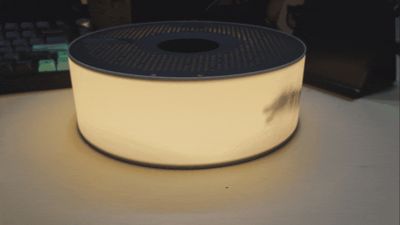
Print Profile(1)

Description
Requirements:
AMS is optional, only the dragon requires one filament change, which can be manually paused. The print quality difference without changing filament is not significant, so it's acceptable not to change
Sanding is required, which can significantly improve the smoothness of operation
Lubricant is required, including dry lubricant and grease
A soldering iron is needed to solder wires, motor, and Type-C female connector
Optional glue, for fixing the guide rail and internal gear, glue is recommended
Hot melt glue is needed to secure the Type-C interface, regular glue should also work
Accessories to purchase:
5V COB LED strip 1m, choose one without wires and switches. If you choose one with wires and switches, you can consider soldering the N20 motor directly to it, then a separate Type-C interface will not be needed, just use the existing switch

6V GA12-N20 geared motor recommended 30-60 RPM

Several 24-26AWG wires
Type-C 2P female connector with board

When printing the lampshade, it is recommended to print a few layers first to test the size. If it is too small, you can slightly increase the scale. The snap-fit layer of the lampshade may shrink slightly inwards, and there is no good solution for this at the moment
Before installation, it is recommended to test all moving parts to avoid rework
Installation process:
Pre-processing
1 (Strongly recommended) Sand the surface of the undulating ring. Although variable layer height is set for the undulating ring, it will still feel stuck without sanding

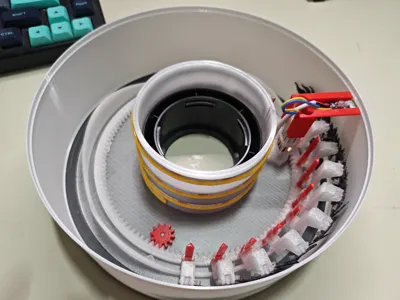
2 Solder the LED strip, motor, and Type-C interface together. Pay attention not to reverse the positive and negative poles of the LED strip, and note the direction of the N20 motor's gear! (You can pre-assemble and test before soldering). Then, wrap the LED strip around the LED strip sleeve, making sure the opening of the sleeve aligns with the buckle of the spool, which is the back
Installation process:
1 Glue the guide rail into the slot of the internal gear (it can still run without glue, but the guide rail might be pulled out during operation). (Important!) After it is completely dry, spray/apply dry lubricant to the guide rail. Insufficient lubrication will prevent the dragon from resetting by gravity. Also, the guide rail must be printed with a smooth printing plate, otherwise the texture of the printing plate will cause significant friction with the slider

2 Assemble all parts of the dragon together. There are 10 pieces with fixed pegs, and one connecting piece is used between every two pieces with fixed pegs

3 Use filament (approx 8mm) to secure the slider and the dragon. It is recommended to hold the filament with needle-nose pliers, push a part of it in, then wiggle and clamp it tight

4 Place the dragon with the slider installed onto the guide rail that has dried glue and applied lubricant

5 Begin assembly by placing the base onto the spool, noting the position of the buckles. Then place the idler wheel, making sure to apply grease to the rotating parts
6 Install the gear (D-shaped opening) onto the N20 motor, then snap it into the motor base (note that the wider side should fit snugly into the base. The lower part of the base is square and corresponds to the N20's reduction gearbox, while the upper part is curved to hold the motor). During installation, you might need to adjust the vertical position of the gear to prevent it from colliding with the motor base. Then slide the lamp cylinder into the spool


7 Install the undulating ring and the already installed internal gear section in sequence


8 Install the cable management rack, snap the Type-C interface into the slot, and route the wires around both sides of the fixed pegs. Then secure it completely with hot melt glue

9 Place the lampshade over it, noting that the lampshade has two retaining strips for holding the spool. However, it is quite flexible before full assembly and may become misaligned. The Type-C opening on the back of the lampshade corresponds to the installed interface

10 Snap on the spool top cover to complete the assembly. Since it's hard to apply force, it's recommended to press down on the top cover with your entire palm and rotate it using friction to secure it

11 Install the bracket, then place the main body onto it
Additional content:
The dragon does not look very good, you can design your own if needed. Its basic dimensions are as follows: thickness 0.6mm, tenon length 3mm. There is a clearance area on the top left of the connector


License
You may create derivative works based on this object, provided that all such derivative works are published exclusively on the MakerWorld platform and include proper attribution to the original creator. You may not share, upload, host, distribute, or publish this object—or any derivative work of this object—on any other digital platform, marketplace, or distribution channel. Commercial use of this object and any derivative works is strictly prohibited. This includes, but is not limited to, selling, renting, sublicensing, or using the object in any context in which you receive monetary compensation or other financial benefits.
Comment & Rating (0)