Monetina fatina denti con nome customizable


Print Profile(1)


Description
Boost Me (for free)
If you want to support me, I would be grateful. Thank you
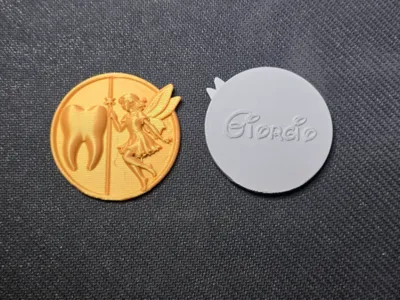
The "tooth fairy coin" is the traditional gift (a small coin or banknote) that the tooth fairy leaves under children's pillows in exchange for a lost baby tooth, a magical gesture that helps little ones overcome the fear of losing a tooth and celebrate growth, a custom widespread in many cultures, sometimes replaced by the "tooth mouse" or other figures, with commemorative golden coins to make the memory more special
The child places the lost baby tooth under the pillow before sleeping, and during the night the fairy (or mouse) arrives, takes the tooth, and leaves a small coin or banknote
It is a way to transform a small "pain" into a magical experience, rewarding the child's courage and celebrating the transition to growth
To make the memory even more special, I propose this small coin specifically created for the tooth fairy
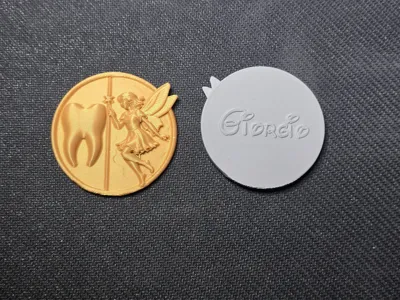
On the back, I engraved the name in a Walt Disney style font, much loved by children. To change the name, go to objects – text shape, press the T indicated by the arrow, and simply enter the desired name


The coin is placed in the tooth bag or container, to then be exchanged for the tooth, creating a precious and tangible souvenir
Printed in gray and gold PLA Basic (printing is very easy and uses only 8 grams of filament)
The colors can be changed in the slicer at the time of printing, the model can be enlarged or reduced as desired (keep the “uniform scale” function active)
It does not require an additional assembly process
To get the cleanest print possible, I added supports and raft as it is a circular object
When removing the supports, use a cutter like the one in the photo: the print will be clean

PRINTING INSTRUCTIONS:
Layer height 0.2 mm
Initial layer height 0.2 mm
Wall loops 2
Top shell layers 5
Bottom shell layers 3
Infill 15%
Grid pattern
Supports yes
Raft yes (raft layers 5 – z distance raft 0.15 mm)
Outer wall speed 200 mm/s
Inner wall speed 300 mm/s
License
You may create derivative works based on this object, provided that all such derivative works are published exclusively on the MakerWorld platform and include proper attribution to the original creator. You may not share, upload, host, distribute, or publish this object—or any derivative work of this object—on any other digital platform, marketplace, or distribution channel. Commercial use of this object and any derivative works is strictly prohibited. This includes, but is not limited to, selling, renting, sublicensing, or using the object in any context in which you receive monetary compensation or other financial benefits.
Comment & Rating (7)