SPP Enclosure for Original Prusa XL


Print Profile(0)
Description
A simple cover for the Prusa XL.
Based on AndreLoco's PrusaXL_3D model. Thank you very much.
All parts are glued together. No screws needed.
The cover is placed on the printer and secured with double-sided tape.
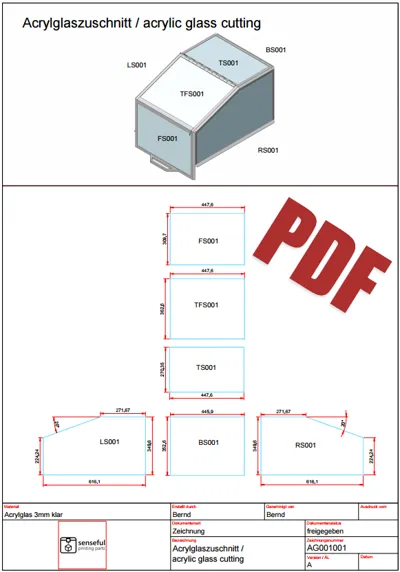
You only need the acrylic glass cutouts, the printed parts, glue, and double-sided tape.
I uploaded the acrylic sheets as dxf files to acrylglasplattenshop.
Tip: I ordered the rear acrylic sheet (BS001) in black.
You need filament for the hinges. The filament is fused at the ends.
In the instructions, I have shown the parts in the position in which I printed them.
Label the individual parts. It's easy to get confused.
The gluing plan is intended as a rough guide for gluing.
I placed 3 to 4 small dots of adhesive in the groove where the acrylic sheets are inserted.
A simple cover for the Prusa XL.
Based on the 3D model by AndreLoco. Thank you very much.Thank you very much.
All parts are glued together. No screws required.
The cover is placed on the printer and secured with double-sided tape.
All you need are the acrylic glass cutouts, the printed parts, glue, and double-sided tape.
I uploaded the acrylic plates to acrylglasplattenshop as dxf files.
Tip: I ordered the rear acrylic panel (BS001) in black.
You will need filament for the hinges. The filament is fused at the ends.
In the instructions, I have shown the parts in the position in which I printed them.
Label the individual parts. It's easy to get confused.
The adhesive plan is intended as a rough guide for gluing.
I placed 3 to 4 small dots of adhesive in the groove where the acrylic sheets are inserted.
____________________________________________________________________
I am making my design available free of charge.
However, you can thank me. Follow the link below.
I am making my design available free of charge.
However, you can thank me. Follow the link below.

Comment & Rating (1)