Search models, users, collections, and posts

DryBox for BMCU (AMS clone)

Print Profile(2)

All
P1S
X2D
A2L
A1
H2D Pro
H2D
H2S
X1 Carbon
P2S
X1
X1E
H2C
P1P

0.2mm layer, 3 walls, 12% infill
Designer
38.9 h
12 plates
5.0(7)

0.2mm layer, 2 walls, 100% infill
Designer
4.6 h
4 plates
5.0(6)

Open in Bambu Studio
Boost
175
444
32
12
254
25
Released 

Description

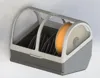
Fully printed on a DryBox 3D printer. Designed for use on the P-series, but can also be used for the A. 

The box has a place to mount the FV3 filament rewinder, and 4 outputs for PTFE tubes. In my case, I use the BMCU 370С on the P1s. The filament for printing was PLA, which accelerated the printing time. But it is possible to use PETg. PETG transparent was used for the transparent frosted glass effect. The printing profile and transparent sheet files can be found in the profile.

For assembly, you need 2 M3x20 bolts with with reduced head diameter. Apart from about 2 kilograms of plastic, nothing else is needed.

Also, it is advisable to let the parts cool down before removing them. If you tear them off while they are hot, they may warp and gaps will appear during further assembly. I also recommend choosing the size of the pins for assembly for your printer. The parts should fit easily, but without play.

I recommend using PTFE tubing with an inner diameter of 2.5mm or larger. Preferably 3mm, this makes it easier for the filament to pass through. Also, the holes after printing can be quite tight, so before assembling and gluing, I recommend checking and, if necessary, drilling to the required diameter.

Profile for P1S. I recommend opening the project in bambu studio rather than triggering the print from the app.


I would be happy if someone could add some improvements. For example, for drying the filament, or something else. 
Therefore, the sldasm file is freely available.


New design for A-series is avaliable now:

https://makerworld.com/en/models/2410333-bmcu-lite#profileId-2642746
 

Comment & Rating (32)

(0/1000)

Is everything okay with the project? I only see 4 boards with flat models.
The designer has replied
0
Reply
This is the print profile for the transparent elements of the box. The profile for printing the box itself is separate in this project. Everything is available
0
Reply
Where can I find box project? I don't see it in your profile.
0
Reply
Replying to @user_986032650 :
Here is that profile
0
Reply
Boosted
Print Profile
0.2mm layer, 3 walls, 12% infill
Printed perfectly using the default profile and basic pla. I will post pictures of the completed project. Thanks for sharing 👍 I am truly loving this idea. I have the parts ordered for the spools and as soon as I can I will complete this and send more pictures. Again thank you for sharing your talents with us.
(Edited)
profile
1
Reply
Do you have pictures of the outside of the box? Isn't a piece missing from the transparent part? I only see 5 and there should be 6, right
Show original
0
Reply
Boosted
I will post the completed box when I get back home. I used black pla for the frame and rear cover and a clear desktop sheet for the front windows. I use it for a single bmcu 370C for the longest time. Now it's used for filament storage. This is an older version you should consider using his latest if you haven't printed this one yet. It looks to be the best ams for the bmcu.
0
Reply
Great print turned out nice. I,m waiting for the parts of the spools to arrive to finish it off. Thanks for the model
2
Reply
Do you have a link to the Fv3 coil holders they used?
The designer has replied
0
Reply
I used this model for printing https://makerworld.com/en/models/1415066-filamentalist-fv3-rewinder-pc4-m6-mod#profileId-1469469 Holder plate is named Center[option] And you should use m3x6 up to m3x10 max screws, 16pc
(Edited)
2
Reply
Replying to @your3d :
nice THX, What would be nice now if you could integrate the BMCU now. Then you would actually have an AMS. Would this be possible that you bring out an update version where you could install the BMCU 370c
designer
1
Reply
Replying to @Fr3chdaxx :
I can try. But it is difficult for me to have free access to both this box and the bmcu. So for now I did this. Now I use the side mount p1s bmcu. You may also have seen some BMCU PRO models, which already have rewinders in their design. I am waiting for their sale of this version. https://makerworld.com.cn/zh/models/1709386-bmcu-pro#profileId-1881590
1
Reply
I'm only having problems with my P1S and the bmcu not loading the filament correctly :/
Show original
0
Reply
this is exactly what I was looking for thanks hopefully will update with pics once everything is printed
designer
1
Reply
I'm printing it right now. It would be cool if there were a way to store silica gel in there!
0
Reply
has anyone added drying
Show original
0
Reply
Boosted
Print Profile
0.2mm layer, 2 walls, 100% infill
Printed perfectly. I will post more pictures when I get the rewinders built. Thanks for sharing 👍
0
Reply
Boosted
Print Profile
0.2mm layer, 3 walls, 12% infill
1a
0
Reply

License

This user content is licensed under the MakerWorld Exclusive License.

You may create derivative works based on this object, provided that all such derivative works are published exclusively on the MakerWorld platform and include proper attribution to the original creator. You may not share, upload, host, distribute, or publish this object—or any derivative work of this object—on any other digital platform, marketplace, or distribution channel. Commercial use of this object and any derivative works is strictly prohibited. This includes, but is not limited to, selling, renting, sublicensing, or using the object in any context in which you receive monetary compensation or other financial benefits.