Search models, users, collections, and posts
Daytona Aluminum Racing Jack Pad DA15LP
IP Report


Print Profile(1)
0.2mm layer, 4 walls, 100% infill
Designer
10.9 h
2 plates
Open in Bambu Studio
Boost
7
10
1
1
10
5
Released
Description
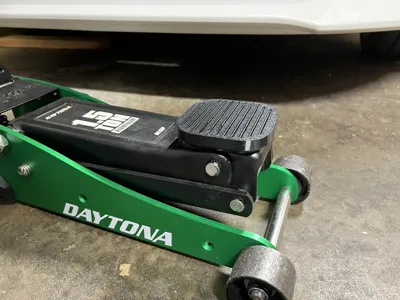
I could not find a suitable model for this DAYTONA 1.5T Aluminum racing jack from Harbor Freight, so I made one.
Disclaimer: This is not guaranteed to fit other models of Harbor Freight/Pittsburgh/Daytona jacks. This has only been tested on ONE DA15LP Daytona Aluminum 1.5 Ton racing jack (my personal one). I would love others to print it and try it out, to see if my model is sufficient for others.
Notes about the design
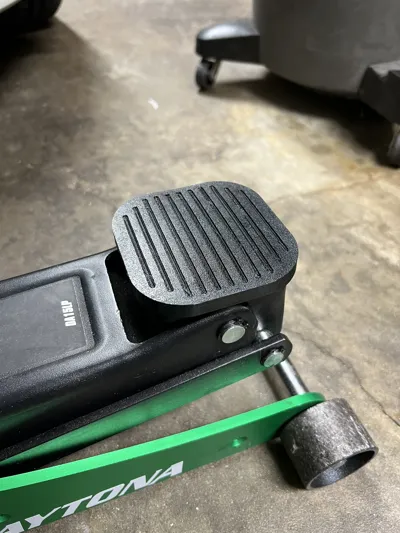
- The intent was to be a snug fit without being too tight. The result is slightly looser than I was going for, but tight enough that it is not warping the face of the pad (as I had with a tighter fitting test print).
- The lines in the face of the pad are more for looks, and therefore optional. I have included a version without them.
- I designed this model in Solidworks, as that is what I am used to and use for work, so I cannot share the design file.
- Section measurements show approximately 3.1mm between the tall corners and the top of the jack pad, and approximately 4.9mm between the lower middle sections and the top of the jack pad.
- I did successfully lift my car (2023 GR86) by the pinch weld with this jack pad and it merely dented the pad and then recovered back to being flat again.
Notes about the print
- This is designed to be printed with 100% infill using 95A TPU. I used 4 walls to increase rigidity of the thin outside section.
- I printed this from Inland TPU (95A) on a stock Bambu Lab P2S. This was my first TPU print, and it came out pretty good I'd say!
- The Generic TPU profile used limits the volumetric flow rate to 3.2 mm^3/s, but I was able to print at 3.6, even up to 4 mm^3/s. Your mileage may vary here. Do your own testing to minimize stringing and globs, and DRY YOUR TPU!!!
- The pictured print was not perfect, but used a higher volumetric flow rate and a lower temperature, which may have lead to the increased globs and stringing. The default 3.2mm^3/s while it takes longer, was much cleaner of a print overall.
- The filament was fed from a Polymaker Polydryer box, bypassed the Filament Buffer, and routed it directly into the PTFE tube through the connector at the rear top left of the printer above the poop chute. There was a blue locking ring preventing the tube connector from being pushed in. I removed it to be able to feed the filament through using a spare PTFE tube. Reducing restriction for the printer to pull the filament was important.
- This will be a PITA to remove from the bed. I tried to use a glue stick (Elmers purple stuff) but it did not seem to help. The best result I had was to GENTLY pull upward on one corner with a pair of needlenose pliers, enough to get the material to let go a little bit. Then rinse with isopropyl alcohol and work your hand underneath it. Definitely worth letting it cool before trying to remove it.
This model is also available on Printables: https://www.printables.com/model/1770351-daytona-aluminum-racing-jack-pad-da15lp
License
This user content is licensed under a
Creative Commons Attribution-Noncommercial-Share Alike
Comment & Rating (1)