Texture Painting Practice Palette


Print Profile(1)

Description
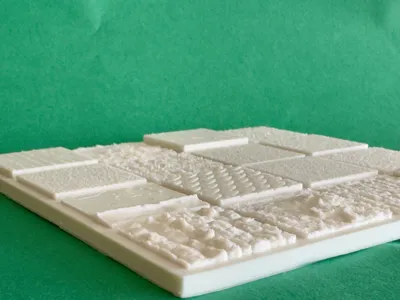
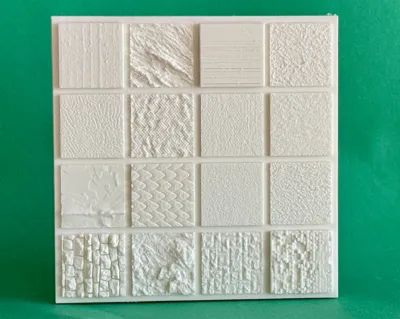
Texture Painting Practice Palette
A material sampler (texture atlas) designed for testing paints and miniature painting techniques before applying them to your final model. This board features a cross-section of surfaces: from organic textures to hard-surface materials.
Print Settings
Due to the micro-details of the textures (fabric weaves, skin pores), high-precision printing is recommended to capture the relief:
- Nozzle: 0.2 mm (Highly recommended for detail)
- Layer Height: 0.06 mm
- Material: PLA
- Only 26g filament

🎨 Technique Guide & Applications
1. Drybrushing
The king of techniques for high-relief textures. It involves grazing raised details with a nearly dry brush loaded with light paint.
- Bricks & Stones (Bottom row): To bring out sharp edges and rocky textures.
- Dragon Scales (3rd row, 2nd from left): Instantly highlights their three-dimensionality.
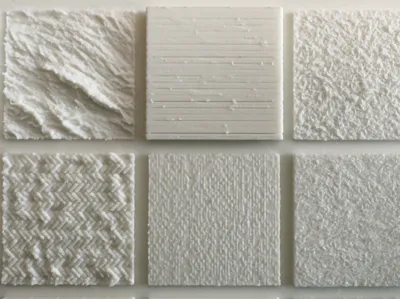
- Wood Planks (Top left): Perfect for catching knots and wood grain splinters.
2. Wash / Inking
The opposite of drybrushing. Diluted paint or specific "shade" flows into recesses, creating natural contrast and shadows.
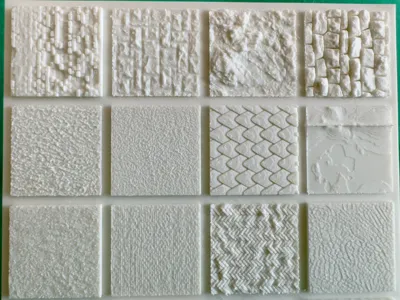
- Herringbone Pavement (2nd row, 2nd from left): The grout lines will practically paint themselves.
- Fabric Weave (3rd row, 3rd from left): A wash darkens the spaces between threads, adding depth to the material.
- Stone Walls: A dirty, brown-green wash gives them an ancient, mossy appearance.

3. Glazing
Applying very thin, semi-transparent layers of color to tint the surface underneath without obscuring details. A test of patience.
- Leather/Skin (2nd row, 1st from left): Skin is never uniform. Glazes of reds, browns, and purples create the effect of "living" tissue.
- Scales: Use glazing to achieve iridescence (shifting colors), e.g., transitioning from deep blue to green.
4. Stippling (Dabbing/Sponging)
Striking the surface perpendicularly with a brush or using a sponge to create random noise and texture.
- Plaster / Concrete (Top right): These surfaces are flat but rough. Stippling with various shades of grey and beige "tricks" the eye into seeing a sandy texture.
- Rust: If you imagine the planks or bricks have metal fittings, stippling with orange/brown is the best method for corrosion effects.
5. Edge Highlighting
Precise painting of only the sharpest edges with the brightest color.
- Flat Tiles/Bricks (2nd row, 3rd from left): To separate elements in a clean, almost comic-book style.
- Cracks in Stone: A thin, bright line painted just underneath a dark crack makes the fissure appear deeper (illusion of a light-catching edge).
6. Wet Blending
Mixing two colors directly on the surface while the paint is still wet to create smooth gradients.
- Smooth Surface (3rd row, 1st from left): Resembles smooth concrete, rubber, or stretched tarp. There is no texture here to hide mistakes. You must manually paint the light gradient to prevent the surface from looking flat.

Boost Me (for free)
Every Boost brings me closer to the next spool of filament. Don't let my printer starve! 👋
License
You shall not share, sub-license, sell, rent, host, transfer, or distribute in any way the digital or 3D printed versions of this object, nor any other derivative work of this object in its digital or physical format (including - but not limited to - remixes of this object, and hosting on other digital platforms). The objects may not be used without permission in any way whatsoever in which you charge money, or collect fees.
Comment & Rating (2)