Bracket parts that fit into corners


Print Profile(1)

Description
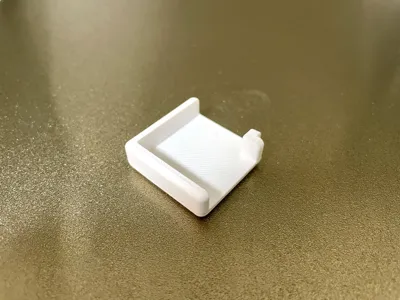
Corner Groove Bracket 🎯
A bracket with grooves at the corner! Perfect for assembling plates at right angles with an L-shaped groove design. Combine it with other objects to create all sorts of creative solutions—like fixing partitions in bookshelves or installing a vacuum cleaner holder in your wardrobe. The possibilities are endless! Let's build something awesome! 🚀
Features ✨
- Independent Vertical/Horizontal Settings: Set groove thickness independently for vertical and horizontal directions. Perfect for combining plates of different thicknesses!
- Flexible Plate Thickness Support: Adjust plate thickness to accommodate various plate sizes (typically 3mm to 10mm)
- Safe Corner Processing: Optional fillet processing for smooth, rounded corners that look great and are safer to handle
- Full Customization: Freely adjust width, length, and height to optimize the size for your specific needs
Boost Me (for free)
If you love the these designs please consider a BOOST 🚀 It helps me keep creating more designs 🙏
What Makes This Bracket Special 🎯
Why This Bracket Stands Out
- L-Shaped Groove Design: Simple structure that allows you to assemble plates at right angles without screws or glue
- Bottom Clearance: The groove bottom has space equal to the plate thickness, ensuring secure fixation while making removal easy
- Independent Parameters: Set different groove thicknesses for vertical and horizontal directions, allowing you to combine plates of different thicknesses
- Dimensional Accuracy: Even with fillet processing, the design maintains accurate dimensions, so you get exactly what you expect when printing
Real-World Use Cases 🏡
📚 Bookshelf & Storage
- Bookshelf Partitions: Install divider plates in bookshelves to organize and categorize books
- Shelf Reinforcement: Reinforce existing shelves to support heavier items
- Storage Box Dividers: Create custom dividers in drawers and boxes
🏠 Furniture & Interior
- Wardrobe Accessories: Install vacuum cleaner holders or small item organizers in wardrobes
- Desk Expansion: Attach additional shelf boards to desks to expand workspace
- Wall Storage: Mount boards on walls to create shelves for small items
🛠️ Workshop & DIY
- Jigs & Fixtures: Use as jigs or fixtures to hold plates at precise angles during work
- Prototype Assembly: Quick assembly aid for prototypes and test pieces
- Display Stands: Assemble stands and frames for displays
🎨 Other Creative Ideas
- Photo Frame Assembly: Assist in assembling photo frame structures
- Custom Dividers: Create custom dividers in drawers and small item containers
- Pet Accessories: Build shelves and dividers for pet supplies
How to Use 🛠️
1. Start Customizing
Click the "Customize" button on the model page to open the Parametric Model Maker interface. Time to make it yours! 🎨
2. Adjust Parameters
In the left parameter panel, you can adjust the following settings:
📐 Basic Dimensions
- Width: The width of the bracket [mm]
- Length: The length of the bracket [mm]
- Height: The height of the bracket [mm]
🔧 Groove and Plate Parameters
- Vertical groove thickness: The thickness of the groove in the vertical (length) direction [mm]
- Horizontal groove thickness: The thickness of the groove in the horizontal (width) direction [mm]
- Plate thickness: The thickness of the plates you'll be assembling [mm]
⚙️ Processing Settings
- Processing type:
- None: No processing (sharp corners)
- Fillet: Fillet processing (rounded corners for a smoother look)
📏 Processing Parameters
- Fillet radius: The radius of the rounded corners when fillet processing is selected [mm]
3. Preview Your Model
As you change parameters, the 3D preview pane in the center updates in real-time! Rotate and zoom to check out your creation from every angle. 🔍
Pro Tips:
- Set the plate thickness to match your actual plate thickness
- Make the groove thickness slightly larger than the plate thickness for smooth insertion
- Choose fillet processing for safer, more polished-looking corners
4. Export Your Model
Happy with your design? Click the "Generate" or "Export" button! 🎉
- Select output format: Choose STL (for 3D printing)
- Download: Your file will be downloaded
5. Slice and Print
Import the downloaded file into your slicer software (like Bambu Studio) and slice it.
Steps:
- Click "Import" in your slicer software
- Select the downloaded file
- Adjust print settings (layer height, infill, etc.)
- Click "Slice"
- Send to your printer and watch the magic happen! 🖨️
Important Notes ⚠️
- Always check the preview, as some parameter combinations might cause shape issues
- If the groove thickness is smaller than the plate thickness, the plate won't fit
- Complex shapes may have limitations
Happy printing! 🎊
License
You shall not share, sub-license, sell, rent, host, transfer, or distribute in any way the digital or 3D printed versions of this object, nor any other derivative work of this object in its digital or physical format (including - but not limited to - remixes of this object, and hosting on other digital platforms). The objects may not be used without permission in any way whatsoever in which you charge money, or collect fees.
Comment & Rating (0)