Heat-Set Insert Station


Print Profile(1)

Bill of Materials


Description
Hello my 3D printing friends 👋
Once again, I've been working on a problem that has bothered me for a long time Who doesn't know this situation?
You've printed a model that requires heat-set inserts – and in various sizes too Finally, the model is printed, you're eager to assemble and use it… and then the real fun begins 😅
Constantly heating up the soldering iron, inserting a nut, putting it aside, letting it cool, changing a loose tip – over and over again
In the end, you only have two options: take a lot of time or get blisters on your fingers 😂
That's exactly where my idea came in
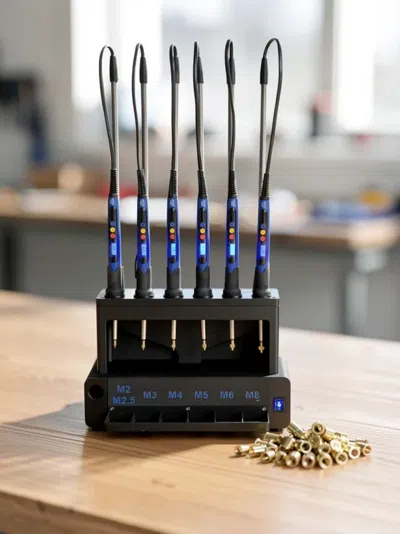
For this reason, I built a heat-set insert station that allows you to use all sizes from M2 to M8 simultaneously!
I find the station super practical – but try it yourself and let it convince you 😊
The following parts are required:
Soldering irons: 6 pieces
I ordered the blue 90 watt version you can choose your version that you want it is only important that you buy the correct voltage 220 for EU 110 Volt for US
Threaded tips: 6 pieces
Springs: 3 Pack = 6 pieces
Cable clamps: 2 pieces
Switch: 1 piece
Here you can choose between Blue, Red, Green or Black
Further parts and filament can be found below in the Maker Lab Parts
----------------------------------------------------------------------------------------------------------------------------------------------------------------------------------------------------------Assembly:
Please melt in 4 heat-set inserts here

Turn the part over and melt in 4 more pieces

Please cut off the eyelets on the top and bottom of the springs and insert them into the fixture

Please cut off the plugs on the soldering iron directly at the plug!
Then put the end caps on the springs and thread the cable as shown in the photo into the springs

Please screw the plate onto the base with 4 M3 × 10 mm screws


Place the assembled part on the base plate and guide the cables through the routing, as shown in the picture

Now turn the entire part upside down and screw the parts from below with 4 M3 × 10 mm screws

Solder the cables as shown in the photo:
– one cable that reaches to the back
– a longer cable for the power supply plug
⚠️ CAUTION:
Only carry out these steps yourself if you feel confident and have sufficient expertise
If not, have the wiring absolutely carried out by a specialist
Danger to life if improperly executed!


Now feed the cable into the switch opening and insert the switch into the housing

Now please melt 5 heat-set inserts into the component

Assemble the component as shown in the picture and screw it with 4 M3 × 10 mm screws

Sort the cables and insert them into the terminals as shown in the picture

Once you have connected all the cables, insert the terminal blocks into the designated place

Now you can mount the cover plate with 5 M3 × 10 mm screws – and you're done with the base! 🙂

Now please melt 6 more heat-set inserts into the drawer and then assemble the handle 🙂


Done

I wish you a lot of fun assembling and hope that this model is at least as much of an enrichment for you as it is for me 🙂.
As always with my models: If you have any questions, just ask! I am happy to help you and stand by you with advice and action as much as I can 🙂.
Boost Me (for free)
I exclusively develop unique models that I print and optimize multiple times until they fit perfectly and meet my quality standards one hundred percent. I invest many hours of work and a lot of filament to provide you with the best quality models. With a boost, you appreciate my work and give me the opportunity to earn points to finance my future projects.
License
You shall not share, sub-license, sell, rent, host, transfer, or distribute in any way the digital or 3D printed versions of this object, nor any other derivative work of this object in its digital or physical format (including - but not limited to - remixes of this object, and hosting on other digital platforms). The objects may not be used without permission in any way whatsoever in which you charge money, or collect fees.
Comment & Rating (0)