Multi-purpose Magnetic Soldering Workstation


Print Profile(4)


Description
1. Introduction
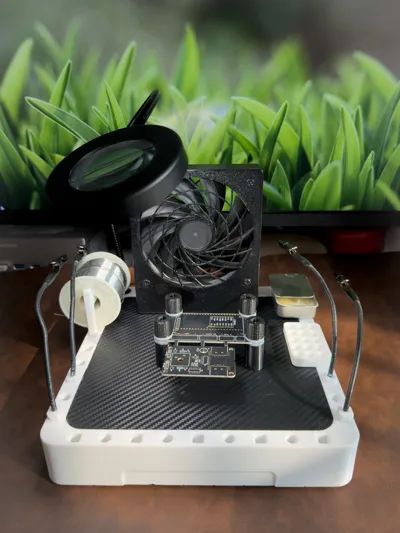
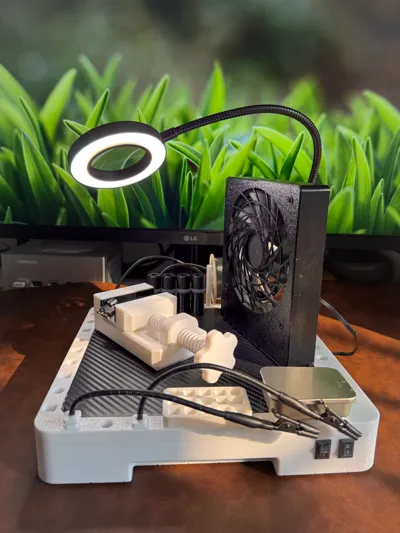
This project is a multifunctional magnetic workbench, specially designed for electronics soldering and DIY. The main body is based on a 200x200x8 R15mm steel plate, utilizing magnetic properties and surrounding standard holes to achieve powerful modular expansion capabilities. The main image shows a soldering workbench configuration, with more possibilities waiting for you to develop
Core Features:
1. Super stable base: Total weight reaches 3kg after embedding the steel plate, remaining perfectly still during operation
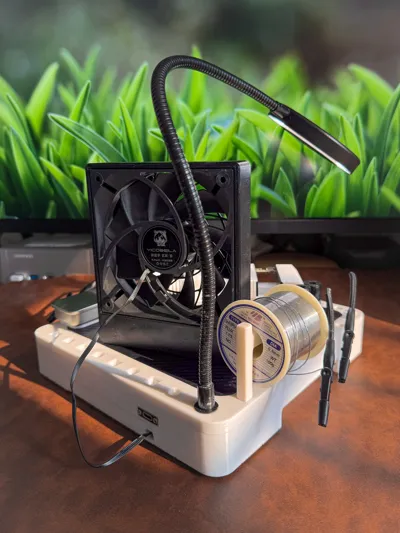
2. Portable power supply: Standard with 21700 lithium battery and integrated charge-discharge module, supporting pass-through charging
3. Lighting assistance: Standard with magnifying glass LED light for clear detail viewing
4. Solder fume extraction: Standard with 12cm fan, powered by a boost module (supports 8V/9V/12V, 8V recommended), achieving solder fume extraction and cooling functions
5. Portable design: Hollow handles on both sides for easy carrying
Optional Parts:
- Magnetic vise (modified from @Ms's mini vise)
- Solder wire holder
- Flux board
- Component organizer
- Universal flexible alligator clip holder
- PCB board spring clamp
2. Printing Guide
2.1 Anti-Warping
Although the model and print profile have been optimized for anti-warping, due to the large model size (nearly full bed), the following measures are strongly recommended
1. Machine calibration: Before printing, ensure temperature, flow rate, K value, and first layer calibration are completed
2. Clean build plate: When using a PEI plate, be sure to thoroughly clean it with dish soap and warm water to remove grease before printing (very important)
3. Enable leveling: Check automatic bed leveling when printing
4. Temperature control recommendations: It is recommended to increase the first layer bed temperature by 5℃ and decrease other layers by 5℃ (e.g., PETG: first layer 75℃, others 65℃)
5. Maintain constant temperature: Close the enclosure door and top lid. For models like P1S, it is recommended to set the exhaust fan to the lowest speed to maintain chamber temperature and reduce temperature difference. For P2S, set the air conditioning system to chamber temperature maintenance mode
6. Physical fastening: Use bed clips to prevent the build plate from being pulled off the bed by model forces (clips for P2S are included in the profile, other printers can search and print their own)
7. Enhance adhesion: If necessary, use a PVP glue stick or specialized spray
8. Natural cooling: After printing, do not remove the part immediately. Keep the enclosure closed for natural cooling until the bed reaches room temperature before removal
2.2 Print Settings
- Material: White PETG recommended
- Infill: Sparse infill is set to Gyroid, with localized reinforcement in the upper hole areas
- Top surface texture: The top surface uses a Hilbert Curve, offering excellent texture. If modification is needed, adjust the largest cube modifier (also remember to restore "top surface flow ratio" to default)
- Embedded nut (important): Total print time is about 11.5 hours. A pause has been set at approximately 9.5 hours (refer to slicing software for layer height). Please set an alarm to embed the LED light's hose fixing nut into the model during the pause, then resume printing
- Post-processing: The slender strips at the hose light holes are support structures; simply trim them off after printing
3. Assembly
Workbench Body
- Steel plate sanding: Use a steel file or similar tools to sand the edges of the steel plate, and thoroughly clean the steel plate with a steel wool and dish soap
- Steel plate fastening: Use nano double-sided tape to bond the steel plate to the printed part. Note: Adhere only 1/3 of the area. The tape is extremely strong, and full adhesion will prevent the steel plate from being removed
- Anti-slip mat: It is recommended to attach the self-adhesive silicone strips from the BOM list to the bottom surface, which will provide an "extremely stable" anti-slip effect
- LED light fastening: It is recommended to apply a small amount of super glue (Super Glue/CA Glue) to the threaded connection between the LED ring and the hose before tightening, to prevent loosening during use. Also ensure the hose base is securely connected to the workbench
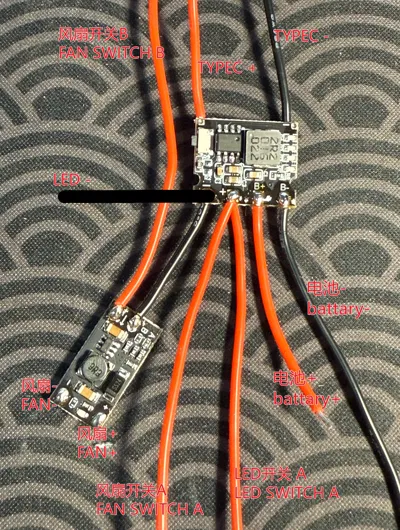
- Wiring connection: Refer to the main diagram for wiring connections. Note: Each module and connection point in the battery compartment should be wrapped with electrical tape to prevent short circuits
Hose Clamp Accessories
- Reinforcement: It is recommended to reinforce the connection points of the hose with the clamp and base using hot melt glue
- Protection: It is recommended to cover the alligator clip jaws with heat shrink tubing to prevent damage to the PCB board
4. Notes
Surface texture: Due to sudden changes in layer print time, subtle cooling lines (Benchy hull line effect) may appear on the upper 1/3 of the workbench. This is a physical characteristic that is difficult to completely avoid; perfectionists can address it with wet sanding
Solder paste dispensing tip: Heat the solder paste to a liquid state with a heat gun or hair dryer, pour it into a small metal storage box, and it will solidify upon cooling
5. Expansion
Magnetic accessories can be freely attached, and hole expansion parameters are as follows. You are welcome to develop more accessories
1. Square holes: 8.2x8.2mm (R1 rounded corners). The back row and rightmost holes are 9mm blind holes, while the rest are 15mm stepped holes. A D3.2mm through hole is reserved in the center, allowing for tightening with M3 screws
2. Round holes: Diameter D8.2mm. Depth is the same as above. A D4.15mm through hole is reserved in the center, allowing for tightening with M4 screws
3. Fit tolerance recommendations
- Loose fit: Shaft dimensions recommended are 8x8mm (R1) or D8mm
- Tight fit: Shaft dimensions recommended are 8.1x8.1mm (R1) or D8.1mm
Boost Me (for free)
Modeling is not easy, boost me~
Documentation (1)
License
You may create derivative works based on this object, provided that all such derivative works are published exclusively on the MakerWorld platform and include proper attribution to the original creator. You may not share, upload, host, distribute, or publish this object—or any derivative work of this object—on any other digital platform, marketplace, or distribution channel. Commercial use of this object and any derivative works is strictly prohibited. This includes, but is not limited to, selling, renting, sublicensing, or using the object in any context in which you receive monetary compensation or other financial benefits.
Comment & Rating (0)