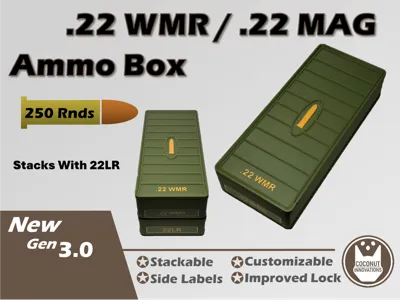
Ammo Storage Box .22 WMR / .22 Magnum 250 Rounds


Print Profile(1)

Description
Membership
If you are interested in printing these to sell, please join my Commercial License. Thank you!
Boost Me (for free)
Please consider Boosting this greatly helps offset the material cost to make these for folks.

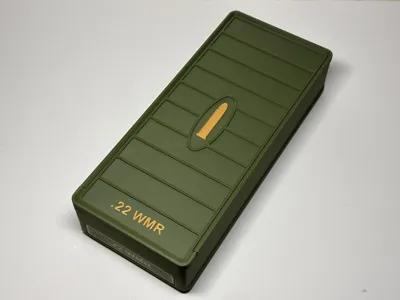
This is a 250 Round .22 WMR / .22 Magnum ammo box. It has a locking sliding cover. I like to slide the cover back to reveal 10 rounds and dump them out in 10 round increments. It was designed to have the bullet side facing down and hangs on rim. It is an easy print and requires no support. You can adjust the colors easily in the Bambu slicer. The text is user editable, so you can customize it. I designed it so that it is the same length and width as the 250 round 22LR box, so they stack great together!
22LR -250 Round Box:
100 Round .22WMR / 22 Mag Box:
Other Boxes
Check out my other ammo boxes for similar designs. If you are looking for another caliber, just let me know via a DM.
Collection of my other ammo boxes - https://makerworld.com/en/collections/1273196
Gen 3
- Snap in Side Labels that are customizable - The text, color, and frame color can all be customized by the user.
- Stackable - Chamfer on bottom and mating feature on cover.
- Customizable Text on Lid
- Improved Robustness - Wall thickness increased
- Moved snap lock feature from start to end of the cover groove. This will improve the issue a few folks had with the the seem delaminating between layers.
- Simplified Geometry
Assembly
- Snap in side labels - Hook one side first and slide finger across to engage the other side. I also put 3 recessed areas incase you want to add superglue for permeant mount of labels.
- Snap in Round divider Tray - It you need to remove this just use a pencil and gently pry it to disengage the snap feature.
- Slide Cover on - The first few snaps will be a little firm, but it will loosen after a few and it sits for couple days.
License
You shall not share, sub-license, sell, rent, host, transfer, or distribute in any way the digital or 3D printed versions of this object, nor any other derivative work of this object in its digital or physical format (including - but not limited to - remixes of this object, and hosting on other digital platforms). The objects may not be used without permission in any way whatsoever in which you charge money, or collect fees.
Comment & Rating (24)