Ultimate Player Kit - In Door Storage Mod


Print Profile(5)


Bill of Materials

Description
Boost Me (for free)
Boosts are the best way to show designers your appreciation. Boosts show what you like and what I should do more of, and helps fund future models and prototyping
Membership
Subscriber only benefits include full commercial sales license to my entire library and access to a members only discord where we chat about future designs and early access to beta test designs and faster feedback.
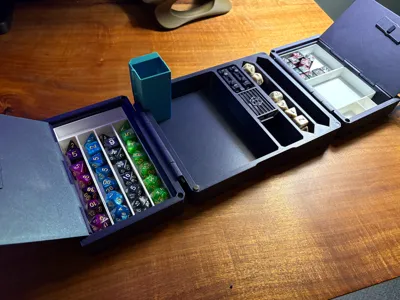
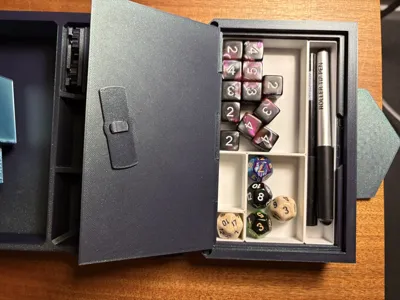
Door Storage For Ultimate Players Kit - the mod for DMs, Dice Goblins, and Organization Fanatics alike!
Please read through all of the instructions before printing.
If you really liked the Ultimate Players Kit, but you would rather use that tracking space for more dice, physical character sheets, spell cards, or anything else, this is the upgrade for you!
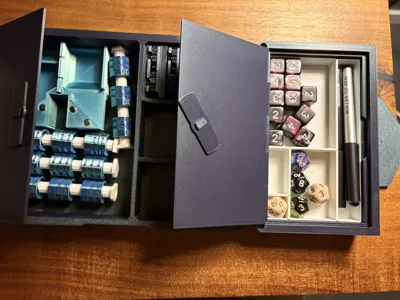
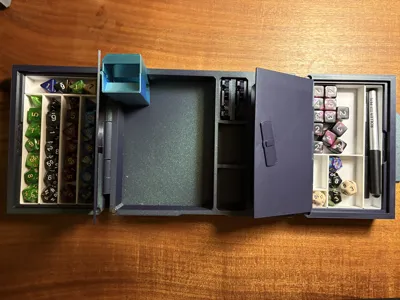
Simply replace the doors of the kit with these doors, and they become convertable. The new doors still will let you use trackers if you like, but you can also swap the trackers for door inserts that let you convert them into extra storage.
I've also included a series of configurable bins that let you further organize the storage doors to meet any needs!

Please note: there are new door shells included in the print profile, you must print these, the doors and inserts will not fit either the v2 or v3 door shells. For more information, refer to the upgrade paths below.
Starting fresh (haven't already printed an Ultimate Players Kit)
This is a mod for the Ultimate Players Kit. As such, the profiles in this print do not have all of the files you need to create the entire kit from scratch. Start by printing the base from the ultimate players kit: https://makerworld.com/en/models/2019312-ultimate-dnd-players-kit-v3-lockable-tracking#profileId-2175985
Then you can print the contents of these profiles.
Upgrading from the Ultimate Players Kit v3
To use these if you have the v3 ultimate players kit, you do need to reprint the door shells from the included file, but everything else, tray, accessories tracking wheels, wheel covers are all fully compatible with the new door bodies. Key differences are:
- I've removed the middle rod supports, which is key to opening up the space for actual storage.
- I've increased the depth of the doors by 3mm which allows space for a closing lid while still being able to fit dice and other things in.
- I've widened the internal space by removing some of the outer rod supports. It turns out these are unnecessary and over engineered, so reducing them gives much more space for activities.
Upgrading from Ultimate Players Kit v2
I've decided not to include a bolt hinged version as I didn't want to encourage new users to use that design. I know many people have used it successfully, but it is flawed and as a result I have fully depricated it. If you want to use these, you will need to print a new v3 bottom tray as well as the door shells included in the profile. The existing tracker wheels, and door inserts are cross compatible however.
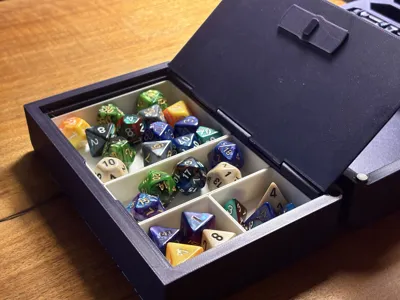
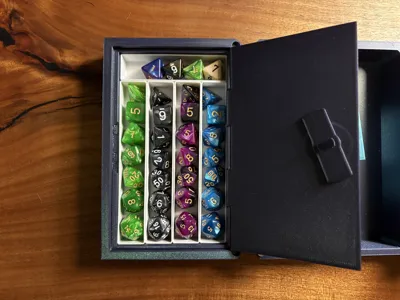
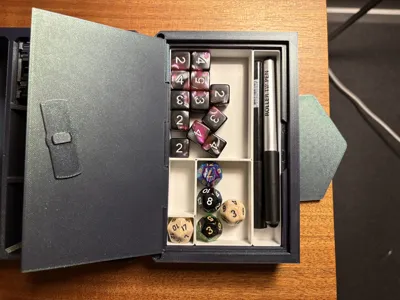
Configurable Bins
- The configurable bins are set in a 4 wide x 7 high grid, so as long as your total adds up to be 4 wide by 7 high, you can fill up the space perfectly.
- The width and height unit of a 1x1 bin is 22mm.
Change Log
22/12/2025 - Fixed an issue where the doors were unintentionally overscaled on the Y axis
23/12/2025 - Modified the door shells so that the inserts can be used on either side, opening outwards or inwards.
Print Settings
I strongly recommend you use the print profiles that I have provided, even if you use other slicers, using my 3mf files, as I believe I have the optimal support settings (including manual supports for the doors)
If you need to manually use the STL files, here is what I've found is the best settings
Door Shells
- Manually painted supports (only on the lock rail), auto generating will cause supports to generate inside of the filament holes which can be a huge pain to clean out
- Normal supports (manual)
- Support type: Snug
Door Inserts
- Tree supports (auto is fine), Normal supports can cause similar issues with the filament hinges
Knobs
- Normal supports (auto is fine)
Assembly Instructions

- Make sure that support material (if any) is cleared out of the latch reciever on the main door bodies, and test but running the latch through them to make sure it smoothly can slide through. If it can't, keep clearing it out, removing supports or stray overhang using a box cutter or the scraper.

Insert the clip into the latch noting the orientation shown here with the pins on the horizontal sides. Vertical will cause your knob to not match its lock status.

- Place the assembled latch underneath the door bottom (note the recess in the picture above) and make sure the pins of the latch pin stick up through the center of the hole.
- Making sure you've removed supports from the central hole of the knob, press the knob onto the latch pins and press it all the way down, centering the knob on the recess until you hear a click. Note the orientation of the knob to the pins (knob vertical, pins horizontal). It will not fit any other way.

- Place the lid onto the door insert and feed a length of unprinted filament in as a hinge
- Slide the fully assembled insert into the correct door, noting that the left assembly can only fit on the left door, it won't work the other way around. Check the registration pins along the sides of the door insert match up to the wheel rod slots on the door shell. If they don't line up at all, you've got the wrong insert, use the other one.
Want to add accessories of your own?
If you have ideas for accessories to add to the Ultimate Players Kit, that is welcomed enthusiastically. I hope that with these inserts, it will fuel the community to come up with things to fit in that I haven't even thought of, especially with all of the new room for activities that the new door inserts afford. If you make a model that is an accessory for the kit, share it with me and I will gladly include a link in the description. There is already a couple of other creations made by other creators (Dice Jail?!) and its so cool to see.
As Always, A huge thank you to the community.
I have been truly overwhelmed by the outpouring of support from you all. Your comments, messages of support, enthusiasm, and even feedback (both good and bad) has meant the world to me. Thousands of you have downloaded my designs and shared with me your stories of making them as gifts, or for loved ones or your whole parties and it is truly heart warming. My recent videos have gotten almost 2 million views and well over a thousand comments, and counting. Please continue to share your pictures and your stories, as it really motivates me to continue designing and making for you all.
Thank you from the bottom of my heart.
License
You shall not share, sub-license, sell, rent, host, transfer, or distribute in any way the digital or 3D printed versions of this object, nor any other derivative work of this object in its digital or physical format (including - but not limited to - remixes of this object, and hosting on other digital platforms). The objects may not be used without permission in any way whatsoever in which you charge money, or collect fees.
Comment & Rating (243)