Silk Christmas Gift Bows


Print Profile(2)


Description
These bows are designed specifically for dual (or multi) color silk PLA. The ribbons print on their sides, giving the entire bow a smooth, high-sheen appearance that looks wonderful with PLA silk in general. Each one is also printed with a gentle curve, allowing multi extrusion silk filaments to create dynamic color shifts across the ribbon.
They print in about 25 minutes and use very little material (~5g each), but there are some challenges as we’re pushing the limits of what the printer can do. Success requires specific printing parameters, the right filament, and measured, deliberate assembly.
________________________________________
Design:
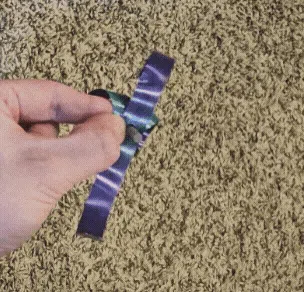
The bow is assembled from thin strips printed on their side that slide onto a central pin, bend, twist, and are locked in place with a cap. There are six total thin strips: a small middle piece (two holes), two medium strips, and three large strips. The five larger strips each make up two loops in the bow.
Two strip shapes are included with different curves to draw out the color shifting in dual extrusion silks.
- The C-shape is easier to assemble, and the two ends will look different.
- The S-shape will give you symmetrical coloration but requires you to bend one of the ends in the opposite direction of how its printed.
The pin is best printed in a different, standard filament. I found that the top of it tends to come out funny with silk.
________________________________________
Key things you must know first:
• Patience is mandatory. Rushing assembly will break parts.
• Not all silk PLA works. Some are excellent, some are usable with superglue as a helper, and some are too stiff and brittle to work at all or simply won’t print cleanly at the width we need. In theory Silk+ should work great (Sunlu offers some). Matte filament will not work at all.
• This has to print without a brim, so your build plate must be very clean. You may want to use an adhesion promoter.
• It also has to print without supports for the holes. Because of that, the slicer will give you multiple warnings about floating regions. Ignore them and print.
• Print orientation determines how the colors come out. The provided profile includes some good options and you can try rotating all pieces together or moving individual pieces around. It will take some experimenting if you want a specific color distribution, but it will likely look great no matter what!
• The included print profile is well-tested. I found through dozens and dozens of trials that the ribbon needs to be 0.3mm wide, layer height has to be increased, and we need to use every trick in the book to strengthen adhesion between the layers, including higher extrusion temp, increased flow ratio, and *very* slow speeds.
________________________________________
Assembly:
One plate of ribbons = one bow: short middle piece + medium ribbons + 3 slightly longer ribbons.
TL;DR - first loop the middle piece, then the two shorter strips (middle hole, loop and twist each outer hole), then the three longer strips, and last the cap.
The middle piece goes on first:

Then the two medium ribbons followed by the three large ribbons. Slide the center hole onto the pin first, and see below for gifs that explain how to bend the ends into place.

Finally push the cap onto the pin. The cap then functions as the base of the completed ribbon.
Recommended ribbon bending method:
1. Point the pin toward yourself with the free end of the ribbon pointing up
2. Bending the ribbon ‘away’ from you, bring the end down and pull it forward even with the pin.
3. Flip it sideways over onto the pin. The sides of the ribbon should not be hitting, if they do you aren't flipping it over correctly.

The S-shape requires you to bend one end “backwards” from how it was printed. You can pre-bend it to relax that initial shape, and heat can help as well.
The holes in the strips are the weakest point - some tips:
• Work the strips onto the pin slowly and evenly, mild twisting or rocking motions do the trick if it’s a tight fit. If you force it on, it will break.
• We're bridging a single line to make the holes so there is some variation in how cleanly the holes print between filaments and even during the same print. We can’t support the holes so we need to just accept that they're imperfect. Thankfully, they are not visible on the final product and all we need from them is functionality.
• Some filaments will make the holes pretty narrow most of the time, enlarging them on the model doesn't really solve it so it is what it is. If a hole is too narrow you can gently smush a little bit of the material to the side with a tool. Don't cut it, it will almost definitely break during assembly.
Assembly tips:
• Pushing the cap onto the pin before assembly makes it much easier to fit it on at the end. I like to add a dab of glue for good measure but it isn't necessary.
• Warmer strips bend more reliably without breaking, cold strips are more brittle. You can heat up your printer’s bed and let them warm up on there, hold them in front of a heater, or briefly use a hair dryer.
• Superglue can help with moderately brittle silks that don't completely come apart when assembling. You can apply it and then slide on the next ribbon, holding it together while it dries. It’s also nice insurance to put a dab of glue on the cap at the end. If it feels like too much trouble it probably is, I've made Geeetech silk work with this method before but am not too interested in struggling with it again.
________________________________________
Printing parameter details
• Print slow for the best adhesion possible. It’s so little filament that the time to print is short even at 30mm/s.
• Required line width: 0.3 mm. Thicker won’t bend, thinner isn’t strong enough. This is pushing the limits of reliability with a 0.4mm nozzle which likely contributes to why some silks won’t work.
• No seams. Seams become holes. Holes = layer separation.
• Classic walls with thin wall detection is required.
• Print hot (around 230 °C), slow, and with increased flow ratio.
• No brim. Not necessary and causes problems.
• Single line adhesion means the build plate must be very clean.
• Max out your plate’s temperature for PLA (or even go over a bit) and use an adhesion promoter if needed. This design printed well on all plates I tried (Biqu glacier and frostbite, Arkfly purple cool plate, Bambu smooth plate).
- If your ribbons are printing with a lot of tiny holes in them, you can try drying the filament but most likely it’s just not going to work for that filament spool/brand. If the filament always splits, again it's just incompatible with this design.
The printing itself is straightforward once dialed in, and if it seems like a filament brand is working great you can try printing faster. 22 Network's silk is pictured below and I can print the model at default speeds just fine!

Boost Me (for free)
If you like the model, please throw a boost my way!
What filaments work might depend on specific colors to some degree but this is what I've found so far (YMMV, and I'd love to get some reports in the comments):
Filaments that work:
- 22 Network's silk is rock solid for this (pictured here ^) and is extremely well-priced on Amazon.
- Kingroon
- IKSystem
Kinda works with glue
- Geeetech, but I don't really even try to use it anymore because it's a pain
- Eryone
Troublesome filament for this model:
- BBlife
- Mika3D
- Xiro
License
You shall not share, sub-license, sell, rent, host, transfer, or distribute in any way the digital or 3D printed versions of this object, nor any other derivative work of this object in its digital or physical format (including - but not limited to - remixes of this object, and hosting on other digital platforms). The objects may not be used without permission in any way whatsoever in which you charge money, or collect fees.
Comment & Rating (47)