Nintendo 64 Cartridge Lightbox (Guide Included)


Print Profile(13)


Bill of Materials


Description
Thank you for stopping by!
Boost Me (for free)
If you get any use from this please consider giving me one of your boost. It really makes my day!!
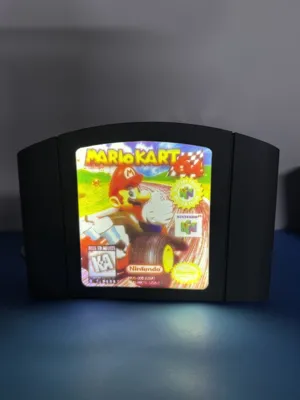
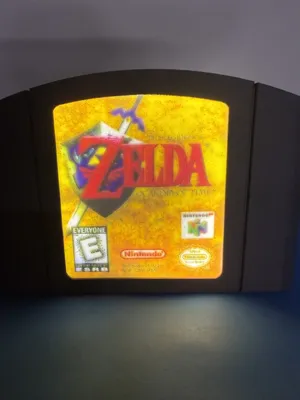
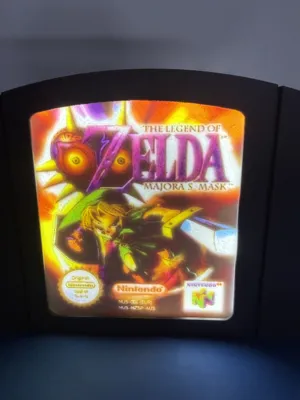
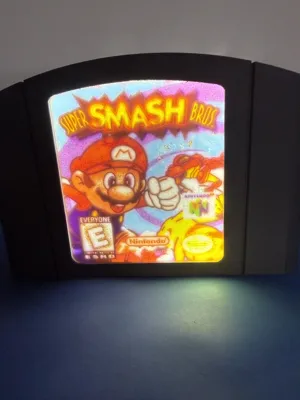
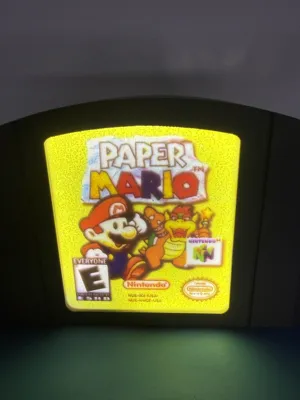
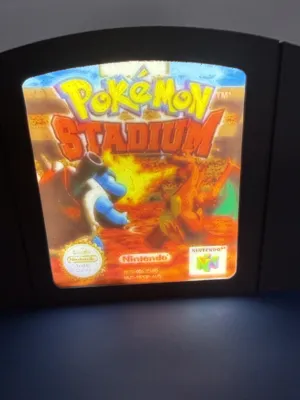
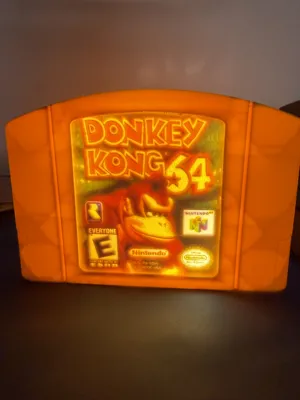
This was a model I made for a retro gaming convention I had a booth at.
Be very careful removing the supports around the front lip. ive tweaked the support settings to get them off alittle easier but use caution still.
I hope that you enjoy it!
I have made a guide below if you would like to make your own.
If you would like to support me it would mean the world to me.
https://buymeacoffee.com/layeredvisions
Patreon (Commerical license & Updates)
Or leave me a boost.
Thank you!!!!
IF YOU CHOOSE TO, YOU ARE MORE THAN WELCOME TO ADD YOUR PRINT PROFILE WITH THE GAME COVER YOU MAKE TO THIS ONE AND KEEP ANY POINTS YOUR PRINT PROFILE MAKES TO YOURSELF.
This site was instrumental for me to make the inserts and share them with you, if you choose to make your own you might find the picture your looking for here.
https://www.thecoverproject.net
STEP ONE: NAVIGATE TO “MAKERLAB” ON MAKERWORLD.COM

STEP 2: SCROLL UNTIL YOU SEE “MAKE MY LITHOPHANE” AND SELECT IT

STEP 3: SELECT “CREATE FROM BLANK”

STEP 4: SCROLL UNTIL YOU SEE “COLORFUL LITHO WITHOUT FRAME” SELECT IT

STEP 5: SELECT “PICK IMAGE”

STEP 6: FIND YOUR IMAGE, SELECT “OPEN”

STEP 7: UNDER “SIZE” ADJUST WIDTH TO 102MM, THIS SHOULD SET THE HEIGHT AROUND 116MM-118MM

STEP 8: UNDER “ATTRIBUTE” ADJUST “MARGIN” & “MARGIN THICKNESS” TO THE LOWEST POSSIBLE VALUES

STEP 9: IN THE “IMAGE” TAB USE THE SLIDERS TO MAKE YOUR IMAGE LOOK THE WAY YOU WANT IT TO.(NOT PICTURED)
STEP 10: SELECT “EXPORT” IN THE TOP RIGHT, THEN SELECT YOUR PRINTER AND NOZZLE SIZE. WAIT FOR MODEL GENERATION.

STEP 11: SELECT “DOWNLOAD”

STEP 12: OPEN FILE IN “BAMBU STUDIO” AND SELECT “SLICE PLATE” (THE CORRECT SETTINGS SHOULD BE SET UP FROM MAKE MY LITHOPHANE)

STEP 13: ONCE SLICED SELECT “PRINT PLATE”

STEP 14: SELECT YOUR PRINTER AND VERIFY YOU HAVE THE CYAN,MAGENTA,YELLOW, AND WHITE LOADED IN THE CORRECT SPOTS. THEN SELECT “SEND”

Congrats! you should be all finished. If you run into any snags along the way feel free to reach out to me in a comment or DM and ill be more than happy to help.
IF YOU CHOOSE TO, YOU ARE MORE THAN WELCOME TO SHARE YOUR PRINT PROFILE WITH THE GAME COVER YOU MAKE TO THIS ONE AND KEEP ANY POINTS YOUR PRINT PROFILE MAKES TO YOURSELF.
Boost Me (for free)
If you found this guide helpful, or the model cool and want to help me out, consider giving me one of your boost.
thank you again for checking my model out! I hope you like it!
License
You may create derivative works based on this object, provided that all such derivative works are published exclusively on the MakerWorld platform and include proper attribution to the original creator. You may not share, upload, host, distribute, or publish this object—or any derivative work of this object—on any other digital platform, marketplace, or distribution channel. Commercial use of this object and any derivative works is strictly prohibited. This includes, but is not limited to, selling, renting, sublicensing, or using the object in any context in which you receive monetary compensation or other financial benefits.
Comment & Rating (4)