TPU Nose Gear Damper – Freewing Avanti S V2


Print Profile(1)

Description
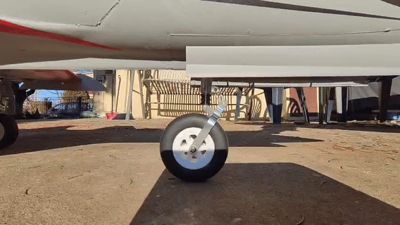
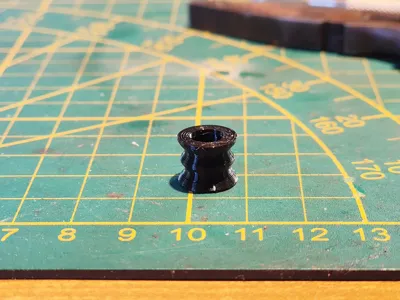
Questo componente è un rinforzo funzionale per il carrello anteriore retrattile del jet EDF Freewing Avanti S V2, progettato per risolvere un problema tipico durante i decolli su piste in erba.
Nella configurazione originale, la molla del carrello anteriore risulta eccessivamente morbida, causando un marcato abbassamento del muso durante la fase di accelerazione. Questo comportamento rende il decollo meno efficace, richiedendo un’elevata quantità di comando di cabra e una maggiore lunghezza di pista prima della rotazione.
Questo sistema consente di:
ridurre l’affondamento del carrello anteriore durante la corsa di decollo
mantenere un assetto più corretto e stabile dell’aereo
facilitare la rotazione, migliorando sensibilmente i decolli su erba
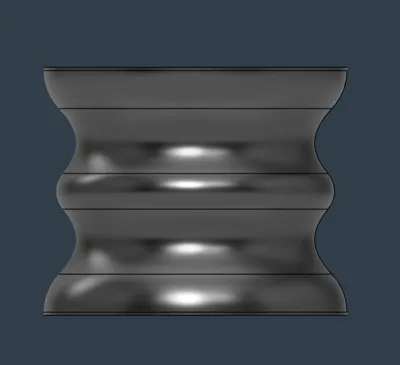
Il componente è progettato per essere stampato in TPU, offrendo:
elasticità controllata, senza irrigidire eccessivamente il carrello
assorbimento delle imperfezioni del terreno, proteggendo meccanica e struttura
un ottimo compromesso tra supporto e smorzamento
Il rinforzo non altera il corretto funzionamento del carrello retrattile e rappresenta un upgrade semplice ed efficace per chi utilizza l’Avanti S V2 su superfici non asfaltate.
Istruzioni di Montaggio:
1)Rimuovere la clip di sicurezza che blocca il perno tra la ruota anteriore e l’asta del carrello.
2)Se necessario, rimuovere anche la ruota per lavorare con maggiore comodità.
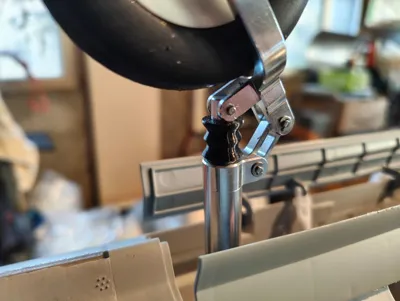
3)Inserire lo smorzatore in TPU sull’asta del carrello anteriore.
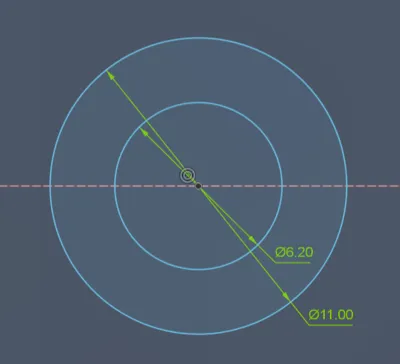
4)Prima del rimontaggio, verificare l’accoppiamento tra perno e fori:
spesso i fori delle parti originali e il perno stesso presentano tolleranze non ottimali e tendono a grippare.
5)Per migliorare la scorrevolezza, si consiglia di ripassare i fori con una punta da trapano del diametro corretto, senza asportare materiale in eccesso, al solo scopo di migliorare l’allineamento e la finitura.
6)Durante la fase di rimontaggio, la molla del carrello anteriore deve essere riportata in tensione.
Per facilitare l’operazione, è consigliato utilizzare un pernetto, un punzone o un utensile simile per mantenere allineati i fori mentre si reinserisce il perno principale.
7)Una volta inserito il perno, riposizionare la clip di sicurezza.
Al termine del montaggio, verificare che il carrello anteriore scorra liberamente, ritorni correttamente in estensione e che il meccanismo retrattile funzioni senza attriti.
-------------------------------------------------------------------------------------------------------------------
This part is a functional reinforcement for the retractable nose landing gear of the Freewing Avanti S V2 EDF jet, specifically designed to address a common issue during takeoff from grass runways.
In the stock configuration, the nose gear spring is excessively soft, allowing the nose to compress too much during the acceleration phase. This results in an unfavorable takeoff attitude, requiring significant up-elevator input and additional runway length before rotation.
This system:
limits excessive compression of the nose gear during the takeoff roll
helps maintain a more stable and correct aircraft attitude
improves rotation efficiency, especially on grass surfaces
The part is designed to be 3D printed in TPU, providing:
controlled flexibility without overly stiffening the landing gear
effective absorption of ground irregularities, protecting the mechanics
an optimal balance between structural support and damping
The reinforcement does not interfere with the normal operation of the retract mechanism and significantly improves takeoff performance when operating the Avanti S V2 from non-paved runways.
Installation Instructions:
1)Remove the retaining clip securing the pin between the nose wheel and the landing gear strut.
2)If required, remove the nose wheel to gain better access and working clearance.
3)Install the TPU damper onto the nose gear strut.
4)Before reassembly, check the fit between the pin and the mounting holes:
the stock parts often have tight or inconsistent tolerances, which may cause binding.
5)To improve smooth operation, it is recommended to lightly pass a correctly sized drill bit through the holes, only to clean and align them, without removing excess material.
6)During reassembly, the nose gear spring must be reloaded (put back under tension).
To make this step easier, it is strongly recommended to use a small pin, punch, or similar tool to hold the spring and keep the holes aligned while inserting the main pin.
7)Once the pin is installed, secure it with the retaining clip.
After installation, ensure that the nose landing gear moves freely, fully extends, and that the retract mechanism operates smoothly without binding.
License
You may create derivative works based on this object, provided that all such derivative works are published exclusively on the MakerWorld platform and include proper attribution to the original creator. You may not share, upload, host, distribute, or publish this object—or any derivative work of this object—on any other digital platform, marketplace, or distribution channel. Commercial use of this object and any derivative works is strictly prohibited. This includes, but is not limited to, selling, renting, sublicensing, or using the object in any context in which you receive monetary compensation or other financial benefits.
Comment & Rating (0)